A better way to generate servo control signals is to include the Arduino Servo library in your sketch, one of the standard libraries of pre-written code bundled with the Arduino software.
- To see a list of Arduino libraries, click the Arduino software’s Help menu and select Reference.
- Find and follow the Libraries link.
We want to take a closer look at the Servo library.
- Find and follow the Servo link.
- Follow and read the links for these functions on the Servo library page:
attach()
writeMicroseconds()
detach()
Servos have to receive high-pulse control signals at regular intervals to keep turning. If the signal stops, so does the servo. Once your sketch uses the Servo library to set up the signal, it can move on to other code, like delays, checking sensors, etc. Meanwhile, the servo keeps turning because the Servo library keeps running in the background. It regularly interrupts the execution of other code to initiate those high pulses, doing it so quickly that it’s practically unnoticeable.
Using the Servo library to send servo control signals takes four steps:
- Tell the Arduino editor that you want access to the Servo library functions with this declaration at the start of your sketch, before the setup function.
#include <Servo.h> // Include servo library
- Declare and name an instance of the Servo library for each signal you want to send, between the #include and the setup function.
Servo servoLeft; // Declare left servo
- In the setup function, use the name you gave the servo signal followed by a dot, and then the attach function call to attach the signal pin. This example is telling the system that the servo signal named servoLeft should be transmitted by digital pin 13.
servoLeft.attach(13); // Attach left signal to pin 13
- Use the writeMicroseconds function to set the pulse time. You can do this inside either the setup or loop function:
servoLeft.writeMicroseconds(1500); // 1.5 ms stay-still signal
Seconds, Milliseconds, Microseconds
A millisecond is a one-thousandth of a second, abbreviated ms.
A microsecond is a one-millionth of a second, abbreviated μs.
There are 1000 microseconds (μs) in 1 millisecond (ms).
There are 1,000,000 microseconds in 1 second (s).
Example Sketch: LeftServoStayStill
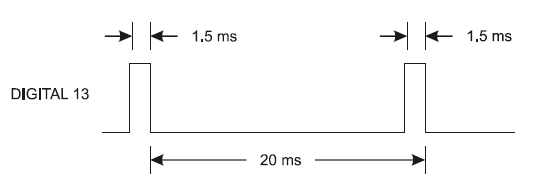
For calibrating servos, your sketch will need to send signals with 1.5 ms pulses. Take a look at the timing diagram below. This stay-still signal’s high pulses last 1.5 ms. That’s halfway between the 1.7 ms full-speed-counterclockwise and 1.3 ms full-speed-clockwise pulses.
- Enter, save and upload LeftServoStayStill to your Arduino. The pin 13 LED should glow, about halfway between the two brightness levels you observed earlier.
/*
 Robotics with the BOE Shield – LeftServoStayStill
 Generate signal to make the servo stay still for centering.
 */

#include <Servo.h>                           // Include servo library

Servo servoLeft;                             // Declare left servo

void setup()                                 // Built in initialization block
{
  servoLeft.attach(13);                      // Attach left signal to pin 13
  servoLeft.writeMicroseconds(1500);         // 1.5 ms stay still signal
}

void loop()                                  // Main loop auto-repeats
{                                            // Empty, nothing needs repeating
}
Your Turn – Check a Second Control Signal with the Pin 12 LED
You’ll be using this code a lot, so it’s a good idea to practice declaring an instance of Servo, attaching the signal to a pin, and setting the pulse duration.
- Save LeftServoStayStill as BothServosStayStill.
- Add a second Servo declaration and name it servoRight.
Servo servoRight; // Declare right servo
- Attach your servoRight signal to digital pin 12.
servoRight.attach(12); // Attach right signal to pin 12
- Set the servoRight signal for 1.5 ms (1500 μs) pulses.
servoRight.writeMicroseconds(1500); // 1.5 ms stay still signal
- Your sketch should now look like BothServosStayStill.
- Save the sketch and upload it to your Arduino.
- Verify that both LEDs are at a similar brightness level.
/*
 Robotics with the BOE Shield – BothServosStayStill
 Generate signals to make the servos stay still for centering.
 */

#include <Servo.h>                           // Include servo library

Servo servoLeft;                             // Declare left servo signal
Servo servoRight;                            // Declare right servo signal

void setup()                                 // Built in initialization block
{
  servoLeft.attach(13);                      // Attach left signal to pin 13
  servoRight.attach(12);                      // Attach left signal to pin 12

  servoLeft.writeMicroseconds(1500);         // 1.5 ms stay still sig, pin 13
  servoRight.writeMicroseconds(1500);        // 1.5 ms stay still sig, pin 12
}

void loop()                                  // Main loop auto-repeats
{                                            // Empty, nothing needs repeating
}