Are you ready fly your multirotor sUAV? Let's check!
If you have an ELEV-8 Quadcopter you must register it with the Federal Aviation Administration's UAS Registry [1] before flying outdoors.
The owner, operator, and pilot of every ELEV-8 v3 are to abide by all laws, regulations, and guidelines, including, but not limited to, those detailed in this guide. Reading and abiding by this entire tutorial may help prevent property damage, personal injury, prosecution, and fines.
An RF transmitter (shown below) works by sending signals to a receiver on the aircraft. There are at least 5 channels (separate signals) that get sent to the aircraft, one for each control: Throttle, Rudder, Elevator, Aileron, and Gear.

The transmitter shown is a Mode 2 transmitter. This means that the Throttle/Rudder stick is on the Left, and the Elevator/Aileron stick is on the right. Mode 1 transmitters have the sticks switched, and are much less common. All Parallax guides and literature assumes the use of a Mode 2 transmitter.
These names come from the control surfaces of fixed-wing aircraft (airplanes). These surfaces are flaps that can be moved to redirect the air around them, which changes the direction an airplane flies.

Although a multirotor sUAV does not have flaps, it is able to simulate the effect of control surfaces by controlling the speed of each of its motors individually. So, the same transmitter 5 channels, with the same names, are also used when flying an sUAV. Let’s look at each channel – one at a time – in the next section.
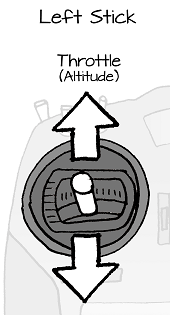
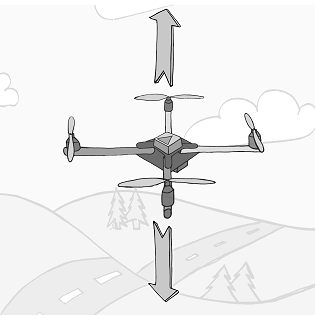
The throttle stick starts in the downward or “zero throttle” position. The throttle is controlled by moving the left stick up and down. On a multirotor, the throttle controls the speed of all of the motors equally, generating lift and moving the multirotor up.
The multirotor moves in an upward direction when the throttle is increased moving the stick upward. If the throttle is decreased by moving the stick downward, the multirotor generates less lift, and will begin to descend because of gravity.
Every multirotor has a neutral throttle position. This is an approximately centered position where the overall force of lift pulling the multirotor upward is the same as the force of gravity pulling the multirotor downward. This causes the multirotor to hover or stay at the same height in the air.
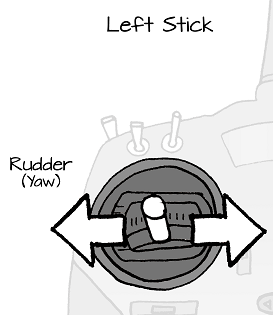
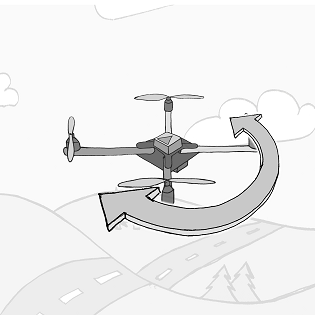
The Rudder is controlled by moving the left stick horizontally (left and right), and it contains a spring that returns the stick to the center when it is not being pushed left or right. Controlling the Rudder causes the multirotor to Yaw. Yawing is when an aircraft rotates in a way that causes the aircraft to point itself in a new direction. When a multirotor yaws, it simply turns in place.
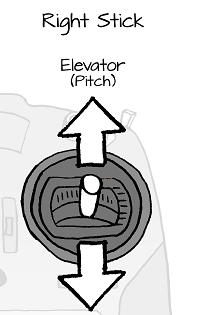
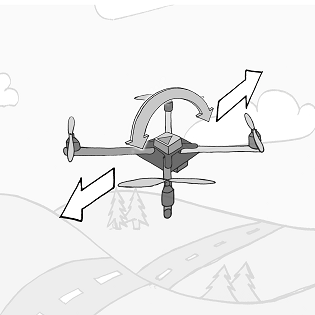
The Elevator is controlled by moving the right stick vertically (up and down), and it contains a spring that returns the stick to the center when let go. Controlling the Elevator causes the multirotor to Pitch. Pitching is when an aircraft rotates in a way that causes its “nose” to move up and “tail” to move down or for its nose to move down and its tail to move up.
Pushing the right stick up will cause the multirotor to “pitch forward”. When the multirotor pitches forward, its nose drops down, its tail lifts up, and it begins to accelerate forward.
Pushing the right stick down will cause the multirotor to “pitch backward”. When the multirotor pitches back, its nose lifts up, its tail drops down, and it begins to accelerate backward.
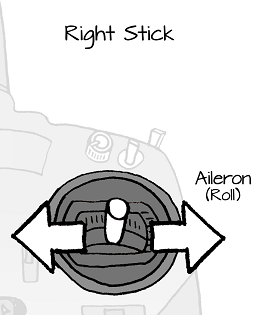
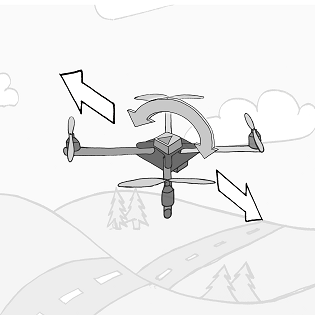
The Ailerons are controlled by moving the right stick horizontally (left and right), and it contains a spring that returns the stick to the center when it is let go. Controlling the Ailerons causes the multirotor to Roll. Rolling is when an aircraft rotates in a way that causes its right side to move up and left side to move down or for right side to move down and its left side to move up.
Pushing the right stick to the right will cause the multirotor to “roll right”. When the multirotor rolls right, its right side drops down, its left side lifts up, and it begins to accelerate sideways to the right.
Pushing the right stick left will cause the multirotor to “roll left”. When the multirotor rolls left, its right side lifts up, its left side drops down, and it begins to accelerate sideways to the left.
The ELEV-8 v3, as well as other sUAVs have various modes. These modes often determine the flight characteristics of the sUAV. For instance, there are manual modes that give full control of the sUAV to the operator and there are stability modes that fly steadily by smoothing and limiting the operator’s input. The ELEV-8 v3 currently has two flight modes, stability and manual. The ELEV-8 v3’s modes can be changed in flight, but it is best to consult with the operating instructions as it may not be safe to change modes in flight on other multirotors or sUAVs. Transmitters usually have more than one switch, and it is important to know which switch is configured as the Gear (Mode) switch. Most transmitters can be configured to used a different switch based on the operator’s preference.

Default Gear Switch on a SPEKTRUM DX6/DX7 radio configured for the ELEV-8 v3
Your multirotor will only fly properly when the correct propellers are installed on their corresponding motors. Get this wrong, and your quad will flip right over on take-off—a maneuver sometimes called “pancaking.”
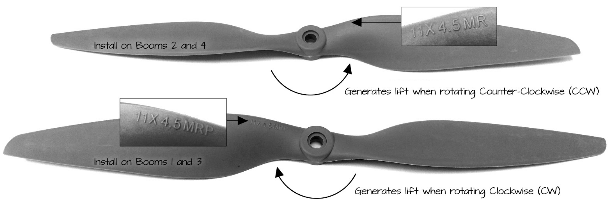
The angled blade pushes downward on the air if it is rotating in the proper direction. This downward push generates lift:

Check the top chassis plate for the direction your propellers should spin when installed correctly. Remember: do not have propellers installed while doing any pre-flight calibrations or safety checks; spin direction can be assessed by watching the motors (without propellers!) during calibration.
If possible, have a more experienced operator take the first flight. A more experienced operator will better be able to deal with any issues that arise and ensure that your multirotor is properly configured.
Until you become comfortable with flying your quadcopter, keep it in Stability Mode.
Until you have a few dozen flight hours (which will take you quite a while), keep the quadcopter within a few hundred feet, and always stay within the line of sight. Also, keep the front of the multirotor (it’s nose) facing directly away from you, so you can more easily relate your hand’s motions on the controls to the sUAV’s motion in response. Failing to follow this advice will make flying significantly more difficult.
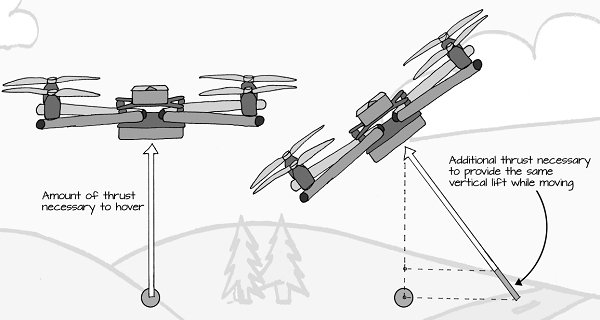
For all rotor-based aircraft (including quadcopters), any directional movement will decrease lift, causing the quad to lose altitude. To keep from dropping, you will need to compensate by slightly increasing the throttle. Stability Mode on the ELEV-8 v3 does this for you automatically (yay!).
One of the challenges you will have is that momentum (the tendency for an object to keep moving in the direction is has been moving) causes the multirotor to keep moving in its current direction, even after you stop pushing the stick. For instance, if you push the right stick to the right to make your sUAV fly to the right, it will keep moving that way even if you stop pushing on the right stick. You have to give the right stick a small push to the left to counteract its momentum to stop its rightward movement.
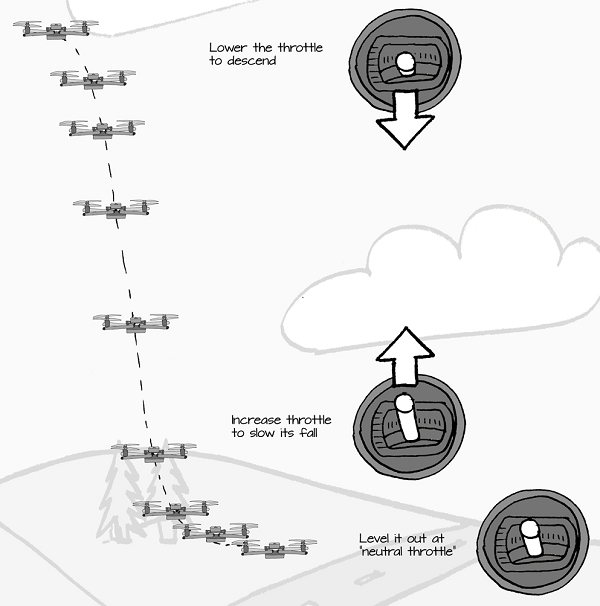
The momentum of the multirotor also requires some throttle correction as it moves up and down. In other words, after you change altitude, you will need to increase or decrease the throttle around “neutral throttle” to enter a stable hover. This is especially true when descending; once the multirotor achieves the desired altitude a swift increase in throttle will be required to offset the momentum of the falling multirotor:
The transmitter’s controls are sensitive, so avoid overreacting or overcompensating - this may take some practice!
All rotor-based aircraft (including quadcopters) are much more stable in ascent (going up), than descent (going down), so be careful to descend slowly, or you may lose control.
If anything goes wrong, just throttle down! If you are learning to fly at a low altitude, a short fall onto a grassy field won’t do much damage to your sUAV, but an out-of-control sUAV can do a lot of damage and harm.
One of the most common causes of a crash is a loss of directional resolution. This happens when you can no longer tell which direction the multirotor is facing or moving—if you don’t know, you cannot effectively control it:

Moving air has less pressure than air that is still. This causes something called the Ground Effect. The air moving between your sUAV and the ground creates a slight vacuum that pulls down on your sUAV - therefore requiring more throttle to take off. It can also pull down on your sUAV if you fly within a few feet of the ground. Avoid the ground effect by hovering and flying at least 3 ft (1 m) off the ground.
This same effect of low pressure air between an sUAV and a flat surface exists in other places, too. walls, ceilings, buildings, and structures can all cause your sUAV to be “sucked in”, causing them to crash and get damaged.
Flying an sUAV takes a lot of concentration - more even that driving a car. Because you are focused on flying, it is difficulut to see any hazards that may come into your flying space. For this reason, it's highly recommended that you use a Spotter. Spotters are required if you are flying First-Person View (FPV), and strongly recommended for Line-of-sight flying. Your Spotter should know the laws and rules for sUAV flying, and their role is to look out for potential hazards like the Big 4 mentioned in the Safety section of the ELEV-8 v3 Safety tutorials.
Before you go out and fly your full-size multirotor, it would be prudent to spend some time practicing operating RC multirotors in a low-risk fashion, where dozens of crashes won’t stretch your wallet thin.
There are two main ways to practice flying:
Once you are comfortable with your flying abilities, you can at last begin flying your full-size multirotor! What follows is some general advice on how to successfully approach your first few flights. The first thing any new operator must learn is throttle control. Below are some steps we recommend following to help you get a handle on the matter. (Don’t forget about all of the guidelines, warnings, and precautions!). Keep in mind that learning this will take dozens of flights. It is not something you can learn in a day, or even a week, and complete mastery will take many months of dedicated practice.
Place the multirotor on the ground facing away from you in a wide open area. Plug in the battery. Step back at least 25 ft. You and your spotter should be wearing safety eyewear:

After arming the flight controller, slowly and carefully increase the throttle until the multirotor begins to lift off. For most multirotors, it takes approximately 50% throttle to take off. As soon as your multirotor leaves the ground, gently ease off and begin to decrease the throttle and land.
If all systems are working correctly, the multirotor should not drift much horizontally and it should maintain fairly level flight. If this is not the case, then stop and troubleshoot; an sUAV can’t be flown safely with faulty hardware or software.
If the quadcopter simply flipped over and pancaked, go back and check your propellers - they may have been mounted in the wrong direction.
Repeat this process, gently lift off and then land again, until you have a good feel for how much throttle is required to keep the quad in the air. Try keeping it airborne slightly longer - but don't worry about sideways drift yet, all we care about right now is that the quad stays at a steady height. For now, keep the multirotor below head height at all times. If the quad drifts too far, ease off the throttle and land it.
Once you are able to hold the multirotor at a steady altitude, try to use the right (roll/pitch) stick to counteract the multirotor's horizontal drift. If the multirotor drifts left, move the stick to the right just slightly. If it starts drifting towards you, push the stick up a fraction. You want to get a feel for how the multirotor moves and responds to control. At this point, holding your multirotor at a steady height should be mostly automatic. Remember to cut the throttle if the multirotor gets out of position, and especially if it starts moving towards you.
Continue to practice this until you can hover the multirotor in one spot for a full battery pack. At that point, you're ready to move on.
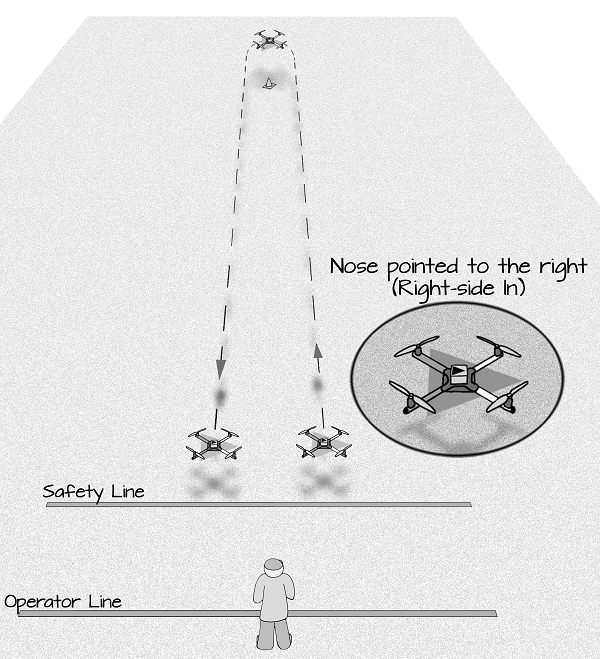
With the nose of the multirotor pointed away from you, gently take off and hover your multirotor approximately 5 ft (1.5 m) off of the ground. Gently push the right stick left and then right. The multirotor will move in the same direction as your pushes on the right stick. Repeat this process by pushing the right stick up and down instead of side to side. This will help you get a feel for how to respond to the momentum of your sUAV in flight. Make sure to maintain at least 25 ft. (7.6 m) between you and your multirotor, and cut the throttle if it gets too close:

Next, after moving your quadcopter to different locations, practice landing your multirotor in a small area, such as within a few feet of a marker on the field. Make sure that you are not flying too close to any lightweight objects such as leaves that could be blown into your sUAV’s propellers.
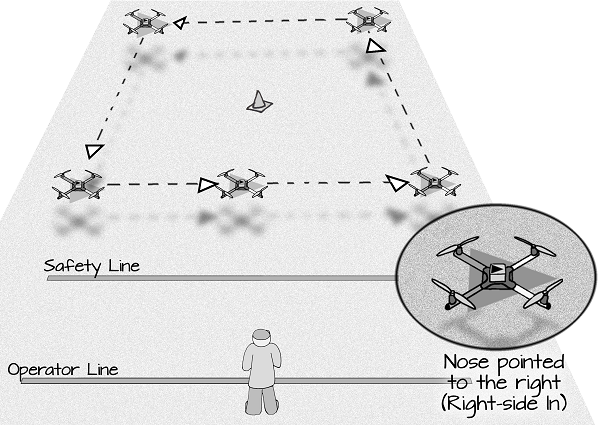
Once you are able to move your quadcopter and land it a specific spot, set up a course like the one shown below to practice following a specific path. Begin with a square, flying in straight lines to reach each point:

As you become more comfortable navigating a course with your multirotor, try flying it in a circle. This will allow you to practice controlling both the Ailerons and Elevator (right stick controls) at the same time:

Set up your flight area to include cones or other markers spaced every 25 feet (or every 5 or 10 meters - an even number). You will use these markers as a guide to help you visually understand distances a you fly your sUAV. Make sure your indoor [7]or outdoor [8]flying area is properly set up and that you have taken all necessary precautions as outlined earlier in this guide.
Remember that if something goes wrong, THROTTLE DOWN and let your multirotor fall before it damages something or causes injury.
This exercise is as important for the Spotter as it is for you, the operator.
Once you are able to estimate distances visually, you a ready to begin estimating your distance vertically. There two ways, with the help of a spotter) to directly measure the altitude (height) of your sUAV when flying: using the Parallax GroundStation (if your ELEV-8 v3 is equipped with an XBee Radio for telemetry), or with an inclinometer [9]. But, with a little bit of knowledge and some practice, you should be able to reasonably estimate the height of your sUAV when you are flying. Estimating your Altitude is especially important because if you are flying outdoors, it is against the law to fly over 400 feet (122 m) Above Ground Level (AGL).
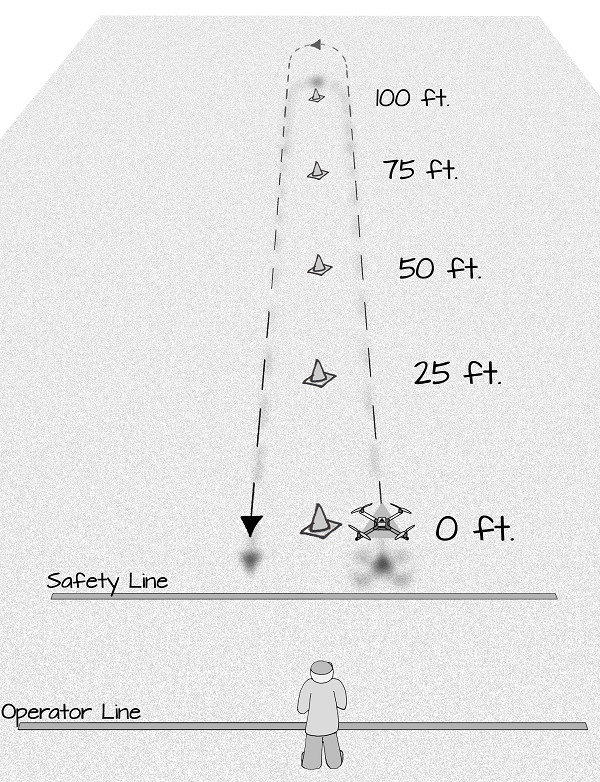
To practice estimating altitude, you will set up a marker or cone exactly 50 ft (15 m) away from you. During the practice, you will take off and land from that marker, and you will only fly straight up and straight down taking care to keep your sUAV directly over the marker.
Look carefully at the following image. It shows the angle you would be looking up for various altitudes:
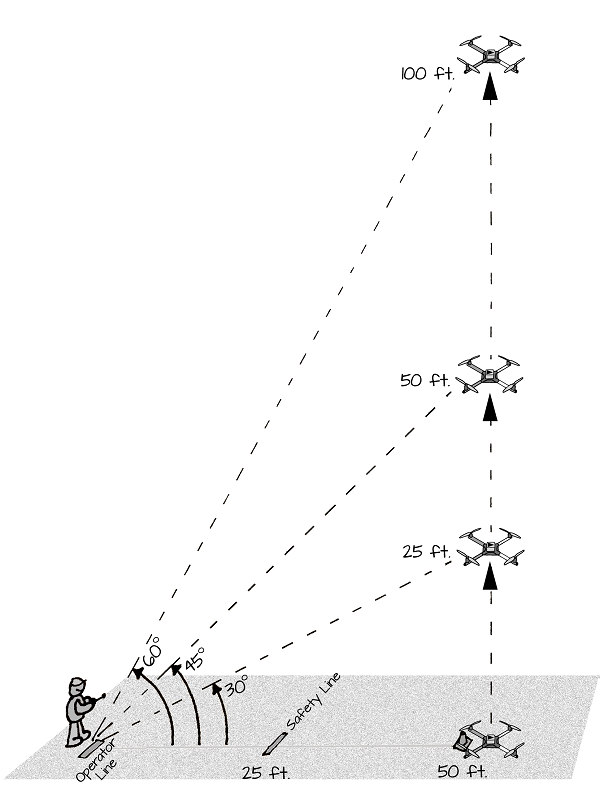
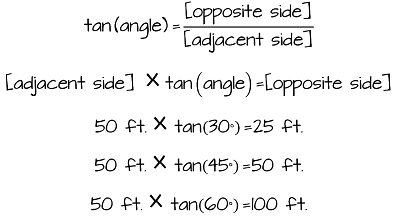
The angle you are looking up at will help you determine the height of your sUAV. When you are looking up 30 degrees from the ground, the height of the object you are looking at is half as high as it's ground distance from you - if it's 50 feet (15 m) away, then it's 25 (7.6 m) feet high. When you are looking up at a 45 degree angle, an object's height is the same as it's ground distance, so if it started 50 feet (15 m) away from you and flew up 50 feet (15 m), you would be looking at a 45 degree angle. If you are looking up at a 60 degree angle, it's height is double the ground distance - if it started 50 feet (15 m) away and flew up to where you are looking up 60 degrees, it is 100 feet (30 m) high.
Notice that in the drawing above the operator and the sUAV make up the bottom side of a right triangle. Because it is a right triangle, we can use tangents to calculate distances from the angles we know. The tangent (tan for short) of an angle describes the relationship between the adjacent side of the triangle (how far it is from the operator to the sUAV on the ground) and the opposite side of the triangle:
Again, If you have a Spotter, fellow student or friend with you, they can use an inclinometer (a very simple tool to build) [9] or the sensors tab on the Parallax GroundStation (if your ELEV-8 v3 is equipped with XBees) to call out your altitude and help you know exactly how high your sUAV is as you practice.
Because you will also be descending and landing from higher altitudes, these exercises are also a good opportunity to practice your landing skills. Remember that as your sUAV descends, it gains momentum, and it will take increased throttle before you land to slow and stop its fall:
To practice estimating your altitude:
Once you have spent several hours practicing nose-out flight, you are ready to begin practicing flight with the multirotor in different orientations. You will begin by making short, simple flights with your multirotor oriented left-side in. Make sure your flying area is properly set up and that you have taken all necessary safety precautions as outlined earlier in this guide. Remember that if something goes wrong, THROTTLE DOWN and let your multirotor fall before it damages something or causes injury.
The following exercises are designed to help operators who have thoroughly practiced both the basic and intermediate exercises and who are able to fly nose out proficiently and consistently.
DO NOT attempt these exercises if you are a beginning or novice operator. Remember that if something goes wrong, THROTTLE DOWN and let your multirotor fall before it damages something or causes injury.
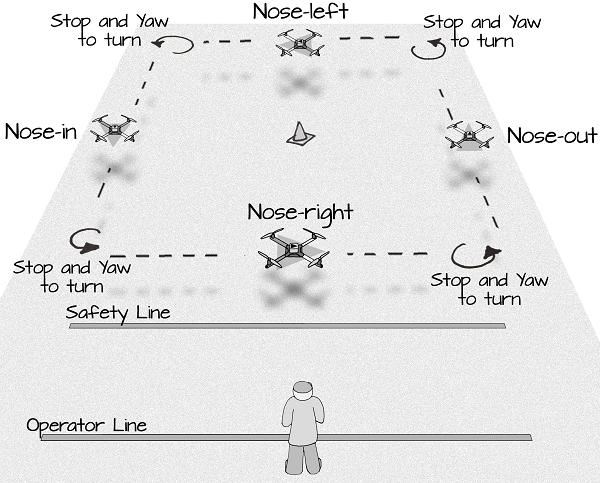
In the previous exercise, you practiced flying straight out and back in with the nose of your sUAV pointed to the right and again with the left. In this exercise, you will be continuing to practice with nose-left and nose-right flights, but you will be adding maneuvers to these flights.
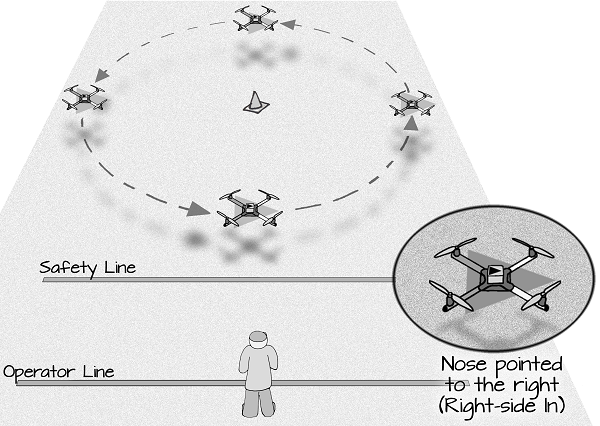
In this exercise, you will be flying right-side in and left-side in, but you will be flying in a circle. Flying in a circle will require you to use both the elevator and aileron at the same time as you move through the path.
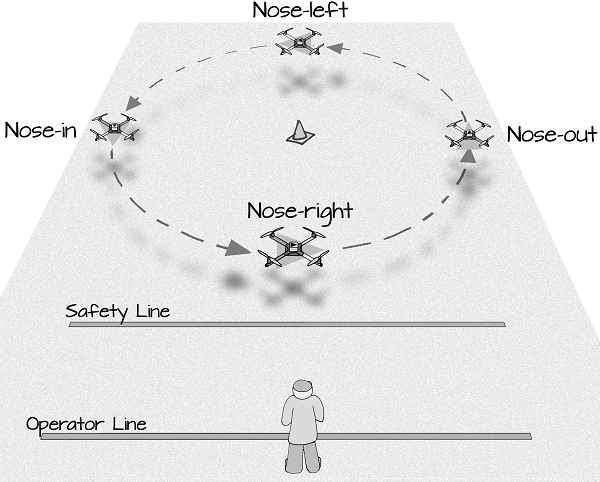
In this exercise, you will be keeping the nose of your sUAV pointing in the same direction that it is moving. This will require you to use the Rudder on the left stick to Yaw in addition to the Elevator and Aileron to move laterally.
In this exercise, you will again be flying nose-forward, but you will be flying in a circle. Flying in a circle will require you to use both the left and right sticks to continually alter the sUAV's motion as you move through the path.
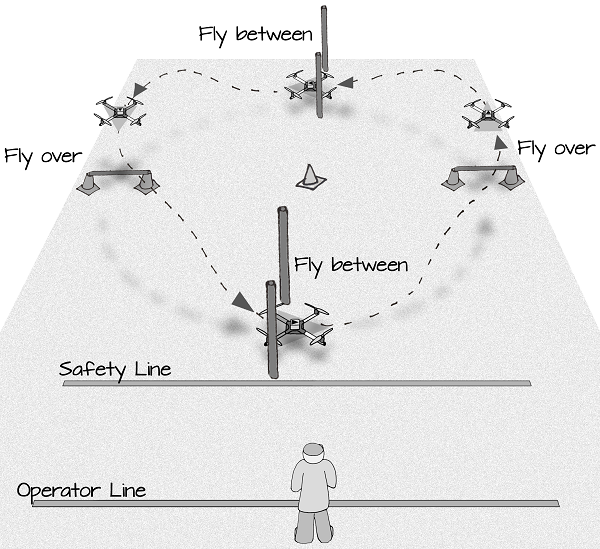
In this exercise, you will again be flying nose-forward in a circle, but you will be varying the altitude of your sUAV to fly over and through/under obstacles. Flying through an obstacle course will require you to use both the left and right sticks to continually alter the sUAV's motion as you move through the course.
You can use a variety of objects to create a course, but the best materials are both lightweight and sturdy. Covering long lengths (8-10 feet) of small diameter (1/2" or 3/4") PVC pipe with pool noodles or pipe insulation works well.

Links
[1] http://www.faa.gov/uas/registration/
[2] http://learn.parallax.com/node/1186
[3] http://learn.parallax.com/node/974
[4] http://learn.parallax.com/node/1196
[5] http://learn.parallax.com/node/1205
[6] http://learn.parallax.com/node/1206
[7] http://node/1205
[8] http://node/1206
[9] https://www.exploratorium.edu/math_explorer/howHigh_makeInclino.html