The ability to make a robot follow light (or run away from light like a bug on your kitchen floor) was an early goal of robotics' research. Why light following? There was potential for robots to be able to use light, particularly sunlight, as a renewable source of power. NASA and JPL’s Mars Spirit and Opportunity robotic rovers use solar panels to recharge their batteries. It makes sense then that such robots might be programmed to seek out light, and avoid darkness.
Hyperion [1], an experimental robot, was developed by roboticists at the Robotics Institute at Pittsburgh’s Carnegie Mellon University, CMU. Sent to the arctic and desert regions of our planet, Hyperion was developed to explore the idea of a moving a solar-powered robot that seeks sunlight to keep its batteries charged. This concept might lead to robotic rovers that could operate semi-autonomously for years, on the Moon or distant planets. The robot’s name, Hyperion, comes from Greek mythology. Hyperion, when translated, means "he who follows the Sun."
Source: http://www.frc.ri.cmu.edu/atacama/atacama2003-05/hyperion.html
The front of the S3 has three phototransistor light sensors: small, black, oval-shaped holes. They allow your robot measure the ambient (or surrounding) light. A phototransistor light sensor is a sensor that reacts to light in a predictable way. When light hits the tiny chip inside the sensor’s clear plastic case, current is allowed to flow through the the circuit. More light equals more current flow. The S3 continually measures this current and interprets it as levels of ambient light, then uses this information to execute light-seeking or light-avoiding programs.
This image shows the location of the S3’s three phototransistor light sensors; they are located within the shell to protect them from harm.
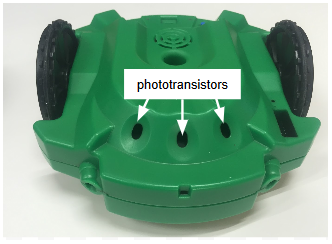
Important Note: Do not insert any object into these sensor holes! These sensors can be easily damaged by sticking a Sharpie® pen tip, or any other object in these openings. Permanent marker ink will blackout the sensor’s clear plastic case, rendering the sensor unusable.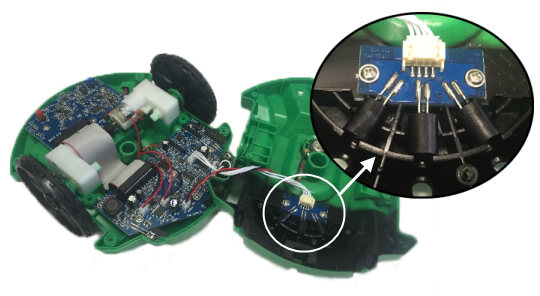
Now, how do we use these sensors to help us see the light?
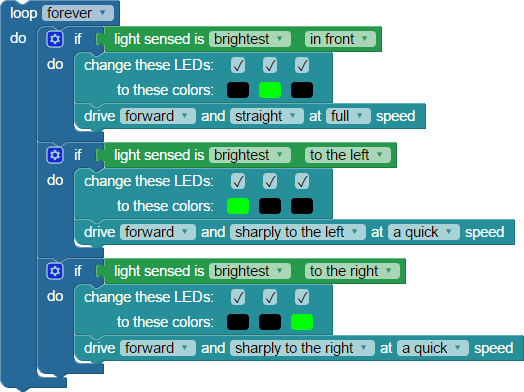
The S3’s first demo monitored the light sensors and used the indicator LEDs to give visual feedback, showing varying light levels with different colors (green, amber, etc). Let’s create a slightly simpler program that does something similar, to familiarize you with how to use the detect light block. The following blocks are are found in the CONTROL, SENSOR, and ACTIONS categories.
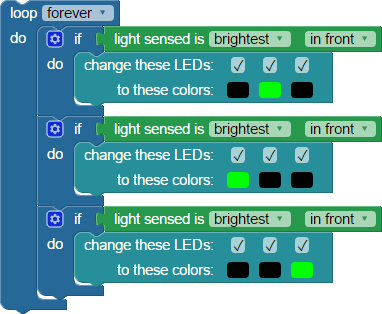
To break things down a little, lets discuss what these blocks are doing. Starting with a loop block makes the program repeat endlessly. Then, the detect light block (repeated three times here) reads each of the S3’s phototransistors to figure out which is seeing the most light. The change LEDs block sets to green whichever indicator LED corresponds to the side with most light, and turns the other LEDs off.
In this example a single LED is lit up green based on where the light sensor finds the most light - front (center), left, or right. If you can do something like light an LED based on a sensor reading, you can just as easily program the S3 to drive at the brightest light source instead.
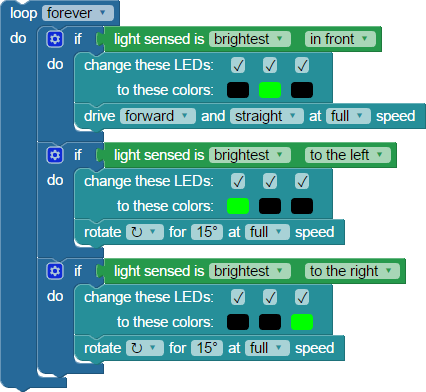
This program tries to always drive straight at the brightest light source. If that brightest source is not located directly in front, this program will turn your S3 clockwise or counterclockwise until it can aim straight for the light. It's close, but it's not quite a fully autonomous navigation program yet, so let's keep going.
Early robot hobbyists in B.E.A.M. robotics developed a number of terms to describe how robots interact with light:
For more information see Wikipedia’s B.E.A.M. robotics article at: https://en.wikipedia.org/wiki/BEAM_robotics.
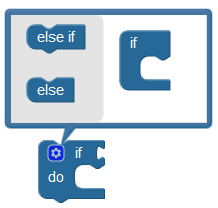
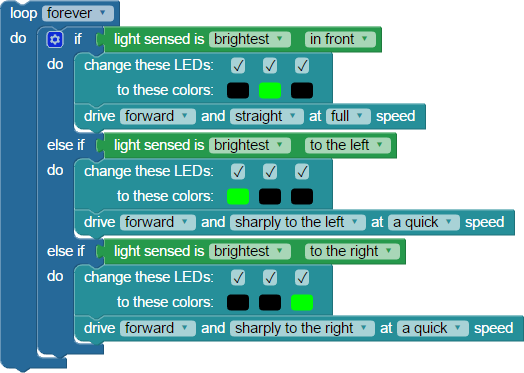
The three previous examples are the most basic way in BlocklyProp to write a light following example for the S3. There are more advanced ways to write a light following program, such as with if...do blocks that use else if conditions.
In an if...do...else if...do statement, if the condition being tested is true, the do statement runs. If the condition being tested is false, the else if statement runs. To create else or else if statements, click the gear icon in the upper left of the block and choose the conditions you want by draging the small else if or else into the if block. Your program may require any number of else or else if blocks, depending on how many conditions you are testing.
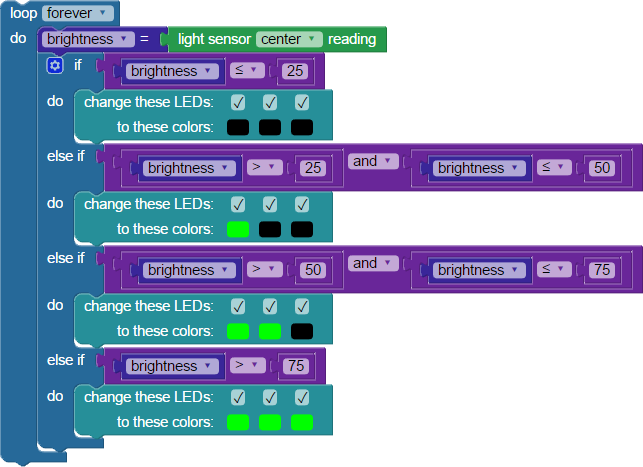
Light Brightness Meter
You can use the other light sensor reading block to measure how bright the light being measured by the light sensor is. If you combine that with the boolean comparison and compare values blocks found in the MATH menu, it is possible to build a light guage.
Recreate the program below to turn your Scribbler robot into a light guage:
Special thanks to Parallax friend Whit Stodghill for his assistance in writing, editing, and testing material for these S3 tutorials.

Links
[1] http://www.frc.ri.cmu.edu/atacama/atacama2003-05/hyperion.html