Once you’ve learned to drive your S3 in the pattern of simple shapes, you can transform those shapes into works of art.
Let’s begin with a fairly complex shape - a five-pointed star.
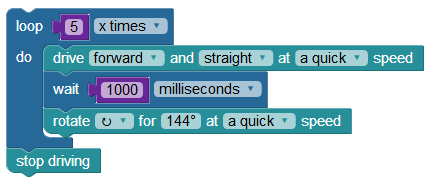
The loop (x times) block allows you to repeat 5 straight lines & 5 angle turns, creating the star shape. Your star's line length is determined by the time parameter of the wait block - the longer the wait time the larger the star. If you want a bigger or smaller star, you can change this value. The rotate block is used because you can now set an angle by entering the value as well as by choosing the angle from the dropdown circle. At the end of your program, the stop driving block will make your S3 stop moving.
Try this program again, but this time place your S3 on a piece of poster board with a Sharpie® in the pen port. You could also place it on a whiteboard using a compatible dry-erase marker. Remember not to use a Sharpie on a whiteboard!
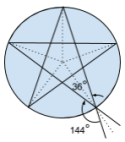 So, where did we get that odd 144° angle? Look at the sketch on the left. If you divide the 360° circle by 5, you can see that the angle between the dotted lines is 72°.
The angle between the lines of the point is half of 72°, or 36°. When the S3 reaches the end of a line in your star (the tip of a point) it turns 180° minus the angle of the point. The angle of the turn is 180°- 36° = 144°.
Study this sketch until this is clear, or do a search for "5-pointed star" to find more resources on the math behind this shape.

Notice in the code above, that the first rotate by radius block has -72° as its rotation value. Clockwise rotation is written as a positive value, while negative values rotate in a counterclockwise direction. This is similar to how percent speed values are positve for forward and negative for backward. What might you imagine is different about using a positive versus a negative radius value? Experiment and find out.
Let’s try an experiment with the second star program we tried (above).

Note that the value in this block was originally 144° in the first two programs. By changing this value to 143°, you may find that your S3 made a slightly better drawing. Every S3 unit is unique, and you might find that different values result in a better outcome when running these tutorial programs. It's up to you to figure out what works best with your robot, using our examples as a guide. This trial-and-error approach is often called optimizing your program.
The best way to discover the purpose of blocks in this example program is to remove them, and then see how that modified program makes your S3 behave. For example, is the stop driving block at the end of this code required?
Is it required in any of the programs in this tutorial? If not, why might it be included and where is it mandatory? Review the Simple Motion with Motors Blocks tutorials that you've already completed to refresh your memory on why we use it. Now let's modify the Curved Star program a bit.
Here you will use two blocks from the MATH category - the math operation block and the number value block. Can you predict what they might do?

The first math operation block adds 2° to the original 73° rotation value. The next math operation block subtracts 2° from the 143° rotation value.
Our additions really made this star shape into art with our subtracting a thing! Don’t you think?
What did you change, and what did you learn? Continue to experiment. Inspiration often strikes by accident, or when you are least expecting it.
Special thanks to Parallax friend Whit Stodghill for his assistance in writing, editing, and testing material for these S3 tutorials.
