In this tutorial, Parallax friend and guest author Jon McPhalen introduces the concept of precision timing with the Propeller multicore microcontroller, using the Blockly programming tool. You will learn about the Propeller's clock frequency, and how to make use of it to control timing in a wide range of applications. This activity is compatible with parts found in the Propeller FLiP Try-it Kit (#32023) [1], the ActivityBot Robot Kit (#32500) [2], and BlocklyProp Starter Kit (#32520) [3].
or
Activity Board WX and FLiP wiring is provided below.
In addition to its somewhat unique architecture, the Propeller was designed to be practical – because it was designed by a person (Parallax founder Chip Gracey) who started as a microcontroller enthusiast and, like you and me, had to work very hard given the restrictions of traditional microcontrollers. Precision timing is an important aspect of many microcontroller applications, and the Propeller was designed to make this task simpler.
In the Hub there is a special RAM register called CNT: the system counter. This register may be read (it is read-only) by any cog (processor) at any time. Internally, the CNT register connected directly to the system clock and is incremented (one is added to it) on every clock cycle. For most systems (including Blockly projects), this means the CNT register is being updated 80 million times per second!
The Hub
To maintain system integrity, mutually-exclusive resources must not be accessed by more than one cog at a time. The Hub controls access to mutually-exclusive resources by giving each cog a turn in a “round robin” fashion from Cog 0 through Cog 7 and back to Cog 0 again. Want to learn more about the Propeller microcontroller? Check out the Propeller P8X32A datasheet [12].
We can use the CNT register for timing by reading it at the start and end of an event; the difference between these two values is duration of the event, expressed at a resolution of 1/80,000,000th of a second. This is excellent for timing high-speed events like an object moving through a speed trap that has sensors on either end.
There is a more popular use of the CNT register that involves precision of timing: that is in the control of code loops. Have a look at this simple set of blocks:
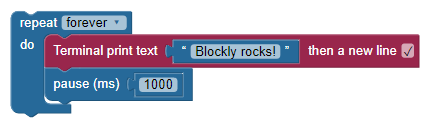
We're sending a message to the terminal window every second. Right? Well... yes and no. In human terms, absolutely. In machine terms, the time between messages is actually a little more than one second You see, it takes time to transfer the message to the terminal cog, and to print the new line that follows. What we don't see is that the program must jump back to the top after it completes the pause block; even this jump takes a little bit of time.
The pause block is perfect for when we want to insert a specific delay into the program, regardless of anything else that is happening.
Let's look at another kind of block – that looks a little complicated at first – but does something really special that is at the heart of many time-critical applications:
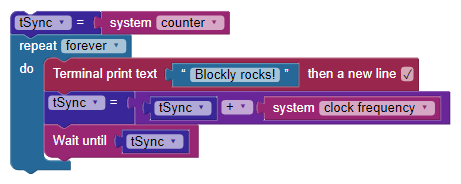
To control this type of loop – which we call a synchronized loop – we need a variable and the use of the wait until block (in the SYSTEM category). The critical part here is that we capture the CNT register into the variable called tSync immediately before entering the loop; this is our synchronization point. After the message is sent, we're going to add the system clock frequency (80,000,000) into tSync; what this does is set a target that is exactly one second past the original synchronization point. The key is in the wait until block. This block will wait until the value of the CNT register matches what we have in tSync. This is different from the pause block because the start of the initial delay was outside the loop, before we printed anything to the terminal. Since the is an infinite loop, the message will be printed to the terminal exactly every second while the program runs. This is happening, because we're always adding the system ticks in one second to the last target (tSync).
Let's make it a little more interesting. Have a look at these blocks:
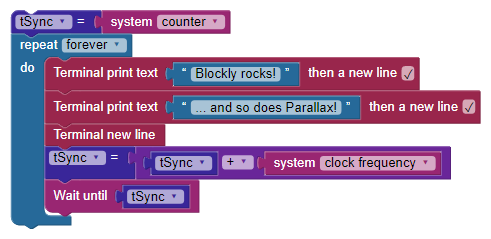
We've added another line, plus another new line to the display.
Pop quiz: Will this take longer to run than the first version of this kind of loop?
The answer is no, and that's what makes the wait until command different than pause. The great thing is that we can put as much code into the loop as will run in the amount of time we have (in this case, one second). The use of synchronized loops is the basis of many robotics and industrial applications.
To be fair, using a synchronized loop to print a message to the terminal is more work than necessary, so let's do something practical. We're going to create a running milliseconds timer. The CNT register is great for very short events, but anything longer than about 28 seconds puts us into a situation where we're dealing with math tricks required to handle signed values; it can be done, but it's not fun. One millisecond (1/1000th of a second) is a very practical unit of time for, well, a lot of things!
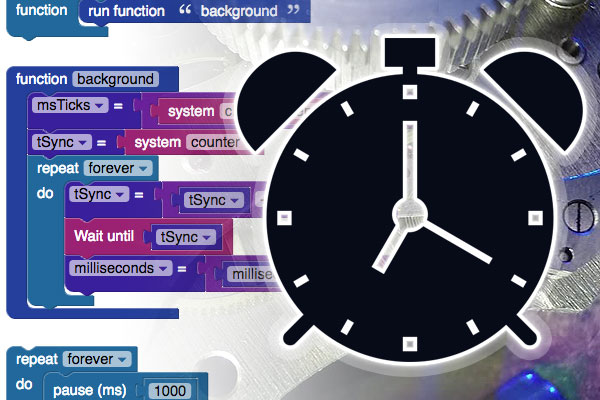
Now we're getting into what makes the Propeller so special; we're going to create a synchronized loop that runs every millisecond and keeps a timer updated for us. That loop is going to run independently of our normal code by launching into its own processor. These are the building blocks for that timer:
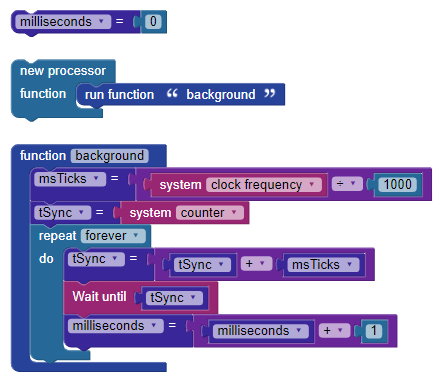
We start by defining our timer variable, logically called milliseconds. To update this variable while our foreground code is busy doing other things, we need to put the update loop into a function, and then run that function in a new processor. For the timer loop, we want it to run every millisecond, which is 1000 times per second. To make that clear, we've created a variable called msTicks. The value of msTicks is calculated from the system frequency divided by 1000.
The current version of BlocklyProp sets the system speed to 80MHz, but future versions may allow the programmer to change this (as we can with other languages). For this reason, we should read the system frequency and calculate msTicks versus hard-coding a value that my not be correct later.
The new processor block is intended to call a function, and not run additional blocks. Define the background function first, and then insert a run function block in the new processor block as shown.
As in our message example, we set the initial synchronization point in tSync before dropping into the loop. Inside the loop, the target for the wait until block is derived by adding msTicks into the current value of tSync. Then we wait. When the wait until block finishes we add one to the value of milliseconds and run the loop again. It will continue to run – at a rate of exactly 1000 times per second – until the Propeller is shut-down.
Let's add some blocks so that we can see the timer working:
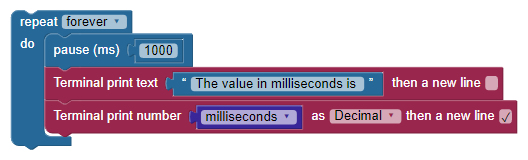
This is a simple repeat forever loop like we started out with, but it's printing the value of our milliseconds timer about every second.
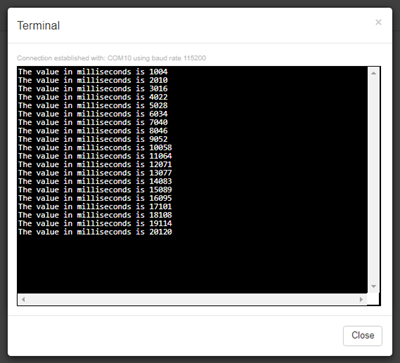
Question: Why is there more than 1000 milliseconds between each line?
Answer: Because the display loop is using pause instead of wait until, so the loop overhead is not accounted for. It takes about 6ms to print the string and convert the value of milliseconds for terminal output.
Now that we have a high-resolution timer, let's make a little game. The purpose of this game is to test our reaction time. When the LED goes on, we press a button – the time between these two events will be measured with our background milliseconds timer.
Let's have a look at the main program loop:
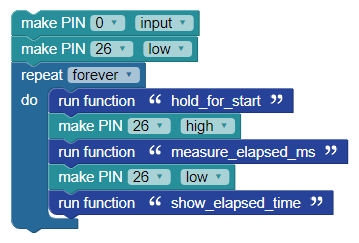
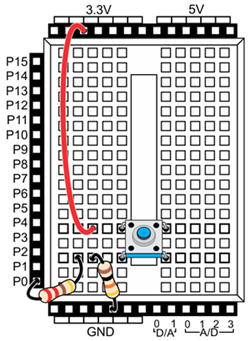
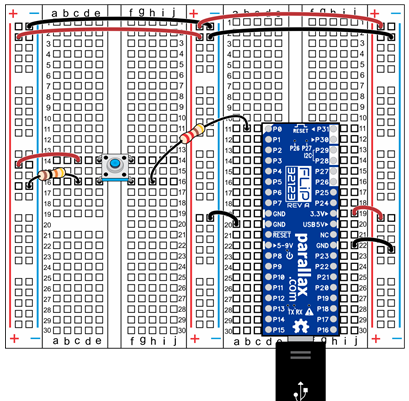
Pin 0 is defined as an input; this is where we will connect a normally open button; when the button is pressed this input will read “1.” Pin 26 controls the LED. We chose pin 26 because the FLiP module and the Propeller Activity Board both have an LED connected to pin 26. The main loop runs “forever” – that is, until we reprogram or shut-down the Propeller.
As you can see, the program is broken into five processes:
By using a structure like this we can easily adapt the program to a wide variety of projects and devices.
In the reaction timer program, we want to put a message on the terminal window and then create a random delay. The random delay prevents us from anticipating the start of timing. It is a game, and it's supposed to be a challenge.
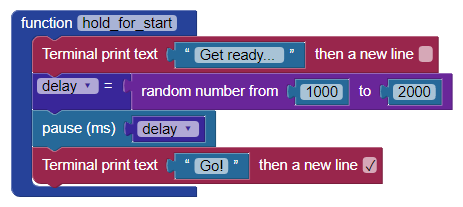
In this function we send a “Get ready...” message to the terminal and then generate a random number in delay that is between 1000 and 2000 – this value will be in milliseconds for use in a pause block; the result is a random delay after the message of one to two seconds. At the end we display “Go!” and the program returns to the main loop where the LED is turned on.
The next process is measuring the reaction time:
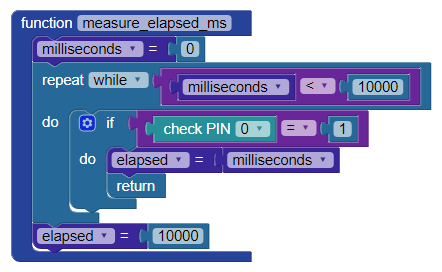
We begin by setting the milliseconds timer to zero. Some will wonder how we can do this if the milliseconds value is updated in the background cog. While that is true, the location of milliseconds is in the shared variable space of the Hub.
Now we can drop into a repeat while loop that will run until while milliseconds is less than 10000 – we're setting a time limit of ten seconds for the reaction. Inside that loop, we look for the button to be pressed. If that happens, the value of milliseconds is copied into elapsed and we return to the main loop. If ten seconds passes, we move 10000 into elapsed and return.
In the main loop the LED is turned off to mark the end of the timing cycle.
The final step is to display the reaction time:
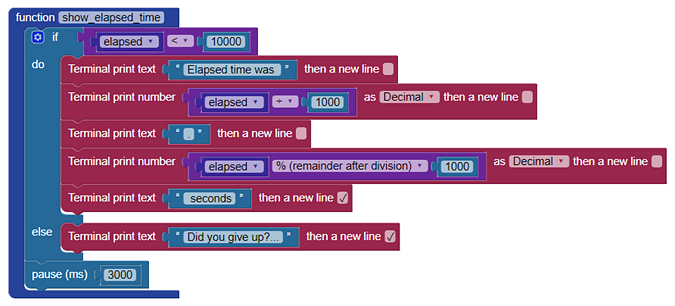
You'll remember that the program gives up if the timer reaches ten seconds, so we check for that first. Assuming a good reaction, we display the time in fractional seconds. This is accomplished by dividing the elapsed milliseconds by 1000 for whole seconds, then using the modulo (%) operator to extract the fractional part. For example, if the elapsed time was 1234 milliseconds, the display would should 1.234 seconds.
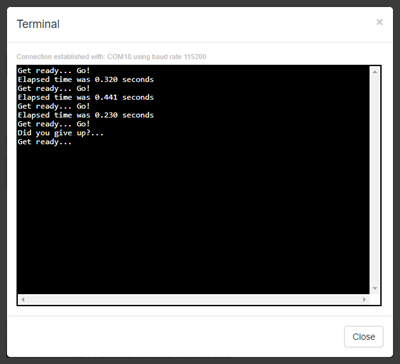
If there was no input, the program will ask if we gave up. In either case, the display will hold for three seconds, and then will run again. Here's what we see when the program is running:
As you can see, the program is designed to make changes for other timing applications very simple. How about a pinewood derby timer? What changes would you make?
Ideas for other uses:
Precision timing is useful in a wide variety of applications, and now you have simple tool for timing high-speed events. What will you do with it?

Links
[1] https://www.parallax.com/product/32023
[2] https://www.parallax.com/product/32500
[3] https://www.parallax.com/product/32520
[4] http://learn.parallax.com/support/reference/propeller-blocklyprop-block-reference/system
[5] http://learn.parallax.com/tutorials/language/blocklyprop/blocklyprop-functions-and-multicore
[6] http://learn.parallax.com/tutorials/language/blocklyprop/circuit-practice-blocklyprop/check-pushbuttons
[7] https://www.parallax.com/product/32912
[8] https://www.parallax.com/product/805-00006
[9] https://www.parallax.com/product/32123
[10] https://www.parallax.com/product/700-32023
[11] https://www.parallax.com/product/805-00016
[12] https://www.parallax.com/downloads/p8x32a-propeller-datasheet
[13] https://learn.parallax.com/sites/default/files/content/AB-Blockly/Projects/PrecisionTiming/PrecisionTimingPrograms.zip
[14] https://solo.parallax.com/