Make the traditional line follower track more colorful!
The addition of a single ColorPal sensor and QTI Line Follower Kit on an ActivityBot 360 creates a far more interesting set of line following navigational challenges. In this project, the use of red, yellow and green color samples are used to signal the ActivityBot 360 to make left, right and u-turn maneuvers, respectively. A WS2812 RGB LED displays the last color seen by the ColorPal and a piezospeaker plays sound effects when colors are detected.
This simple-looking project was designed with specific ActivityBot 360 sensor placement and line shapes in mind. Changing the position of sensors or the angles of line intersection requires different program designs and logic. These are all part of the challenge of creating an environment of your own and code to do the task. Self-driving cars would be easier to program and control if they were able to interact with additional features in a road, as demonstrated in this project.
This project also demonstrates two additional programming practices that can be incorporated into many robotics programs:
Additionally, you may need some double-sided sticky tape, cardboard, popsicle sticks and some small screws to properly position the ColorPal on your ActivityBot 360. The exact configuration of this setup is left up to you.
Note: Soldering assembly is required for the WS2812 LED module.
The QTI Line Follower Kit for the Small Robot (it is compatible with all small Parallax robots) has clear assembly instructions. Please follow these instructions to set up your QTIs. The ColorPal placement should be in front of the QTI Line Follower sensors, close to the surface where the color samples will be detected. The WS2812 and piezospeaker could be wired on the breadboard in several different places but should follow the recommended schematic.
Some of the issues you’ll encounter in assembling this project are limited breadboard space, having a robust physical layout that doesn’t fall apart when retrieved from the table, sharing of power and ground connections to eliminate extra wires, etc. The placement of the ColorPal sensor will require you to devise a mount of some kind using whatever you have available (cardboard, Lego pieces, hot glue, etc.). Your workmanship is important here - take your time and build it in a way you can see the pieces, make adjustments to the setup and ultimately be proud of your work!
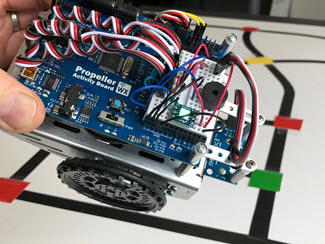
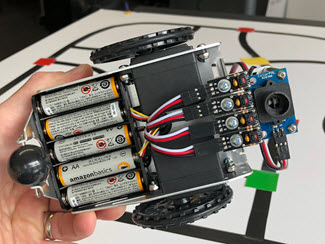
Two pictures provided below show how the components were arranged in this project. At the end of this page you will find wiring diagrams/schematics to connect your various components.
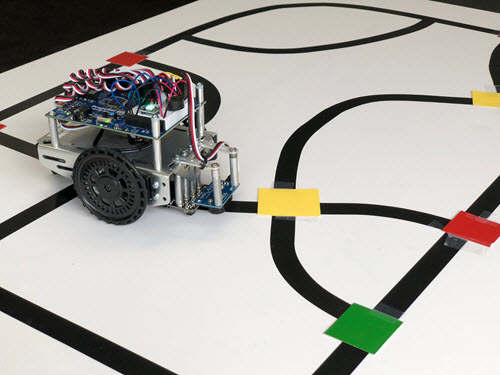
This electrical tape layout was made on a 24” x 36” foam-core poster board from big box office supply stores. You could also use a lighter-colored table or floor. Electrical tape is a very pliable material and can be formed to make corners. Keep the tape flat against the surface of the poster board and use scissors to cut it to avoid it coming loose (don’t stretch it apart and expect it to lay flat afterwards).
This project uses “dead reckoning” to make 90- or 180-degree turns so it’s using right-angle intersections and crossroads. Add a few inches of straightaways before the junctions to make it easy for the ActivityBot 360 to align and find its way back to the directed path of travel.
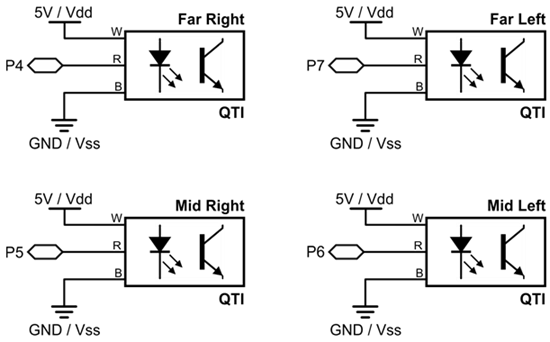
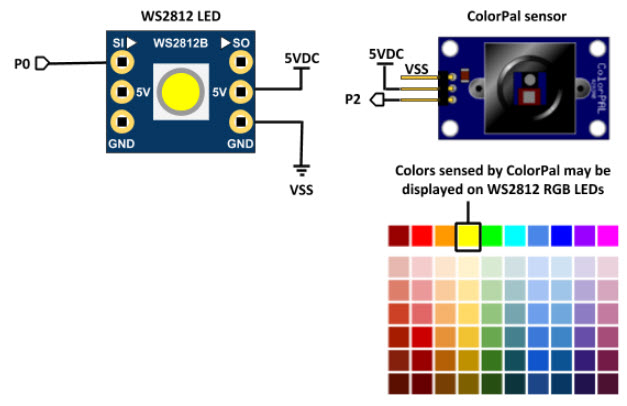
Refer to the ActivityBot 360 Electrical connections [5] for the servo motors and piezospeaker circuit. The QTI Line Follower, WS2812 LED and ColorPal sensor schematics are below.
Support inquiries at Parallax often have several commonalities. One of them is that an entire project was built and a huge program written to run the system. This makes troubleshooting incredibly difficult because it’s not readily possible to determine if the behavior is a result of the circuit, code and logic, or the physical environment. It’s best to divide the circuitry and code into stages so they can be made to function individually first, next with additional parts and finally as a complete system. This is called “subsystem assembly and testing”. Let’s do exactly that!
The two systems that should be tested independently are the QTI Line Follower and ColorPal. We’ll assume you’ve got the WS2812 LED and piezo speaker wired properly in your circuit.
First, if you don't want to recreate these programs by hand, download the zip archive containing the 3 blocks files you will need: Line Follow with AB360 ColorPal blocks files [6]
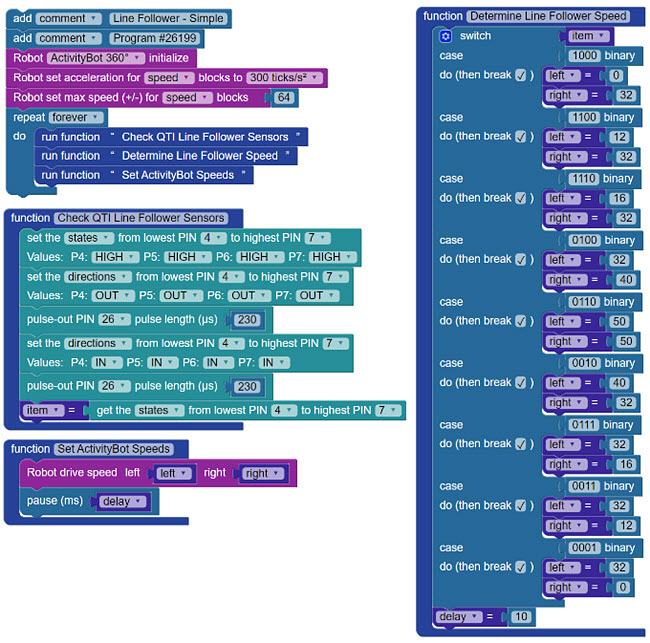
The BlocklyProp QTI Line Follower code is quite basic. Once you’ve assembled the ActivityBot with QTI Line Follower, put a few pieces of electrical tape down and see that it works with this Blockly code.
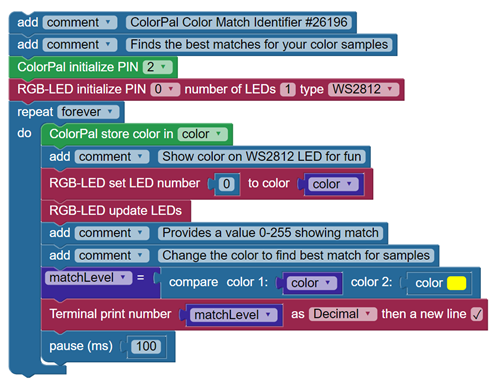
The Line Follower with Color-coded Turn Indicator program must be able to distinguish the color samples you are using from one another, and to associate them closely with your BlocklyProp source code. BlocklyProp has a block for exactly this purpose named compare colors. The compare colors block returns a value from 0 (opposite) to 255 (identical - perfect match) of a 24-bit color sample taken by the ColorPal. This block is found in the Values menu.

The goal is to match the ColorPal’s measured color against a value known by BlocklyProp so you can make decisions in your program.
Color 1 (left) is your various color samples, and Color 2 (right) is BlocklyProp’s color-picker choices.
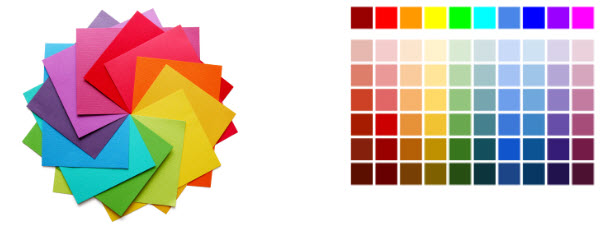
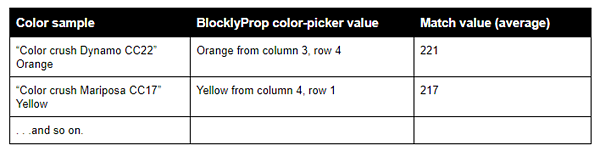
Choose the best match between your color samples (color 1) and a choice from BlocklyProp’s color-picker (color 2). Cycle through your various color samples and find the closest match from the color-picker. You’ll see the values in the Terminal window.
It helps to produce a small chart of your observations so you can have them handy in the full program:
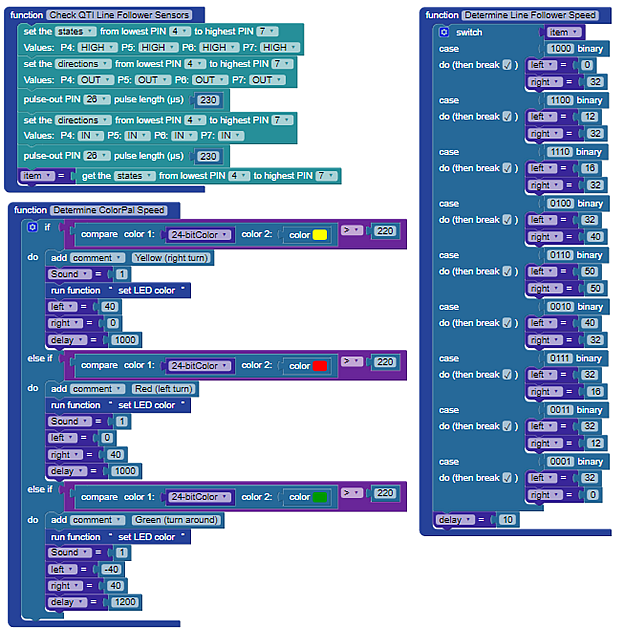
Now you’ll build a program from the two above into the Line Follow with AB360 ColorPal program. Tune it and improve as you desire!


Links
[1] https://www.parallax.com/product/32600
[2] https://www.parallax.com/product/28108
[3] https://www.parallax.com/product/28380
[4] https://www.parallax.com/product/28085
[5] https://learn.parallax.com/tutorials/robot/activitybot/blocklyprop-robotics-activitybot/electrical-connections
[6] https://learn.parallax.com/sites/default/files/content/AB-Blockly/Projects/QTI-ColorPal/LF-with-AB360-ColorPal.zip