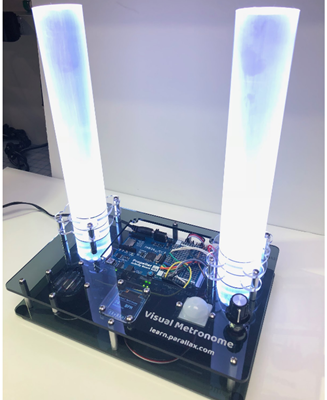
The Visual Metronome was developed using parts from the Animation Kit (#910-28088) as part of a single-day internal Parallax Hackathon. As a new clarinet player, I’ve struggled keeping time with an audible metronome and decided to try using the highly-visible WS2812 (NeoPixels) through acrylic.
The Visual Metronome has the following features:
Dial-set tempo in beats per minute (BPM) from 32 to 220
OLED showing the current BPM and the Italian tempo marking (grave, andante, allegro, prestissimo, etc)
NeoPixel light flashing denotes upbeat (you choose the colors!)
PIR Sensor for automatic on-off control with human presence
Speaker for audible feedback
Code-configurable for other time signatures (2:4, 3:3, 6:8, etc)
Building and coding a Visual Metronome takes a day. The results of this project are worth the effort - you’ll have the most unique tool for whatever instrument you play and will have made an investment in artistic skills that improve one’s well-being.
The project is most easily done with the Propeller Activity Board because it has an A/D converter for the potentiometer tempo speed. If you prefer to use a FLiP Multicore Module, two pushbuttons could be used instead to increase or decrease the tempo. This project used the following electronic components:
(1) Propeller Activity Board WX (#32912)
(1) OLED (#28087)
(1) Circuit Overlay Board (#32999)
(1) 7.5V 1.5A Power Supply (#750-00009)
(1) 10K Ohm potentiometer with knob (source nearly anywhere)
Parallax Animation Kit (#910-28088), which includes the following:
(2) NeoPixel Ring - 12 x 5050 RGB LED (#28088)
(1) PIR Standard (#555-28027)
(1) Pack of wires (#800-00016)
(1) 200 mm Jumper Wires, MM 40-pc (#800-00066)
(1) 200 mm Jumper Wires, FF 40-pc (800-00062)
(1) Speaker (#900-00026)
The following parts from the Animation Kit were not used:
(2) Standard Servo (#900-00005)
The key physical design element of the Visual Metronome is the NeoPixel light transmission through two 1-½” diameter, 10-inch long clear acrylic rods. This is the same diameter as the NeoPixel rings; when they’re placed right against the end of the acrylic rod the light transmits directly to the other end. By sanding the sides, the light comes through the entire length of the rod. These acrylic rods can be found on eBay or Amazon, or from plastic acrylic suppliers.
The base of the Visual Metronome was laser-cut from ⅛” smoked acrylic pieces. The acrylic base in this example was assembled with #4-40 screws and standoffs. The base can be made from nearly anything: wood, foam core board, cardboard, or Sintra. Depending on your design, hot glue or screws might be the appropriate fastener!
If you’d like to build the Visual Metronome using our design, the files are available as a DXF which you may freely use. The two main base plate parts are ⅛” thick transparent smoked acrylic and the holders for the 1-½” acrylic rods are ⅛” thick clear acrylic. Standoffs are 1” aluminum round 4-40s. An assortment of 4-40 screws of ⅜” to ½” long are also helpful. Download DXFs from the download page here on Learn [1].
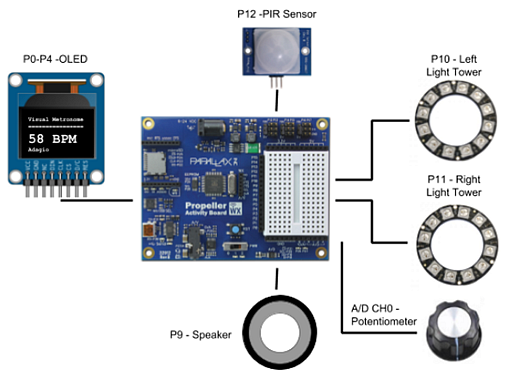
The wiring diagram works like this:
P0 through P4 to the OLED
P9 to the speaker
P10 and P11 to the two NeoPixel rings
P12 to the PIR Sensor
A/D CH0 to 10K Ohm potentiometer
Each component also has power and ground connections.
A Parallax 7.5V 1.5A Power Supply (#750-00009) is plugged into the power jack. The P12 and P12 servo header jumpers are set at 5.0V.
BlocklyProp is designed so that different board types have only relevant block types available to them. The use of the system counter and wait until blocks are available in the “other” board type. However, the analog voltage block is only available for the Propeller Activity Board WX board type.
The solution to this problem is to start building your program with the “other” board type and then move that program into a new project with the "Propeller Activity Board WX" board type.
Coding an accurate metronome on a microcontroller presents a few timing challenges. For example, writing data to an OLED, illuminating the NeoPixels, and control structure statements require unknown amounts of time to execute. Adding pauses and delays doesn’t make it much easier, and the use of external real-time clock represents additional code overhead, too.
The Propeller Multicore Microcontroller has two key hardware features for making a metronome with deterministic timing. The first is the use of an accurate system clock with an elapsed time counter, both readily available to the BlocklyProp programmer. The system counter block provides a current value of clock ticksand the Wait until block stops the program until an elapsed time has passed. The two blocks look like this:


The second feature is the Propeller’s eight parallel processors with shared memory, allowing the time-consuming code overhead of the OLED to run in its own processor in the main loop while the system counter process runs in its own processor.
The entire code for this project can be downloaded from the link below:
Project53482-Visual-Metronome.svg [2]
At first look the code appears to use two processors - the Main Loop and metronomeTime. However, the OLED, RGB LEDs and A/D also run in their own processors. Some BlocklyProp commands do this in their libraries without the new processor block (a reference of those blocks which use their own processors is available on Learn [3]). This brings the total usage in the Visual Metronome to five processors.
The Visual Metronome psuedocode could be summarized as follows:
The main processor:
Starts another new processor with the function “metronomeTime”
Checks the PIR Sensor for motion and increments a counter
Determines the tempo (BPM) from the potentiometer reading (the A/D converter starts another processor)
Writes the Italian tempo marking as a string into a variable
Writes the tempo to the OLED (the OLED starts another processor)
The metronomeTime processor:
Calls a function which checks the potentiometer analog value
Creates the msTicks variable from the system clock frequency
Runs a loop counter which waits for an elapsed time to pass
Sets NeoPixel colors (the RGB blocks start another processor)
Sounds a speaker or creates a delay
The Visual Metronome is all about timing. Most of the code is self-explanatory, but the use of these blocks in the metronomeTime processor should be understood since they manage the timing. Here’s how they work:
Two variables are created. The QuarterMinute variable is equal to the system clock frequency multiplied by 15 - which works out to be 15 seconds. The tSync variable is the current value of the system counter - some value between 0 and 4,294,967,295 which rolls over (the actual number doesn’t matter since we’re only interested in elapsed time). These variables are only assigned once.

The tempo is calculated in the repeat-forever loop. The HalfPeriod equal to QuarterMinute divided by (BPM beats per minute, dividied by two). Next, the tSync variable is calculated. It is set to tSync (the current value of the system counter, stored before the loop) plus the HalfPeriod. Knowing the half period is convenient for turning sound on and off, along with the lights.

The code running in this loop is less than half of the period (a beat). When the loop is done, the wait until block is encountered and causes the program to stop until the next calculated period has elapsed (tSync).

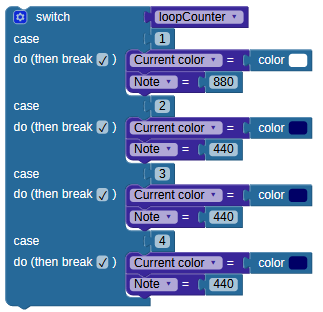
The example code uses 4:4 (four beats per measure). To change this to 3:4 (triple time, as commonly used for the waltz and minuet) or 2:4 (duple, as used in polka or a march) you only need to change the loopCounter variable to the desired number of beats per measure.
And, change the case statement to reflect the number of beats per measure and the colors set on the NeoPixels:
While I’m still struggling with keeping timing on the clarinet, it’s mostly a result of having stopped taking lessons though early tests show the Visual Metronome is a step in the right direction. I’m going to modify the beep to be a short “click” and use less intrusive colors as the next adjustment. Another change suggested by a Parallax engineer is to make the light tubes alternate between left and right, like a mechanical metronome swinging back and forth.
When I put it in front of my son he seemed to know what to do right away on the piano, as shown below.

Links
[1] https://learn.parallax.com/support/download/1865/visual-metronome-design-file
[2] https://learn.parallax.com/sites/default/files/content/AB-Blockly/Projects/Visual-Metronome/Project53482-Visual-Metronome.svg
[3] http://learn.parallax.com/tutorials/language/blocklyprop/precision-timing-propeller
[4] http://learn.parallax.com/support/reference/propeller-blocklyprop-block-reference/system