
The micro:bit module will be in the driver's seat of your cyber:bot robot, and it also has many features of its own. In this tutorial, you will learn how to write programs, called "scripts," to use the micro:bit module's pushbuttons and LED display. Along the way, you will learn some basics of Python programming to remember and use values, do math, make decisions, and repeat actions.
You will need:
Once you have completed these activities, you will be ready to expand the capabilities of your micro:bit.
The micro:bit module has a 5x5 matrix, or grid, of LEDs on the front of it. An LED, or Light Emitting Diode, is an electrical component that allows electricity to flow through it in only one direction.
When an LED is hooked up in the proper direction and electricity is applied, the LED lights up. The 25 LEDs on the face of the micro:bit module are already connected so that we do not need to worry about their connected direction, however, additional LEDs can be connected to the cyber:bot using the breadboard.

Collectively these 25 LEDs form the display of the micro:bit module. The micro:bit module can be programmed so that the LEDs can show images, scroll text across the screen, or be individually illuminated to a variety of brightness levels.
Each LED row (x axis) and column (y axis) is numbered 0 through 4, so each LED can be identified individually. But first, we will try convenient, ready-made instructions for displaying scrolling text and predefined images.
The three pages that follow this one will cover what you need to know to work through the cyber:bot tutorials. But, it is by no means entirely comprehensive. Feel free to check the official MicroPython documentation any time.
Scrolling text across the display is a very useful way to get information from your micro:bit program. When you have your micro:bit on your cyber:bot robot, this is a good way to display values from the robot's sensors.
To scroll text across the display, use the aptly named display.scroll method. The text you want to display goes inside quotation marks " ", and that goes inside the method's parentheses ( ).
#hello

from microbit import *

display.scroll("Hello")
You should see the word Hello scroll across the display one character at a time.
The first line, #hello is a comment. It is just there for you to read the script's name, but is ignored by the micro:bit. We will look at comments again later!
The second line, from microbit import *, fetches the code that knows how to run the display methods. Every complete example script in these tutorials will have at least one import * statement at the top.
The third line makes the text appear on the display. The "Hello" text in quotation marks is a parameter of the display.scroll method, and so goes inside its parentheses.
The text you want to display isn't the only parameter you can use with display.scroll. You can control the speed at which the text scrolls across the display by adding a an additional parameter to the display.scroll method called delay. The larger the value for delay, the slower the text will scroll.
#hello_goodbye

from microbit import *

display.scroll("Hello", delay = 500)
display.scroll("Goodbye", delay = 150)
You should see the word Hello scroll across the display slowly, then the word Goodbye scroll across the screen quickly.
Be cautious when copying and pasting code with quotation marks! Some types of documents use smart-quote characters “ and ” that will result in a syntax error if you try to use them in a script. If you are receiving a syntax error after copying and pasting code with quotation marks, try erasing and retyping the quotation marks directly in your programming environment, then re-flash the program.
Sometimes you might want the micro:bit module to simply show an image instead of scrolling text. We can do this with display.show method, using premade images from the Image object. For example: display.show(Image.DUCK).

#image

from microbit import *

display.show(Image.DUCK)
You should see a duck appear on your micro:bit module's LED matrix, like the picture shown above.
| Image.HEART Image.HEART_SMALL Image.HAPPY Image.SMILE Image.SAD Image.CONFUSED Image.ANGRY Image.ASLEEP Image.SURPRISED Image.SILLY Image.FABULOUS Image.MEH Image.YES Image.NO Image.CLOCK12 Image.CLOCK11 Image.CLOCK10 Image.CLOCK9 Image.CLOCK8 Image.CLOCK7 Image.CLOCK6 |
Image.CLOCK5 Image.CLOCK4 Image.CLOCK3 Image.CLOCK2 Image.CLOCK1 Image.ARROW_N Image.ARROW_NE Image.ARROW_E Image.ARROW_SE Image.ARROW_S Image.ARROW_SW Image.ARROW_W Image.ARROW_NW Image.TRIANGLE Image.TRIANGLE_LEFT Image.CHESSBOARD Image.DIAMOND Image.DIAMOND_SMALL Image.SQUARE Image.SQUARE_SMALL Image.RABBIT |
Image.COW Image.MUSIC_CROTCHET Image.MUSIC_QUAVER Image.MUSIC_QUAVERS Image.PITCHFORK Image.XMAS Image.PACMAN Image.TARGET Image.TSHIRT Image.ROLLERSKATE Image.DUCK Image.HOUSE Image.TORTOISE Image.BUTTERFLY Image.STICKFIGURE Image.GHOST Image.SWORD Image.GIRAFFE Image.SKULL Image.UMBRELLA Image.SNAKE |
You have displayed a single image with a single line of code. To display a series of images, place the sleep function on a line of code between them. The sleep function pauses the micro:bit module for a specified number of milliseconds, giving you time to see the image on the display. For example:
display.show(Image.HEART)
sleep(500)
display.show(Image.HEART_SMALL)
sleep(500)
...will show an image of a heart for half a second (500 milliseconds), then show an image of a small heart for another haf a second. Try it!
#images

from microbit import *

display.show(Image.HEART)
sleep(500)
display.show(Image.HEART_SMALL)
sleep(500)
 (500 ms)
  (500 ms)
In the script images, the heart looks as if it beats once.
You can create custom images from individual pixels on the micro:bit module’s display by using display.set_pixel.
The set_pixel method has three parameters: x, y, and b:
display.set_pixel(x, y, b)
The arguments for x and y indicate the pixel's position in the micro:bit module display's coordinate plane. The b argument controls the brightness (0-9) of the pixel.
![]()
To see how this works, try the following program which lights up two LEDs.
# two_pixels

from microbit import *

display.set_pixel(0, 0, 9)
display.set_pixel(1, 3, 4)
The first statement display.set_pixel (0, 0, 9)lights up the pixel is located at (0,0) which is the top left of the display. It is set to the maximum brightness of 9.
The second statement display.set_pixel (1, 3, 4) lights up the pixel located at (1,3), which is in the second column from the left and down 4 rows. The brightness is only 4, so it is significantly dimmer than the first pixel.
![]()
Using the following script, see how a medium size box can be made by lighting up 8 pixels in the middle of the micro:bit module’s display.
# medium_box

from microbit import *

display.set_pixel(1, 1, 9)
display.set_pixel(1, 2, 9)
display.set_pixel(1, 3, 9)
display.set_pixel(2, 1, 9)
display.set_pixel(2, 3, 9)
display.set_pixel(3, 1, 9)
display.set_pixel(3, 2, 9)
display.set_pixel(3, 3, 9)
Variables are names you can create for storing, retrieving, and using values in the microbit module’s memory. Here are three example variable declarations from the next program:
a = 42
c = "m"
d = 42.06
A variable can hold different kinds of values, such as integers (whole numbers), decimal numbers, and characters. Each of these kinds of values uses a different data type.
The declaration a = 42 creates a variable named a. The value 42 is an integer, so the Python language automatically assigns the int data type to the a variable, and gives a an initial value of 42. If you do not want an initial value, you can assign a value of None to the variable, such as a = None.
Next, c = "m" declares a variable named c and initializes it to the value "m." Since "m" is a character, Python assigns c the data type str for storing strings or text.
Then, d = 42.06 declares a variable named d. The value 42.06 is a decimal number, so Python assigns d the data type float, which can hold floating-point decimal values.
Now that you know how code can store values to memory, how can it retrieve and use them? One way is to simply pass each variable to a method’s parameter.
Here is an example, where display.scroll(Val) uses the display to scroll the value of the variable inside the parentheses.
#variables

from microbit import *

a = 42
c = "m"
d = 42.06

display.scroll(a)
display.scroll(c)
display.scroll(d)
The display will scroll the number 42, then it will scroll the letter m (shown below), then it will scroll the number 42.06.

Sometimes you might want to create your own images for the the micro:bit module display, which you can do with the Image method. The following example shows us how to make a custom image, and then how to store that image in a variable to make it easy to use in your script.
#fading_H

from microbit import *

fading_H = Image("90001:"
                 "90001:"
                 "97531:"
                 "90001:"
                 "90001")
display.show(fading_H)
The example above creates an image of the letter H where the left side of the letter is very bright and the right side is dim. But how?
Notice that inside of the Image method's parentheses, there are 5 rows of numbers and 5 columns of numbers. Each number corresponds to a different LED on the microbit, as one might expect. The top left number corresponds to the top left LED. The bottom right number corresponds to the bottom right LED.
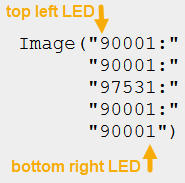
The number 0 tells the micro:bit to turn the LED off. The number 9 tells the micro:bit to turn the LED on at maximum brightness. Any number between 0 and 9 turns the LED on with a partial brightness where a larger number corresponds to a brighter LED.
The image is then stored in a variable called fading_H. The last line of code uses display.show to show the fading_H image:

Arithmetic operators are useful for doing calculations in your program. In this activity, we’ll focus on the basics:
The example script simple_math uses the addition operator (+) to add the variables a and b together. The assignment operator (=) is used to store the result in the variable c. It also displays the result on the micro:bit.
#simple_math

from microbit import *

a = 89
b = 42
c = a + b

display.scroll("a + b = ")
display.scroll(c)
You still have -, *, / and % to try out!
Your cyber:bot will need to make a lot of navigation decisions based on sensor inputs. Computer programs tend to make decisions by testing whether or not a condition is true, and if it is true do one thing, else, do another.
For making these kinds of decisions, comparison operators come in handy.
The script simple_decision demonstrates single-operation decision making. It compares the value of a to b, and sends a message to tell you whether or not a is greater than b, with an if…else statement.
If the condition (a > b) is True, it executes the if statement’s code block: display.scroll("a is greater than b"). If it so happens a is actually not greater than b, it executes the else code block instead: display.scroll("a is not greater than b").
#simple_decision

from microbit import *

a = 89
b = 42
if a > b:
    display.scroll("a is greater than b")
else:
    display.scroll("a is not greater than b")
Notice again that the line beneath if a > b: is indented. Also, the line beneath else: is indented. Python needs these lines to be indented to determine which line to execute when the condition is true, and which line to execute when the condition is false. It is good practice to indent 4 spaces. Many Python IDEs (integrated development environments, such as Mu) place 4 spaces in your code when you press the tab key.
Maybe you only need a message when a is greater than b. If that’s the case, you could cut out the else statement and its code block. So, all your code would need is the one if statement, like this:
a = 89
b = 42
if a > b:
    display.scroll("a is greater than b")
Maybe your program needs to monitor for three conditions: greater than, less than, or equal. For this, you could use an if…elif…else statement. Note that elif is short for "else if."
#more_decisions

from microbit import *

a = 89
b = 42
if a > b:
    display.scroll("a is greater than b")
elif a < b:
    display.scroll("b is greater than a")
else:
    display.scroll("a is equal to b")
You can chain more elif statements after if. The example above only uses one elif but you could use more. Each condition is tested in order, and after the first true condition is found, its code block is executed and the rest of the statment gets left behind.
Sometimes, you need to test whether two or more conditions are true at the same time. A program can handle multiple conditions with the boolean operators, such as and and or. For example, this statement’s block will execute only if a is greater than 50 AND b is less than 50:
if a > 50 and b < 50:
    display.scroll("Values in normal range")
Another example: this one prints the warning message if a is greater than 100 OR b is less than zero.
if a > 100 or b < 0:
    display.scroll("Danger Will Robinson!")
Many robotic tasks involve repeating an action over and over again. Next, we’ll look at two options for repeating code: the for loop and while loop. The for loop is commonly used for repeating a block of code a certain number of times. The while loop is used to keep repeating a block of code as long as a condition is true.
A for loop is typically used to make the statements in a code block repeat a certain number of times. For example, your cyber:bot may use five different values to make a sensor detect distance, so it needs to repeat a certain code block five times. For this task, we use a for loop. Here is an example that uses a for loop to count from 1 to 10 and display the values.
Enter, save, and flash the script count_to_ten to your micro:bit.
#count_to_ten

from microbit import *

for counter in range(1,11):
    display.scroll(counter)

display.scroll("All Done!")
The figure below shows the for loop from the last example script count_to_ten. It labels the elements needed to control how the for loop counts.
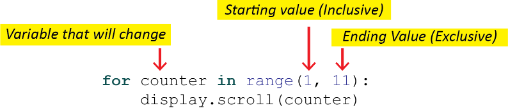
Variable: You must have a variable that the code will change while it is executing the for loop. You do not need to declare the variable before this. It is best to name the variable after its purpose. In this example, the variable was a counter, thus it is named counter. It is very common to use the word index or the letter i as the variable in for loops.
The range function: The range(start, stop, step) function is often used with for loops. The start argument sets the initial value of the previously declared variable. The stop argument sets the value the for loop will stop at. Note that the for loop will only execute while the variable is strictly less than the stop value. Thus the stop value is exclusive. The step argument determines how much to increment the variable by for each iteration.
The start and step parameters are optional. If the start argument is not specified, it is set to 0. If the step argument is not specified (like in the example) then it is set to 1.
The first time though the loop, the value of counter is set to 1. So, display.scroll(counter)displays the value 1. The next time through the loop, Python increments the value counter by 1. After the display is finished scrolling, the for statement checks to make sure the condition counter < 11 is still true. Since counter now stores 2, it is true since 2 is less than 11, so it allows the code block to repeat again. This keeps repeating, but when counter gets to 11, it does not execute the code block because it’s not true according to the counter < 11 condition.
Want to condense your code a little? You can use what is referred to as a list comprehension to put your for loop on one single line. You will learn more about lists in a future chapter.
from microbit import *

[display.scroll(counter) for counter in range(1,11)]
As mentioned earlier, the range(start, stop, step) function defaults to incrementing the variable by 1 each time through the for loop. You can adjust the step argument so that the for loop is incremented by 2, 5, 1000, -1 or any other integer. Do note that if your step is a negative value, you will need the start value to be larger than the stop value.
for counter in range(5000, 15000, 1000):
In later chapters, you’ll use a while loop to keep repeating things while a sensor returns a certain value. Let’s try counting to ten with a while loop:
# count_to_ten_again

from microbit import *

counter = 0

while counter < 10:
    counter = counter + 1
    display.scroll(counter)
While loops often make use of certain assignment operators. Such operators take the value on the right-hand side, perform an operation, and assign the result to the value on the left-hand side. Every time you declare a variable, the equal sign (=) is functioning as an assignment operator. But there are more, less-familiar assignment operators.
For example, the operator (+=) adds the value on the right-hand side of it to the variable on the left-hand side of it. Other similar assignment operators are (-=) for subtraction, (*=) for multiplication, (/=) for division, and (%=) for modulus.
Want to condense your code a little? You can use the assignment operator (+=) to increase the value of counter inside without having to type counter twice.
while counter < 10:
    counter += 1
    display.scroll(counter)
We could also make the loop repeat forever by using the word True instead of the condition counter < 10. Make sure that True starts with a capital T!
while True:
    counter += 1
    display.scroll(counter)
So why does this work? A while loop keeps repeating as long as the condition that follows the word while is true. The word True is actually a pre-defined constant, so while True is always true, and will keep the while loop looping. Notice that the word True is capitalized. Can you guess what while False would do?
Try these different while loops in the script count_to_ten_again. What happens?
(Spoiler alert: Python treats 1 as True and 0 as False.)
Do you remember the script count_to_ten from the last page? The next script, count_to_ten_documented, is different in several ways.
First, it has a block comment at the top. Technically this block comment is called a docstring. Docstrings start with a triple quote """ and end with a triple quote """. People often use these to create block comments and you can write as many lines of notes in between a pair of triple quotes as you want. Use caution when placing docstrings in your code as they could become the documentation that is associated with a function or method.
Also, each line of code has a line comment starting with # to its right, explaining what the code does. Line comments can also be placed above a section of code if they are very long, to avoid having to scroll sideways to read it.
In Python, constants don’t exist at the level of coding we are currently describing, however, we can still use styling to indicate to other people that may read our code that we are intending certain variables to behave as constants, meaning we don’t expect these variables to actually change during an execution of the program.
Three constants are declared at the beginning of the program and given the names START_VAL, STOP_VAL, and STEP_VAL. To indicate to other people that these values are constants we write them in all caps with underscores separating each word.
"""
count_to_ten_documented
"""

from microbit import *         #import the microbit library

START_VAL = 1                  #set START_VAL to 1
STOP_VAL = 11                  #set STOP_VAL to 11
STEP_VAL = 1                   #set STEP_VAL to 1

#count from START_VAL to STOP_VAL incrementing by STEP_VAL
for counter in range(START_VAL, STOP_VAL, STEP_VAL):
    display.scroll(counter)   #display the counter value

display.scroll("All Done!")   #display message when done
Documenting code is the process of writing notes about what each part of the program does. You can help make your code self-documenting by picking variable names that help make the program more self-explanatory. If you are thinking about working in a field that involves programming, it’s a good habit to start now. Why?
In addition to making your code easier to read, abstracting the code with variables and constants allow you to adjust an often-used value quickly and accurately by updating a single declaration. Trying to find and update each instance of an unnamed value by hand is an easy way to create bugs in your program.
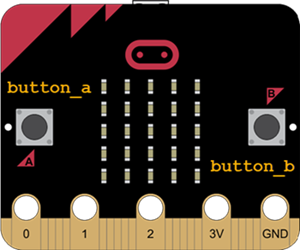
The micro:bit module has two pushbuttons labeled A and B, to the left and right side of the LED display. This kind of button is sometimes called a tactile switch, or tact switch for short. The micro:bit module can be programmed to respond to these buttons being pressed. In your scripts, each button already exists as an object, and they can be referred to as button_a and button_b.
For example, if you want to know how many times button A gets pressed since the micro:bit module has turned on (or since the last time you asked how many times button A was pressed, whichever is most recent), you can use button_a.get_presses. The same can be done for button B.
Note the sleep(5000) at the beginning of the next example script. When you flash the script, use these 5 seconds (5000 milliseconds) to press button A as many times as possible.
After 5 seconds, the script then stores the number of times button A got pressed since startup into the variable called numberOfPresses. The last line of the script uses the display to scroll the value stored in numberOfPresses.
#get_presses

from microbit import *

sleep(5000)

numberOfPresses = button_a.get_presses()
display.scroll(numberOfPresses)
You can write a statement for each button to tell if it is pressed. The button_a.is_pressed method will return either True or False depending on whether or not button A is currently pressed. These methods often work well with conditionals. For example, the following program displays a check mark if button A is pressed. Otherwise, it will display an X.
#is_pressed

from microbit import *

while True:
    if button_a.is_pressed():
        display.show(Image.YES)
    else:
        display.show(Image.NO)
Not pressed:  Pressed:
Another commonly used method of the buttons is to be able to tell if the button was pressed since the micro:bit module turned on, or since the last time the code checked to see if it was pressed, whichever is most recent. The button_a.was_pressed method returns True or False depending on whether or not button A was pressed.
For example, the script was_pressed will display a check mark if button A was pressed in each 5 second interval. If was not pressed in a five second interval, then it will display an X.
#was_pressed

from microbit import *

while True:
    sleep(5000)
    if button_a.was_pressed():
        display.show(Image.YES)
    else:
        display.show(Image.NO)
In some of the earlier examples, your scripts used a function named sleep. This function made the micro:bit wait for a certain amount of time before allowing it to execute the next statement in your script.
A function is a block of code that your script can call to make it do a certain job. In the case of sleep, the block of code is tucked away with other functions in the microbit module. When your script starts with from microbit import *, it gets access to sleep and several other functions.
Functions aren't only found in places like the microbit module. You can also write your own functions and call them, all from within the same Python script. This is especially useful when you have a group of statements that gets used in several different places in your program. After putting that group of statements into a function and giving it a name, it just takes one statement to call the function at any point.
Imagine you have ten statements that need to be executed at four different locations in your script. With a function, you can reduce the extra code from forty lines to fifteen. That's ten lines of code, one line to define the function's name, and then single-line function calls from the four locations.
Since functions are such an important tool for keeping your program small and organized, this activity will guide you through adding functions to your Python scripts and calling them.
Objects, Methods, Properties, and Functions
In case you were wondering why sleep(1000) is considered a function call and display.scroll("Hello world") is considered a method call: When a function belongs to an object, it's called a method. When you see display.scroll("Message"), the object's name is display, and scroll is the name of one of its methods. Another method call you might remember is display.show(Image.duck). The show method is also function code that belongs to the display object.
Objects can be copied and given unique names. Also, in addition to methods, objects can contain properties. For example, the Image object has properties like Image.HEART and Image.HAPPY. Different object copies storing different properties can even cause their methods to produce different, custom results. So the name change from function to method implies some extra flexibility that comes with being part of an object.
The following script defines one function. The smile function simply displays a smile on the microbit’s display. It doesn’t take any inputs nor does it return anything.
#smile

from microbit import *

def smile():
    display.show(Image.HAPPY)
    sleep(2000)
Notice that the syntax for defining functions begins with the keyword def. After a space you can then type the name of the function, such as smile, with a pair of parentheses () attached. After the parentheses, you will need to put a colon:. Just like with if… statements, for loops, and while loops, the very next line after a colon will need to be indented. The indented lines that follow are all part of the function. The indented lines are not executed unless the function is called upon.
The script doesn’t do anything! We defined a function but we didn’t call upon it.
When you call a function, you must type it exactly like you named it. It is case sensitive. Also, it must be called below the function definition.
#smile

from microbit import *

def smile():
    display.show(Image.HAPPY)
    sleep(2000)

smile()

The script smile didn’t have a very complex function. Let’s see what else we can do with functions! For example, we can nest if…else… statements inside functions.
# emote

from microbit import *

def emote(feeling):
    if feeling == "happy":
        display.show(Image.HAPPY)
    elif feeling == "sad":
        display.show(Image.SAD)
    else:
        display.scroll("I don't understand that feeling. Try happy or sad.")
    sleep(2000)

emote("happy")
In the emote script, our function now has an input. That input is either the word "happy" or the word "sad". When the function is called, it will use the nested if..elif..else statement to determine if the feeling is happy, sad, or not understandable!
While the function in the emote script has an input, or parameter, that we can pass through it, it still doesn’t have anything it returns. The functions in the script adding both have parameters and return values.
# adding

from microbit import *

def add_one(value):
    value = value + 1
    return value

def addTogether(value1, value2):
    result = value1 + value2
    return result

display.scroll(add_one(5))
display.scroll(addTogether(5,6))
Notice how the add_one function takes one input. It then takes the input and adds one to it. It then returns the new result of that addition.
The addTogether function takes two inputs. It then adds those two inputs together and assigns the result to a new variable called result. It then returns that result.
Since the neither of these functions cause the value to display, we can instead call them inside of the display’s scroll method. This means we can pass functions through methods!
Not only can we use functions as arguments, we can also write functions that have conditionals as parameters using what is called the ternary operator. The familiar binary operators have 2 inputs. The ternary operator has three inputs: input1 if input2 else input3. Note that input2 is a condition. To see the ternary operator in action, check out the last few lines of the following program
#ternary

from microbit import *

def add_one(value):
    value = value + 1
    return value

while True:
    computation = add_one(5 if button_a.is_pressed() else 10)
    display.scroll(computation)
The result is stored to the variable called computation, then the value of computation is scrolled on the display.
So far, we’ve declared variables inside a function block—the indented portion of code that follows declaration of a function—which means they are local variables. Only the function declaring a local variable can see or modify it. Also, a local variable only exists while the function that declares it is using it. After that, it gets returned to unallocated memory so that another function (like loop) could use that memory for a different local variable.
If your program has to give more than one function access to a variable’s value, you can use global variables. To make a variable global, just declare it outside of any function, preferably immediately after your import statements. Then, all functions in the program will be able to modify or retrieve its value.
The next example script declares a global variable called k, assigns a value to it, and then uses its value from within a function. In contrast, the variable called value is a local variable and only exists within the add_k function. If you try to display.scroll(value), you will receive an error.
#store_retrieve_global
from microbit import *

k = 5

def add_k(value):
    value = value + k
    return value

display.scroll(add_k(3))
If you want to permanently change the global variable from within the function, you must use the keyword global to call upon the global variable. In the script store_change_retrieve, k is created as a global variable with the value 5 assigned. Each time k is called upon in the function add_k it gets incremented by 1.
#store_change_retrieve_global

from microbit import *

k = 5

def add_k(value):
    global k
    k += 1
    value = value + k
    return value

display.scroll(add_k(3))
display.scroll(add_k(3))

Links
[1] https://learn.parallax.com/tutorials/robot/cyberbot/software-setup-microbit
[2] https://learn.parallax.com/tutorials/robot/cyberbot/add-modules-your-microbt
[3] https://learn.parallax.com/tutorials/language/python/breadboard-setup-and-testing-microbit
[4] https://microbit-micropython.readthedocs.io/en/latest/