The Ping))) Ultrasonic Distance Sensor allows your ActivityBot to detect obstacles and measure the distance to them. Even though the PING))) sensor looks a bit like eyes, it is more like a mouth and an ear.
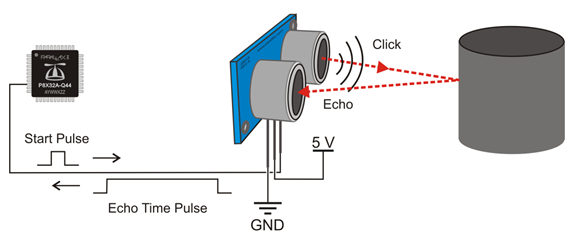
Much like a bat, the PING))) sensor emits an ultrasonic chirp when triggered, then listens for the chirp's echo and signals its return. The Propeller microcontroller can mark the time between triggering the PING))) sensor and getting a return signal. This echo return time can then be used to calculate the distance to an object.
This ability makes different ActivityBot navigation strategies possible, such as avoiding obstacles while roaming, or maintaining a set distance to an object that is moving.
In this activity, we will measure the distance to a variety of objects to get familiar with what the PING))) does, and does not, detect. The PING))) sensor needs power, ground, and one signal connection for the Propeller to get distance measurements.
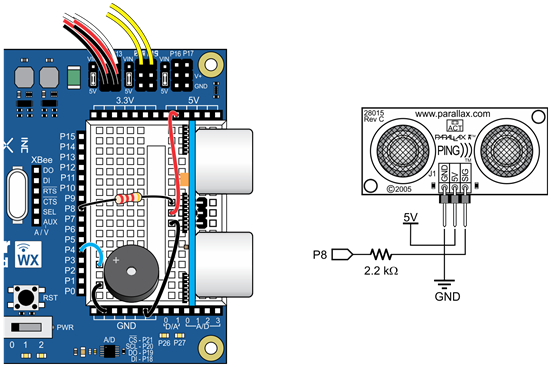
PING))) Sensor and Servo Ports—Do not connect to VIN. If you want to connect the PING))) sensor to a servo port (such as P16 or P17) with a 3-pin extension cable, be sure to set the port's power jumper to 5V first, or you could damage your sensor.
Each servo port includes a 3.9 k-ohm resistor in series with its Propeller I/O pin, so you would not need to include the 2.2 k-ohm resistor shown in the schematic for the breadboard circuit.
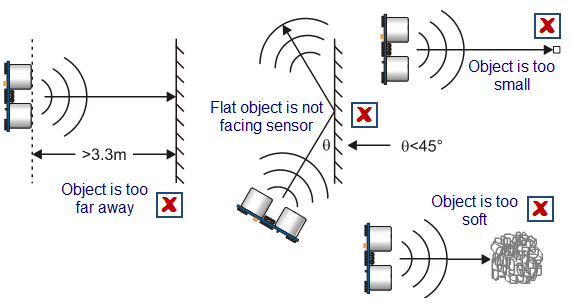
The PING))) sensor emits a very high-pitched chirp and then listens for an echo, much like a bat. By measuring the echo's return time, and using the speed of sound in the air, the Propeller microcontroller can determine the distance between the PING))) sensor and an object reflecting the chirp sound, up to 3.3 meters away. This is how your ActivityBot can navigate using sound.
Echo based navigation only works with objects that can reflect the sensor's chirps effectively. Small objects, or objects too far away, don't reflect enough sound. Soft items, such as curtains and stuffed animals, may muffle the sound and not bounce back an echo. Walls approached at a glancing angle will reflect the sound further away instead of back at the PING))) sensor. Hard-surfaced cylinders, ball-shaped obstacles, and walls faced directly reflect sound well.
Air temperature can affect the accuracy of the PING))) sensor's distance measurements. Check out our reference article [2] about the speed of sound vs. air temperature to learn more about why this happens.
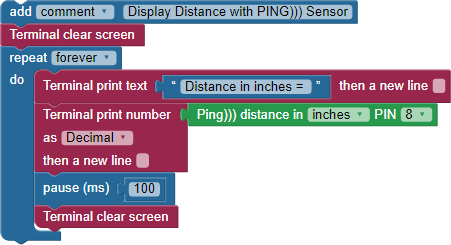
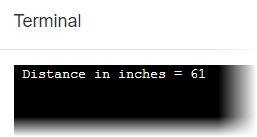
This program displays the PING))) distance measurements in the BlocklyProp Terminal. You can use it to test how well the PING))) sensor can detect various objects and walls at various angles. This will give you an idea of what your ActivityBot can and cannot do with this sensor.
The PING))) sensor gets a brief high/low signal called a start pulse from the Propeller chip to start the measurement. The sensor then makes its ultrasonic click and sets its SIG pin high. When the echo comes back, it sets its SIG pin low. The Propeller chip then can measure the duration of the PING))) sensor SIG pin's high signal, which corresponds to the echo return time.
The Ping distance block takes care of the math for converting the echo return time measurement to distance. In this program, the Ping distance block is plugged into a Terminal print number block, to display the measured value. The Terminal print number block comes just after a Terminal print text block, to add a label and measurement units for the displayed value. These two blocks are in a repeat forever block, along with a pause (ms) and Terminal clear screen block. The pause (ms) block slows down the repeat loop enough to get a smooth display, and the Terminal clear screen block keeps the value updated.
Sound is measured in hertz (Hz). The PING))) sensor emits chirps at 40 kHz, well above human hearing. Most young humans can hear frequencies between 20 Hz and 20 kHz, while some bats can hear frequencies up to 100 kHz. So, while you cannot audibly hear the PING))) sensor's chirps, a bat most likely could.
Even though the PING))) sensor uses a sound that is a higher frequency than a human can hear, lower frequency sounds can bounce off of objects, too. Watch this video about an incredible person who is blind, but can "see" using echolocation: BBC Earth: Blind man uses echolocation like a dolphin [3]. Although he was able to develop that sense himself, sensors like the PING))) can be used to help others with disabilities. Read this article showing a product that could help others: CNN: sonar sticks [4]. Can you think of other ways sensors can be used to help?
Since there is a piezospeaker on the board, let's use tones instead of the Terminal to express the distance measured by the PING))) sensor. The next program saves the block's value in a variable and then uses math to scale the measured distance to a frequency range played on the piezospeaker.
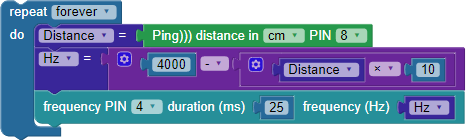
Take a closer look at the project above. Can you see how the Distance variable controls the Hz variable, with the help of two operators and two constants?
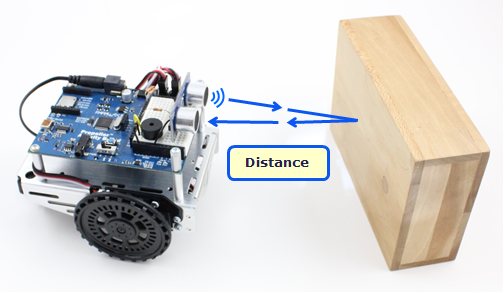
Now that you can measure centimeter distances with the PING))) sensor, and know which kinds of objects it can sense, let’s combine the sensor's input with the servo motor's output.
Our goal is for the ActivityBot to roam and avoid objects using sound with the PING))) sensor. In one way, this is an improvement over whisker-switch navigation, because the ActivityBot does not have to bump into objects to detect them.
But, there is a key difference: there were two whisker switches. With whiskers, the ActivityBot could tell whether an obstacle was on the left or the right, and then turn away in the opposite direction. The PING))) sensor returns a distance value but does not indicate whether the obstacle is more to the left or the right.
Let's start with test code that makes the ActivityBot turn right or left at random when an object comes within 20 cm. Once that is working and tuned, then you'll add blocks for roaming.
This example program makes the ActivityBot stay still until the PING))) measured distance is 20 cm or less. Then, it turns in place until it measures more than 20 cm, which means the robot turned until the object is no longer visible.
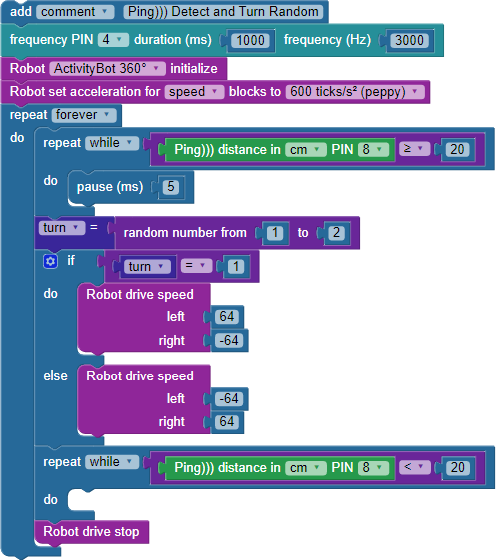
Since this code makes the robot drive, it begins with a frequency out block for the brownout indicator piezospeaker on P4. Next comes the required Robot ActivityBot initialize block. The Robot set acceleration block is set to a moderate 600 ticks/s2 to start.
The rest of the code is in a repeat forever loop. It begins with a repeat while loop. The while condition is a compare values block, checking to see if the value provided by the Ping distance block is greater than or equal to 20. If the answer is true, the code executes the pause 5 (ms) block and then checks the PING))) sensor again. This action will keep repeating, effectively putting code execution on standby until the while condition is no longer true.
When that happens, code execution drops down to the next block. The set variable block makes turn equal to a random number from 1 to 2. That's the BlocklyProp way of flipping a coin to decide which way the ActivityBot should turn. The "coin flip" is checked in the if...do...else...if block. If turn = 1 is true, then the block Robot drive speed left 64, right -64 gets executed, and the ActivityBot turns right. If turn = 1 is not true, then the block next to else is executed, and Robot drive speed left -64, right 64 makes the ActivityBot turn left.
The if...then...else...if block is followed by another repeat while loop. This time, the while condition checks if the Ping distance measurement is less than 20. The code execution stays in standby mode as long as this is true. Staying in standby mode allows the ActivityBot to continue its rotation maneuver until the PING))) sensor reports a measurement greater than 20, meaning that it has turned past the obstacle. Then, code execution continues to the Robot drive stop block which makes the ActivityBot quit turning.
Finally, the code execution returns to the top of the repeat forever loop, where it once again will sit still and check the PING))) distance every 5 ms until an object comes closer than 20 cm.
Redundant subsystems - Whiskers switches rely on touch, and the PING))) sensor relies on ultrasound. As you may have noticed, each one has advantages and disadvantages. In real-world control systems, different types of sensors that depend on various physical properties are often used together, which can help make the system more reliable under a wider variety of conditions. Where risk is low, redundant sub-systems can seem silly, like wearing a belt with a pair of suspenders. But where risk is high, redundant subsystems are critically important. Can you think of any examples?
By adding just two blocks, the example code above can free the ActivityBot to roam. Right now, the ActivityBot stays still unless it detects an object within 20 cm. All that is needed is a block that allows it to drive forward unless an object is detected within 20 cm. If an object is detected that close, it must stop driving forward before performing the turn-away maneuver.

Instead of finding and avoiding obstacles, this next project makes the ActivityBot follow a target. The same sensor system, using different code. The code checks for the desired distance, and if the object is further away than that, the ActivityBot moves forward. If the object is closer than the desired distance, the AcitivityBot moves backward. If the object’s distance is equal to the desired distance, the ActivityBot will maintain its position.
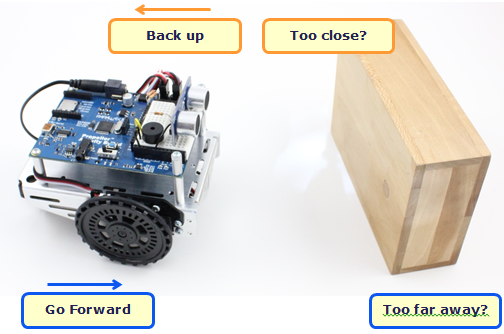
This example makes the ActivityBot try to keep a 32 cm distance between itself and an object in front of it. With no object detected, the robot will go forward until it finds one, then maintain that 32 cm distance. If you pull the object away from the ActivityBot, it will go forward again to catch up. Likewise, if you push the object toward it, it will back up to restore that 32 cm distance.
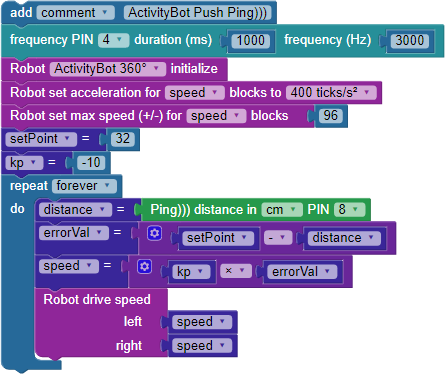
The program declares five variables: distance, setPoint, errorVal, kp, and speed.
The program starts off with the familiar comment block for the project title and frequency out block for the brownout indicator piezospeaker on P4.
After the required Robot ActivityBot initialize, two more blocks contribute to the robot's behavior. Robot set acceleration is set to 400 ticks/s2 which will help cushion sudden changes in speed. Robot drive max speed 96 makes sure that the Robot drive speed block caps its left and right inputs at +/-96, even if the attached speed variable exceeds 96 during runtime.
Two set variable blocks with number values attached come next: setPoint = 32 and kp = -10. These values do not change during runtime.
The rest of the code is inside a repeat forever block. This routine makes the ActivityBot maintain a distance between itself and the target object by repeating four steps very rapidly:
An automated system that maintains a desired physical output level is called a control system. In the case of our ActivityBot, maintained level is the distance between itself and the object in front of it. Many control systems use a feedback loop to maintain the level, and our ActivityBot is a prime example of this. The measured distance is fed back into the system and compared against the set point for calculating the next speed, and this happens over and over again in a process called a control loop.
Engineers use drawings like this block diagram to think through a control loop’s design and also to convey how it works to technicians and other engineers. If the set point (distance the ActivityBot tries to maintain) is 32 and the measured distance is 38, there is an error value. This error value is the set point – measured distance. That’s 32 – 38 = -6. This error is multiplied by a proportionality constant (kp) for an output that’s the speed to correct the error this time through the loop. That’s speed = kp x error value, or 60 = -10 x -6.
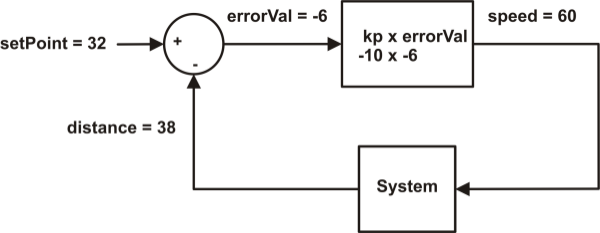
The circle is called a summing junction (for addition or subtraction), and the rectangular blocks designate operations that can vary. In this example, the top one is a proportional control block that multiplies error by a proportionality constant. The System block represents things we do not necessarily have control over, like if you move the object toward or away from the ActivityBot. Other common control blocks that were not used in this example are Integral, which allows corrections to build up over loop repetitions, and Derivative, which responds to sudden system changes.
It’s instructive to watch the relationship between errorVal and speed as the value of distance changes. We can use the Terminal to do this.
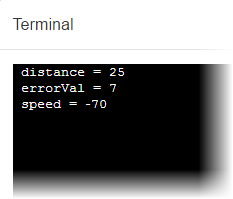
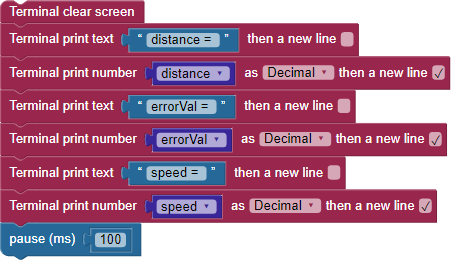
This modified project is for looking at data, not for navigation! Go back to Push Ping, or comment out the Terminal and pause blocks, if you want to return to the navigation activity.
There are lots of values to experiment with here. For example, if you change the setPoint variable from 32 to 20, the ActivityBot will try to maintain a distance of 20 cm between itself and an object in front of it. The value of kp can be increased to make it go faster to correct with smaller error distances, or slower to correct over larger error distances.
If you decrease the Robot set acceleration value, it will cushion the changes but could cause it to respond so slowly that it runs into the object. If you increase it, it will respond more abruptly. Too large, and it could change direction so fast that it could eject the Ping))) sensor from the breadboard.
Would increasing the Robot drive max speed help the ActivityBot keep up with a retreating object? Could decreasing Robot drive max speed too much hamper its response?

Links
[1] https://www.parallax.com/product/28015
[2] https://learn.parallax.com/reference/speed-sound-air-vs-temperature
[3] https://www.youtube.com/watch?v=2IKT2akh0Ng
[4] http://www.cnn.com/2014/06/20/tech/innovation/sonar-sticks-use-ultrasound-blind/index.html