This section shows you how to make your ActivityBot 360° move. It covers:
From here forward, we will be talking about the robot's right and left sides, and its front and back. These terms are from the perspective of a tiny person sitting on the white breadboard, with a hand on each post and feet dangling past the edge of the board.

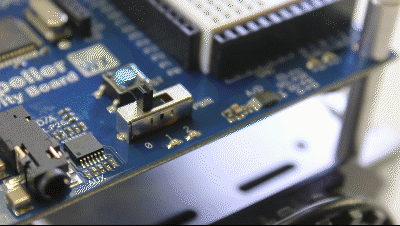
It's time to test your servos' feedback signal connections. If all is well, the example program below will cause the built-in LED on the Activity Board WX to blink on and off when you gently turn a wheel by hand.

Here are some symptoms and causes:
Calibration is optional, but it will improve the accuracy of driving maneuvers. This one-time calibration aids the Robot blocks in measuring and correcting distances and speeds, using information from the servo's feedback connection.
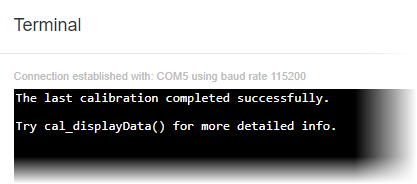
The calibration code takes about one minute to collect all of its data. You will need a smooth, and obstacle-free, floor area. While the calibration program is running, the ActivityBot 360° will pivot forward and backward, using only one wheel at a time. It will let you know when it's done by turning off its P26 and P27 lights (below the breadboard). This video shows an ActivityBot correctly performing the calibration.
IMPORTANT! USE FRESH BATTERIES FOR THIS STEP!

What if it didn't work?
If your robot did not move when you started the calibration program, or it started going backward first instead of forward, or if it started and stopped right away or just twitched, then double-check your electrical connections. You may have a servo cable or feedback signal wire plugged in incorrectly.
What if I need to restart or repeat the calibration?
To restart the calibration process, push the reset button any time while the P26 and P27 lights are on.
To repeat the calibration process once it has fully completed, you will need to use BlocklyProp to reload the program. That is because the program modifies itself at the end so that it cannot run a second time, which keeps your ActivityBot from trying to recalibrate the next time you turn power on to load a new program.
Notice that the Robot calibrate block does not have any sockets or plugs for connecting it to other blocks. It is meant to be used by itself without any other blocks in a program, and it takes care of the entire calibration process automatically.
The Robot calibrate block collects requested speed vs. measured speed data and stores it in a part of the Activity Board’s EEPROM memory, where it can retain data even after you turn the power off. That way, the calibration data is available every time you turn the robot back on.
Later, when your project includes Robot blocks that set a certain wheel speed, the underlying code will use the calibration data from EEPROM to start driving the motors at speeds close to what your program asks. That way the code doesn’t have to make large corrections, just small ones, which improves overall accuracy.
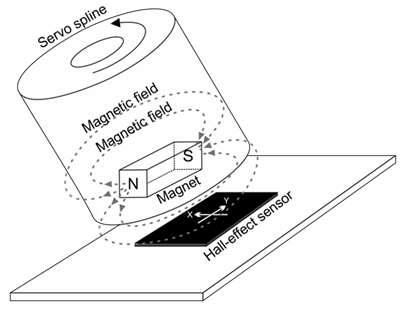
Encoders - An encoder converts information from one format to another. The ActivityBot's encoders convert wheel rotation or position into digital information that the Propeller microcontroller can use.
Encoder Ticks are not insects - Throughout this tutorial, you will see the term ticks when used to describe the ActivityBot's wheels turning. In this context, a tick means 1/64th of a wheel revolution. When the wheel makes one complete revolution, it has rotated 64 ticks. We use ticks per second to note how fast the wheels are turning. Ticks can also refer to distance traveled when considering the circumference of the ActivityBot wheel.
Feedback 360° Servo's Internal Encoders - Each Feedback 360° servo has a tiny magnet inside that is attached to the motor shaft. Also inside the servo's case is a Hall-effect sensor, which can detect changes in the position of the magnetic field as the motor shaft rotates. A tiny processor monitors the Hall-effect sensor and sends position information to the Propeller I/O pin. (For more details, see the Feedback 360° Servo product guide [1].)
There is a block that can check the ActivityBot's calibration data and tell you if there are any mistakes or problems with the ActivityBot's servo, encoder, and battery connections. If this test says the calibration was successful, your ActivityBot will be ready to run navigation programs. If not, then it will tell you what problem(s) it detects. After finding and fixing the problem, make sure to run both the calibration and this test again. Your ActivityBot will not be ready for navigation until it is calibrated AND it passes this test!

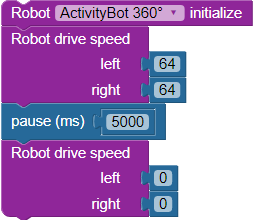
Now that you have successfully calibrated your ActivityBot 360°, it is time to run a simple test program to make it drive straight forward. The test code below makes both wheels rotate forward at 64 encoder ticks per second for 5 seconds, which should make your ActivityBot roll forward about 1 meter (3 ft.).
Your robot should travel forward for about 1 meter (3 ft.) in a straight line. You may see slight shifts as the robot adjusts its course based on encoder feedback.
The first block is Robot initialize, with the drop-down menu set to ActivityBot 360°. Place this block at the beginning of all projects that use other Robot set or Robot drive blocks.
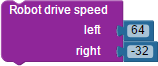
Next is a Robot drive speed block with the number value 64 attached to both its left and right sockets. This makes both the left wheel and right wheel rotate forward at a rate of 64 ticks per second. The pause 5000 block allows the ActivityBot to drive forward at this rate for 5000 ms (5 seconds). After that, a second Robot drive speed block stops the right and left wheels with the number values 0, 0. We will explore this next.
The Robot drive distance block tells the ActivityBot 360° how far each wheel should turn. It is intended for projects where the goal is to drive specific distances and turn specific angles. You can use positive values for forward distances and negative values for backward ones.
The default distance unit for Robot drive distance is 3.25 mm ticks. Inches and centimeters are also options in the drop-down menu. The example below shows how to make the ActivityBot roll forward 208 mm by setting the left and right distances for 64 ticks. We've used this value because 64 x 3.25 mm = 208 mm.

The Robot drive distance block will make the ActivityBot move:
Here are some examples – look carefully at the sign (+/-) of each value:

The ActivityBot 360° wheel circumference is 208 mm, so a full turn makes the wheel travel that far. A single tick is equal to 1/64th of a full turn, and 1/64th of 208 mm works out to 3.25 mm.
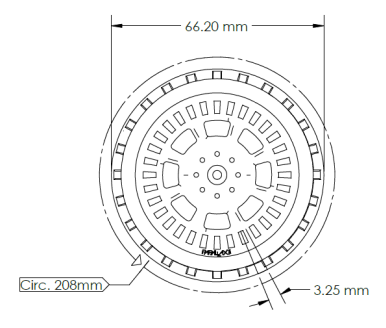
If you know how far you want your ActivityBot 360° to roll, you could divide the distance by 3.25 mm (or 0.325 cm or 0.00325 m) to find out how many ticks your program needs to tell the ActivityBot to travel.
ticks = distance mm ÷ 3.25 mm/tick
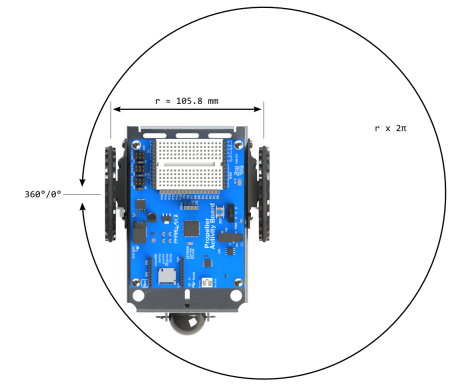
The ActivityBot 360° pivot turning radius is the distance between the wheels. Ideally, it's 105.8 mm, but that will vary slightly with the shape of each aluminum chassis and also with how the servos are mounted. The left wheel will have to turn 2 × π × r to make the ActivityBot pivot by a full circle while holding the right wheel still. In this case, the r is the turning radius, so that’s 2 × π × 105.8 mm ≈ 664.76 mm.
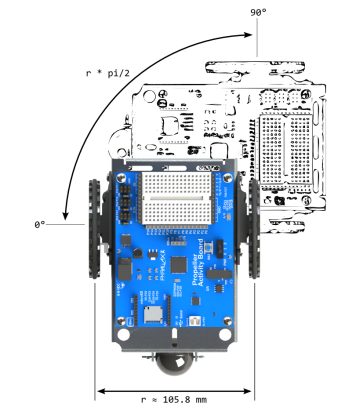
Keep in mind that the turning radius will be slightly different for each ActivityBot 360°, so you may have to tune the number of ticks for a 1/4 turn. For example, your robot's turning radius might need 50, 52, or 53 ticks to get as close as possible to a 1/4 turn.
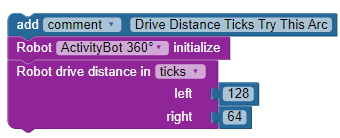
This test code makes your robot go forward 128 ticks, and then make a 51-tick, 1/4 turn, to face 90- degrees to the right.

First comes the comment block noting the project name. Next, the frequency out block for the piezospeaker on P4 acts as a low-battery brown-out indicator.
After the required Robot initialize block, there are two Robot drive distance blocks, set to measure distance in ticks.
The first Robot drive distance block moves both wheels forward with left 128 and right 128. Since 128 is enough ticks for two full wheel revolutions, the forward distance traveled is 3.25 x 128 = 416 mm, or about 16 inches.
The second Robot drive distance block uses left 26 and right -25 to move the wheels in opposite directions. As explained above, that is a combined 51 ticks, causing the ActivityBot 360° to rotate in place, turning 90 degrees to the right.
Drive the distance, no distractions — The Robot drive distance block must complete the wheel turns for its target distance before it stops the motors. Only then will it allow the cog's code execution to continue to the next block. This behavior is called blocking, meaning that it makes the cog wait until it is complete before allowing the program the cog is running to continue. It's a lot like pause and frequency out, except that we know precisely how long each of those blocks will take. With Robot drive distance, we don't necessarily know the exact amount of time a given maneuver will take.
Set your speed limit! — The Robot drive speed block is introduced on another page. Unlike the Robot drive distance block, the Robot drive speed block is non-blocking. It sets the speed and then immediately moves to the next block as it maintains the wheel speeds you have set.
Unit Options — The Robot drive distance block's inches and centimeters options work only with the wheels that come with the ActivityBot robot. If you use wheels with a different circumference, the distance traveled per tick will change.
Line, arc, pivot, rotate in place — The values you use affects the path the ActivityBot takes. Use the same values for a straight line. For example 64, 64 makes the ActivityBot go forward. -64, -64 makes it go backward. Use different values for arcs, like 128, 64. To pivot on one wheel, set one of the two values to 0. To make the ActivityBot rotate in place, use positive values, like 26, -26.
Let's try making the ActivityBot 360° navigate some basic shapes:
By repeating the forward and 90-degree turn maneuver 4 times, the program can make the ActivityBot draw a square.

Repeat x times need to change from 4 to 3, and -26 and 25 values need to change to make 120 degree turns instead of 90-degree turns.
Here is some arc code.
An example course is shown below. To run this particular course, the ActivityBot must perform the following maneuvers:

The Robot drive distance block was good for fixed courses and maneuvers. The Robot drive speed block lends itself to navigation with sensors. The simplest way to use it is to attach a number value block to its left and right fields. Each number indicates how fast each wheel should turn in units of ticks per second. Remember, each tick is 1/64th of a wheel turn and moves the ActivityBot's wheel by 3.25 mm.
After setting the wheel speeds, the Robot drive speed block allows the Propeller to execute whatever block comes next immediately. So, if you want your ActivityBot 360° to keep going at a specific speed for a certain amount of time, add a pause (ms) block between Robot drive speed and the next block that sets wheel speeds.
Here are some other tips to remember:
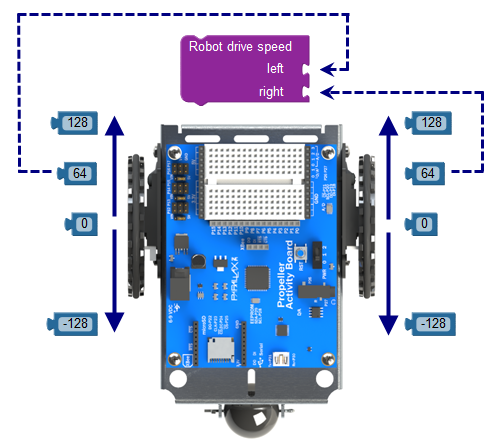
Wheel direction in the rest of this tutorial refers ONLY to turning forward with positive speed values, or backward with negative speed values. It does NOT refer to clockwise or counterclockwise rotation of the individual wheel. A positive value will cause a wheel to turn in the robot's forward direction. A negative value will make it turn in the robot's backward direction.
This short example makes the ActivityBot 360° go straight forward at medium speed (64 ticks/s) for 3 seconds. After that, it makes the robot go backward faster (-96 ticks/s) for 2 s. After that, it stops.
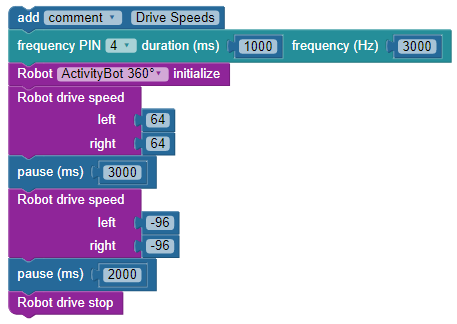
Your ActivityBot 360° should drive forward for 3 seconds, then backward more quickly for 2 seconds.
Did you expect your robot to return to its exact starting position? It stands to reason since 64 x 3 = 192 and -96 x 2 = -192. In a perfect world, that would be 192 ticks forward followed by 192 ticks backward.
In reality, it takes time to speed up during the 3 seconds. During the next 2 seconds, the ActivityBot has to slow down, then speed back up in reverse. So, its reverse distance traveled will be a little less. As was stated previously, when the goal is to travel a certain distance, you should use the Robot drive distance block. It accounts for speeding up, cruising speed, and slowing down. The Robot drive speed block only works to maintain wheel speeds.
The comment block holds the project's name. Next, the frequency out block makes a beep on the P4 piezospeaker to let you know the program has started running. The Robot initialize block is required before using other robot navigation blocks. These three blocks will appear together at the top of most programs that make the ActivityBot move.
The next five blocks define the ActivityBot's maneuvers.
Enforcing the speed limit — No matter what values you attach to Robot drive speed left and right, the C code underlying BlocklyProp will use a maximum value of +/- 128. For most applications, +/- 96 is a better maximum value. If you want to lower the maximum value, you can put a Robot set max speed block at the top of your project, which can be useful if you attach variables or equations for the left and right speed values.
Just keep on rolling — Robot drive speed is a "set-it-and-forget-it" block. It starts the wheels turning at the chosen speed, and then code execution immediately continues with the next block that follows. The wheels will keep turning at that speed until another Robot drive block changes or stops them.
Speed vs. velocity — Velocity is like speed, but it can be either positive (forward motion) or negative (backward motion). Speed itself is just velocity without the sign that indicates direction; velocity's absolute value.
Little things add up — A small variation between what you want your ActivityBot to do and what it does may go unnoticed once or twice, such as going just beyond a target distance or stopping short of a rotation angle. But when these small differences happen one after another, their accumulated effect can be noticeable. Sometimes referred to as error propagation, it is an important concept in robotics, programming, and engineering. And, you may run into it sooner than you think!
Later, your ActivityBot will have to do things such as executing turns until its obstacle sensor gives the all clear. In that kind of situation, the Robot drive speed block will set the servo speeds to make the ActivityBot turn in place. Since Robot drive speed is "set-it-and-forget-it," the program can immediately move on to blocks that monitor sensors. After the sensor detects an opening, the program can go back to a Robot drive speed block that makes the ActivityBot drive forward again.
So, let's try making the ActivityBot turn in place after going forward by using left 52 and right -52 in the second Robot drive speed block. The left 52 will cause the left wheel to slow slightly, from 64 to 52 ticks per second. The right -52 will cause the left wheel turn backward at 52 ticks per second, making the robot turn right. In this example, we are using a pause (ms) 500 block to make the robot turn in place for a fixed amount of time. Just keep in mind that later, this turning in place time will be determined other things, for example when a sensor detects an opening.
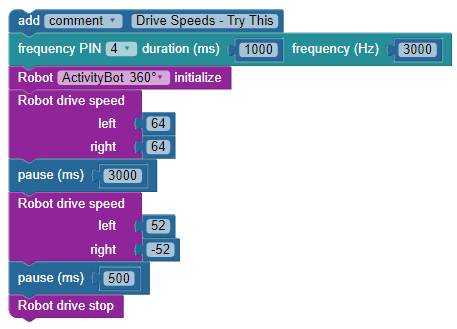
Without any stops and pauses, the ActivityBot's motions seem to blend. If you ever need motions to be more distinct while using the Robot drive speed block, you can add a Robot drive stop and a short pause (ms) block after each maneuver.
Doing this will give the ActivityBot time to stop after going forward for 3 seconds, and before making the turn.
Another example of something your ActivityBot might do with sensors is to go down a corridor, check for openings to the left and right, and then return. You can make the ActivityBot do this by combining portions of the two example programs on this page.
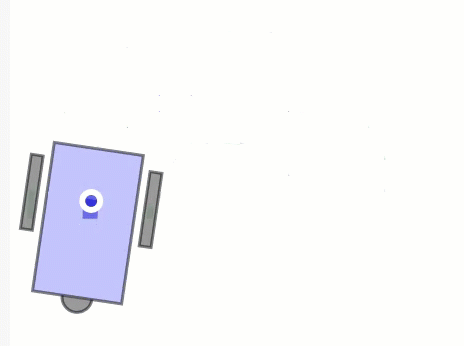
The example program on the previous page moved the ActivityBot's wheels at the same speed but opposite directions - one forward and one backward - to make the robot turn. Other wheel speed/direction combinations perform other kinds of turning maneuvers. Turning maneuvers can be grouped into three general categories:
Wheel speeds are equal, but velocity is opposite to make the ActivityBot turn about its center. This rotation is great for making the robot face a new direction in a tight place and without changing its position. Imagine a pen going through the center of the ActivityBot's "axle." A rotating turn would not draw any curved lines; it would just rotate on this point making the dot darker! You could think of this as an arc with a radius of zero.
One wheel turns forward or backward while the other stays still. Now the center of the circle is the wheel that is not moving, and the ActivityBot pivots about this point. An imaginary pen through the center of the robot would draw a circle with a radius equal to half of the ActivityBot's wheelbase of about 106 mm.

With arcs, both wheels are turning but at different speeds. They may be moving in the same or opposite directions.
Opposite-direction tight arcs: If the wheels are going in opposite directions, the arc created by our imaginary centroid-pen would have a radius between zero (if the speeds were almost the same like a rotating turn) and 53 mm (if one wheel speed is set to almost zero, like a pivot turn).
Same-direction wide arcs: If the wheels are turning different speeds but the same direction. Going back to the imaginary centroid-pen, the radius of such arcs can be anything from about 53 mm to theoretically infinite. The closer the speeds are to each other, the larger the arc radius will be. (Of course, if the speeds are equal, the trajectory is straight.)
This program progresses through the four types of turns described above. The ActivityBot will come to a stop and beep between each type of turn so you can more easily see the relationship between the blocks and the maneuvers.
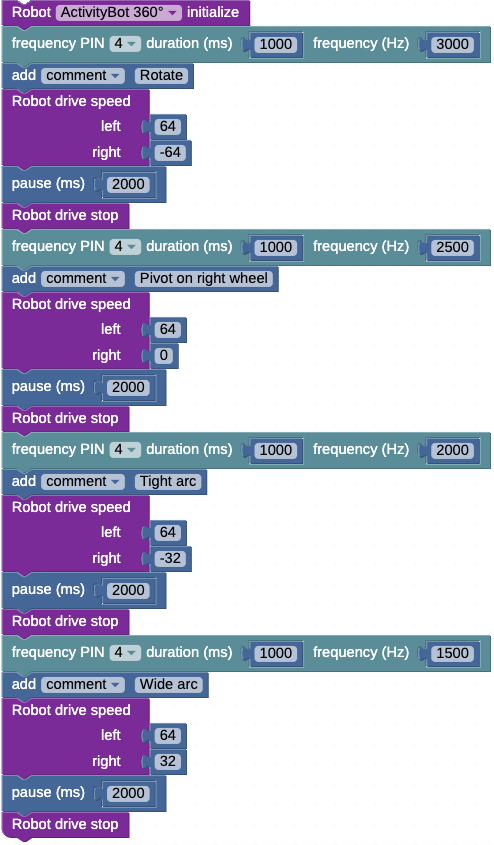
After the required Robot initialize block, the rest of the code is divided into four sections of five blocks each.
Variable Speeds — The Robot drive speed block will accept any block for its left or right fields that resolves into a number value, such as variables and equations. Using a variable for a driving speed can allow the maneuvers to change during runtime without additional blocks. Remember also that the block's underlying C code libraries automatically limit the range to +/- 128, and that you can limit the range further with the Robot set max speed block.
The following example project keeps one wheel's speed steady while gradually reducing the other with a variable. Can you predict what the maneuver will be like?
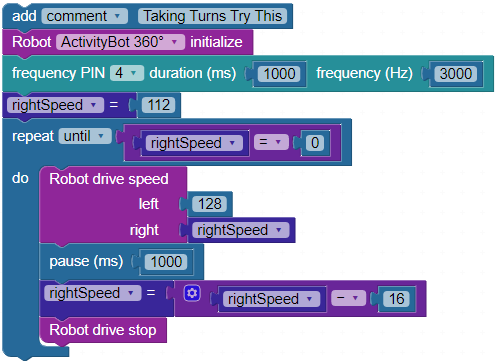
Did your ActivityBot do what you predicted?
To thoroughly understand turning maneuvers, make copies of the Taking Turns project under new names, and try the following variations:
Acceleration is a measurement of how quickly something speeds up or slows down. The ActivityBot's acceleration can be adjusted, which will be important in some robotic applications. Some examples:
The ActivityBot robot's acceleration can be adjusted with the Robot set acceleration block.

Choose the speed option for use with Robot drive speed blocks, choose distance for use with Robot drive distance blocks. The acceleration setting for distance maneuvers is typically slower to help improve accuracy. The acceleration setting for speed is usually a little faster to give the robot more peppy responses in sensor navigation.
You can also change the maximum speed limits for Robot drive speed and Robot drive distance maneuvers.

The default speed limit for Robot drive speed is 128 ticks per second. Even though your code can change the speed at any time, there are some cases when sensors and variables might work together to ask for some unreasonably high speeds. Limiting the speed with this block can prevent some "runaway" conditions.
The default speed limit for Robot drive distance maneuvers is 64 ticks per second. That's the cruising speed the ActivityBot reaches while on its way to its distance goal, unless you use this block to change it. For transporting a drink, it might be safer to pick a slower cruising speed. In a timed dead reckoning navigation contest, you might want to experiment with higher cruising speeds.
This example sets the acceleration and cruising speed for Robot drive distance blocks to high values while it drives forward, then resets to low values while it drives backwards. The overall traveled for both maneuvers is the same, so the ActivityBot returns to where it starts. As you watch your robot go, pay close attention to two things:

The first block in the program is a comment noting the project name. The second block is frequency out, which makes a piezospeaker tone. If that tone plays in the middle of the program instead of at the beginning, it could indicate that the batteries are low. The third block is the required ActivityBot initialize. These first three blocks are used in all example programs that make the ActivityBot move.
Next, Robot set acceleration block is configured for distance at 600 ticks/s2. The Robot set max speed block is set for distance, at 128. That determines the Robot drive distance block's target cruising speed, which is 2 full revolutions per second. After these settings, the first Robot drive distance block makes the ActivityBot go 256 ticks forward. The high acceleration setting causes the ActivityBot to speed up and slow down abruptly, while the high Robot set speed setting directs the ActivityBot to use a high cruising speed to travel the distance.
When your robot completes the first maneuver, the next set of Robot set acceleration and Robot set max speed blocks have much lower values. Then, a Robot drive distance block tells the ActivityBot to back up the same distance it just went forward, 256 ticks. You will see that with the new acceleration setting of just just, 50 ticks/s2, the ActivityBot only gradually speeds up and slows down. With the new max speed of just 64, the cruising speed is slower.
What's in a name? — The acceleration setting in the Robot set acceleration block is in units of ticks per second squared. It does not matter if your Robot drive distance blocks are also using ticks, or centimeters, or inches. The result will be the same.
Setting the acceleration Robot drive speed blocks is about the same as it is for distance maneuvers. The next project shows the effect that different acceleration settings have, when speed and drive time are the same.
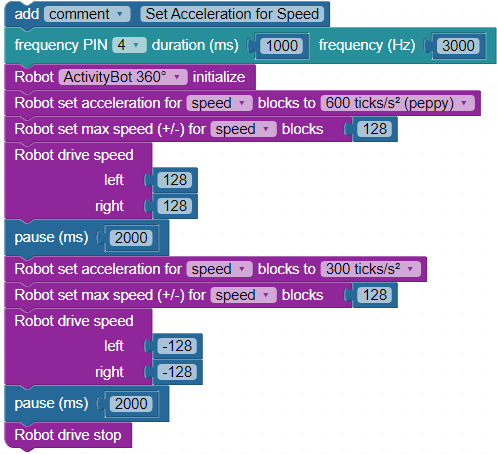
This time, the robot does not make it back to where it started. The robot drive speeds were the same in both directions (+/- 128) and the drive time was the same, pause (ms) 2000. So what happened? Going forward, the acceleration setting was 600 ticks/s2 but going backwards, the setting was only 300 ticks/s2. The slower acceleration rate makes it take longer for the robot to reach full cruising speed, so it wasn't able to travel the same distance in the same amount of time.
Now, let's add the effect of constraining the max speed in the driving-backward maneuver.
After driving forward the same distance as last time, how far did it make it back? It should stop even further from the starting point. Why?

Links
[1] https://www.parallax.com/downloads/parallax-feedback-360%C2%B0-high-speed-servo-product-guide