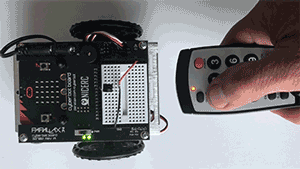
An Infrared Remote is the easiest way to add wireless control to your cyber:bot. This example lets you drive the robot nine different directions using the numbers on the remote. Once you know how the code works, you can extend the use of the remote control for other purposes. You could start the robot in a contest and then change the behavior: adjust speeds, enable different sensors, turn LEDs on or off. Take a look at the video below to see what you’re in for!
Build and test your cyber:bot, following all Prerequisite and Main tutorials up to Navigation with the cyber:bot. If you know how to program your cyber:bot with drive speeds to move different directions then you’re ready to try this project.
You will know how to write a script that makes your cyber:bot respond to remote button presses with the behaviors you assign. That could be motion, LED matrix pictures, or sound effects.
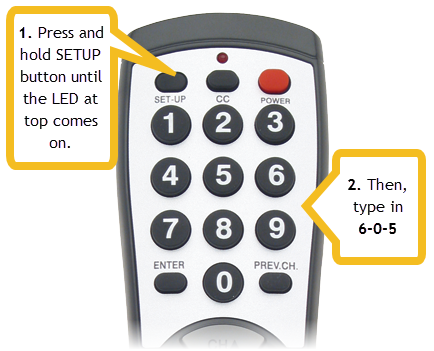
Let's set up your remote!
The remote you are using must be configured to send Sony-compatible infrared signals. The cyber:bot Python code provided for this project makes the cyber:bot recognize Sony IR remote signals only!
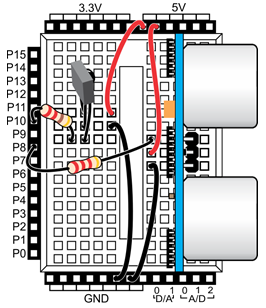
If you have not used the IR Receivers with your cyber:bot before, take a look at the pictures below. The infrared receiver needs three connections: 5 V, GND, and an I/O pin to read the signal it sends.
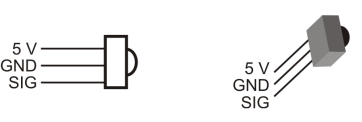
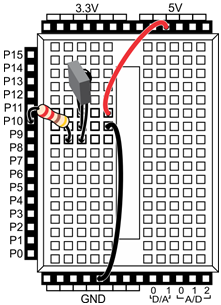

The circuitry inside the infrared receiver makes it safe to connect its signal pin to the cyber:bot PCB with a small resistor, even though the sensor is powered by 5 V
Let's check that your infrared receiver circuit is wired properly and that your remote was programmed correctly. This program displays the numbers from the infrared remote on the micro:bit’s LED display. This example provides an easy way to determine the number associated with each key on the remote (especially the non-numbered CH and VOL keys).
# IR_Remote_Test.py

from cyberbot import *
from tv_remote import *

bot(22).tone(2000, 300)

while True:
    num = ir(10).remote()
    if num > -1:
        display.scroll( str(num), 75, wait=False )
    sleep(100)
IR Interference — Are you seeing numbers appear on the micro:bit LED matrix when you are NOT pressing any numbers on the remote?
First, check to see if you are getting a syntax error report from your micro:bit.
If that’s not the problem, your IR receiver might be getting signals similar to a TV remote’s signals from some other source. The most common culprit is overhead fluorescent light fixtures. If possible, turn them off or try taking your robot to a different area.
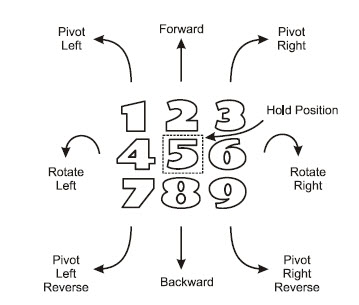
With the next program, use buttons 1-9 to drive the robot in different directions. Once you press a button, your robot will drive in that direction until you choose another direction. Press 5 to make it stop.
# IR_Remote_Control.py

from cyberbot import *
from tv_remote import *

wL = 0
wR = 0
img = Image.HAPPY

bot(22).tone(2000, 300)

while True:
    num = ir(10).remote()

    if num == 1:
        wL = 0
        wR = -75
        img = Image.ARROW_SE
    elif num == 2:
        wL = 75
        wR = -75
        img = Image.ARROW_S
    elif num == 3:
        wL=75
        wR=0
        img=Image.ARROW_SW
    elif num == 4:
        wL=-75
        wR=-75
        img=Image.ARROW_E
    elif num == 5:
        wL=0
        wR=0
        img=Image.HAPPY
    elif num == 6:
        wL=75
        wR=75
        img=Image.ARROW_W
    elif num == 7:
        wL=0
        wR=75
        img=Image.ARROW_NE
    elif num == 8:
        wL=-75
        wR=75
        img=Image.ARROW_N
    elif num == 9:
        wL=-75
        wR=0
        img=Image.ARROW_NW

    display.show(img)
    bot(18).servo_speed(wL)
    bot(19).servo_speed(wR)
The remote flashes its IR LED on/off very rapidly—at 38.5 kHz—for certain periods of time, with periods of off-time in between. The combinations of these pulses are received by the micro:bit as the number pressed, not a series of pulses. How does this work exactly?
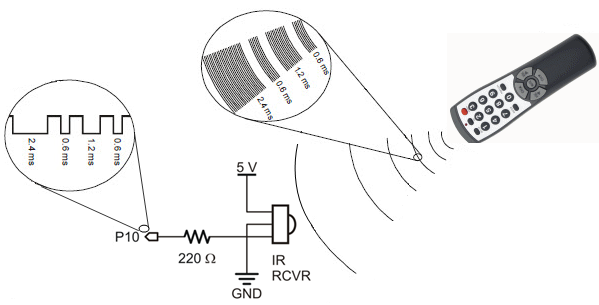
The IR receiver is sensitive to bursts of 38.5 kHz infrared light, and responds by outputting a 5V high signal. The Propeller I/O pin, P10 in this case, measures how long each high signal lasts. The Propeller's cyberbot firmware interprets the high signal patterns, and then works with the tv_remote.py library to match the patterns to different buttons on your remote.
Our program IR_Remote_Control.py begins by initializing the variables wL and wR to zero, and the variable img to image.HAPPY. After a quick beep, the bulk of the code is a while True: loop. Inside the loop, num = ir(10).remote() checks to see which remote button press is detected and stores the result in the variable num. Next, a long if...elif series uses the value of num to select new values for wL and wR as well as an image to display
The new values of wL, wR, and img are passed to the display.show(img), bot(18).servo_speed(wL) and bot(19).servo_speed (wR) calls, so the robot drives off with in a new direction with an updated display until the next new remote button press is detected.
More Actions for More Keys? — There are more buttons on the remote, so you can add more robot behaviors to your project, such as making sound effects on the piezospeaker. However, there is a catch! Keep in mind that when the cyber:bot is generating frequencies on the piezospeaker, it can’t do anything else, like check to see if you have pressed a new button on the remote. The exception is that the servos will maintain the last speed setting they received until they get a new one.
The script IR_Remote_Control.py makes your cyber:bot drive in whatever direction you send it — even into walls. If you have a Ping))) sensor, you can give your 'bot a bit of self-preservation behavior.
Additional parts needed:
The Ping))) sensor can go directly into the breadboard.
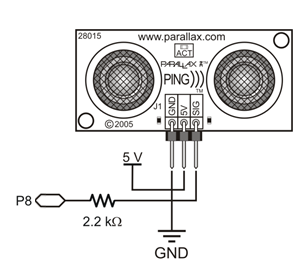
The script # IR_Remote_Control_with_Ping.py is just an expansion of the original. Up top, it adds from ping import *. Then, it takes the entire contents of the while True: loop and wraps it in a nested conditional while loop. This inner loop only executes while (ping(8).distance('cm')) > 15:. If that condition is not true, meaning you have driven your cyber:bot close too an object, some new lines of code at the bottom of the conditional loop make the cyber:bot express its surprise and turn away until the obstacle is no longer detected.
# IR_Remote_Control_with_Ping.py

from cyberbot import *
from tv_remote import *
from ping import *

wL = 0
wR = 0
img = Image.HAPPY

bot(22).tone(2000, 300)

while True:

    while (ping(8).distance('cm')) > 15:
        num = ir(10).remote()

        if num == 1:
            wL = 0
            wR = -75
            img = Image.ARROW_SE
        elif num == 2:
            wL = 75
            wR = -75
            img = Image.ARROW_S
        elif num == 3:
            wL=75
            wR=0
            img=Image.ARROW_SW
        elif num == 4:
            wL=-75
            wR=-75
            img=Image.ARROW_E
        elif num == 5:
            wL=0
            wR=0
            img=Image.HAPPY
        elif num == 6:
            wL=75
            wR=75
            img=Image.ARROW_W
        elif num == 7:
            wL=0
            wR=75
            img=Image.ARROW_NE
        elif num == 8:
            wL=-75
            wR=75
            img=Image.ARROW_N
        elif num == 9:
            wL=-75
            wR=0
            img=Image.ARROW_NW

        display.show(img)
        bot(18).servo_speed(wL)
        bot(19).servo_speed(wR)

    display.show(Image.SURPRISED)
    bot(18).servo_speed(-50)
    bot(19).servo_speed(-50)
    bot(22).tone(500, 1000)

Links
[1] https://www.parallax.com/product/32700
[2] https://www.parallax.com/product/020-00001
[3] https://learn.parallax.com/tutorials/robot/cyberbot/add-modules-your-microbit