In a previous tutorial, the cyber:bot used whiskers to get around, but they only detect obstacles when the robot bumps into something. Wouldn’t it be better if the cyber:bot could just “see” objects and then decide what to do about them?
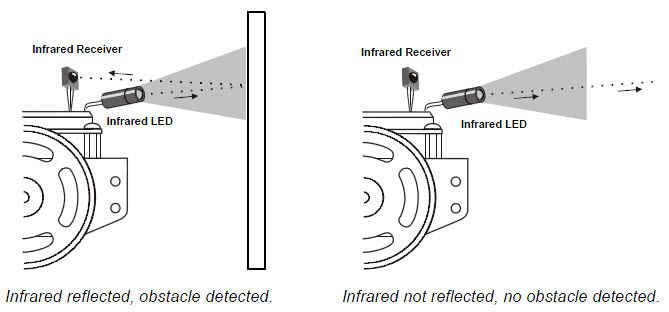
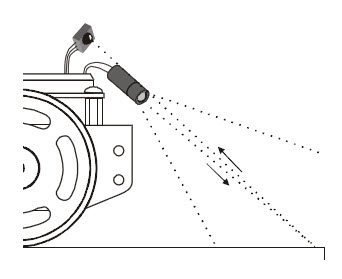
Well, that’s what it can do with infrared headlights and eyes like the ones shown below. Each headlight is an infrared LED inside a tube that directs the light forward, just like a flashlight. Each eye is an infrared receiver that sends the micro:bit module high/low signals to indicate whether it detects the infrared LED’s light reflected off an object.
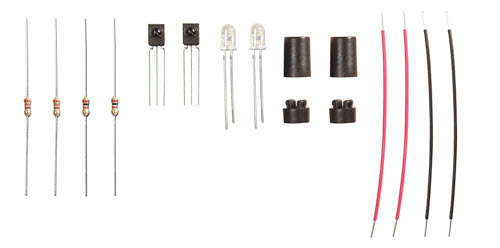
You will need:
You will then be ready to combine infrared navigation with other cyber:bot capabilities. You might also be interested in the project Control your cyber:bot with an Infrared TV Remote [1].
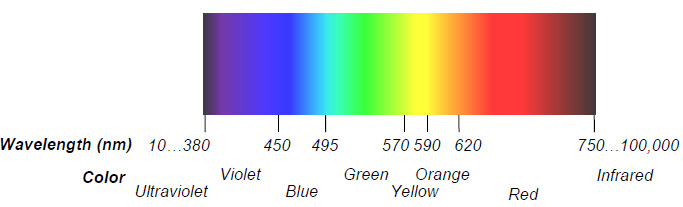
Infrared is abbreviated IR, and it is light the human eye cannot detect. The IR LEDs introduced in this chapter emit infrared light, just like the red LEDs we’ve been using emit visible light, but at a different wavelength.
The infrared receivers in this chapter detect infrared light, similar to the phototransistors in the tutorial Visible Light Navigation for the cyber:bot [2]. But, there’s a difference—these infrared receivers are not just detecting ambient light, they are designed to detect infrared light flashing on and off very quickly.
The infrared LED that the cyber:bot will use as a tiny headlight is actually the same one you can find in just about any TV remote. The TV remote flashes the IR LED to send messages to your TV. The microcontroller in your TV picks up those messages with an infrared receiver like the one your cyber:bot will use.
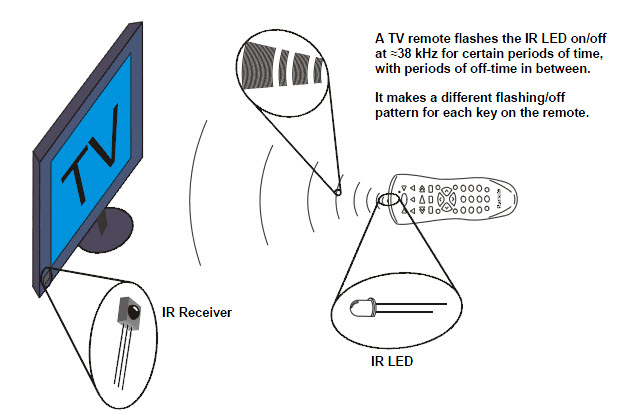
The TV remote sends messages by flashing the IR LED very fast, at a rate of about 38 kHz (about 38,000 times per second). The IR receiver only responds to infrared if it’s flashing at this rate. This prevents infrared from sources like the sun and incandescent lights from being misinterpreted as messages from the remote. So, to send signals that the IR receiver can detect, your Propeller chip will have to flash the IR LED on/off at 38 kHz.
Some fluorescent lights do generate signals that can be detected by the IR receivers.
These lights can cause problems for your cyber:bot’s infrared headlights. One of the things you will do in this chapter is develop an infrared interference “sniffer” that you can use to test the fluorescent lights near your cyber:bot courses.
The light sensors inside most digital cameras, including cell phones and webcams, can all detect infrared light. By looking through a digital camera, we can “see” if an infrared LED is on or off. These photos show an example with a digital camera and a TV remote. When you press and hold a button on the remote and point the IR LED into the digital camera’s lens, it displays the infrared LED as a flashing, bright white light.
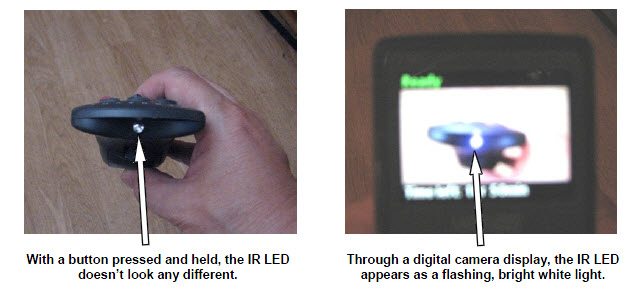
The pixel sensors inside the digital camera detect red, green, and blue light levels, and the processor adds up those levels to determine each pixel’s color and brightness. Regardless of whether a pixel sensor detects red, green, or blue, it detects infrared. Since all three pixel color sensors also detect infrared, the digital camera display mixes all the colors together, which results in white.
Infra means below, so infrared means below red.
The name refers to the fact that the frequency of infrared light waves is less than the frequency of red light waves. The wavelength our IR LED transmits is 980 nanometers (abbreviated nm), and that’s the same wavelength our IR receiver detects. This wavelength is in the near-infrared range. The far-infrared range is 2000 to 10,000 nm, and certain wavelengths in this range are used for night-vision goggles and IR temperature sensing.
In this activity, you will build infrared object detector circuits on the cyber:bot robot's breadboard.
Parts List
(2) IR receivers
(2) IR LEDs (clear case)
(2) IR LED shield assemblies
(2) Resistors, 220 Ω (red-red-brown)
(2) Resistors, 2 kΩ (red-black-red)
(misc) Jumper wires
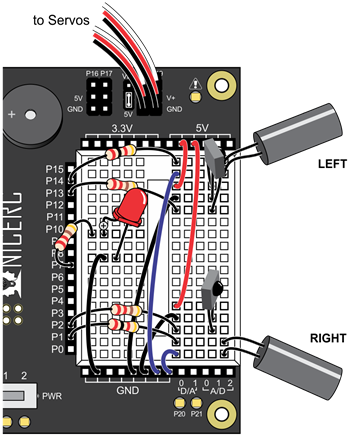
Gather the parts in the Parts List, using the drawings below to help identify the infrared receivers, LEDs, and shield assembly parts.
Make sure you are using infrared LEDs and not phototransistors. The infrared LED has a taller and more rounded plastic dome:
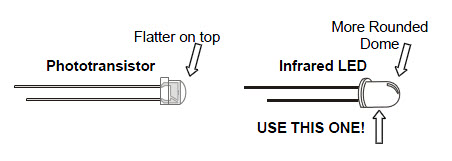
The infrared LEDs are designed to sit in the standoff tubes a certain way. The flat spot on the LED dome matches a flat ledge inside the tube. Holes on the bottom of the tube are labeled for the anode (+) and cathode (-) leads.
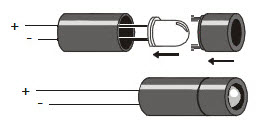
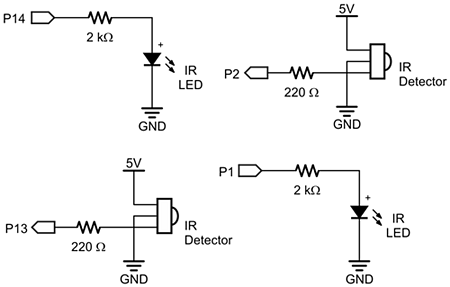
Each IR object detector requires its own IR LED and IR receiver, mounted together on a corner of the breadboard closest to the very front of the cyber:bot.
Note that the anode lead of each IR LED connects to a 2 kΩ resistor (red-black-red). Also note that each IR LED and each IR receiver has its own ground connection wire. In the diagram, the IR LED ground wires are shown in blue to help tell them apart.
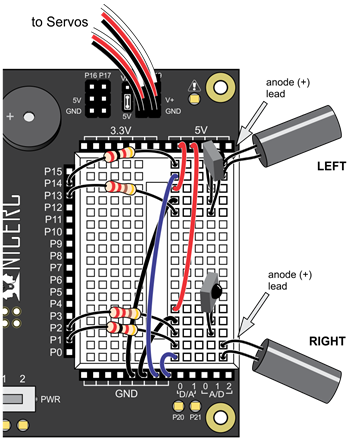
Watch your IR LED anodes and cathodes!
The anode lead is the longer lead on an IR LED by convention. The cathode lead is shorter and mounted in the plastic case closer to its flat spot. These are the same conventions as the red LEDs in the kit.
Object detection with the IR LED and receiver circuits you built on your cyber:bot takes three steps:
The function ir_detect handles all of these steps for us. Here is an example from our next script:
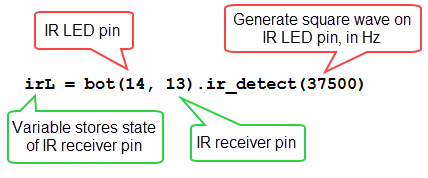
The ir_detect function generates a square wave on the IR LED pin; here the arguments specify a 37500 Hz signal on P14. This square wave last about 2 milliseconds. Then, the function checks the state of the IR receiver pin; P13 in this example, and stores the result in the variable irL. The state of the IR receiver pin. IR receiver detects a reflection of the 37500 Hz infrared light signal, irL will store a zero, and if not, irL will store a 1— remember that this receiver is an "active low" sensor.
This script only tests the cyber:bot’s left IR detector. Focusing on only one of the two object detector circuits at a time helps simplify trouble-shooting. This is yet another example of subsystem testing. After the subsystems check out, we can move to system integration. But first, let's make sure to test and correct any wiring or code entry errors that might have crept in.
#test_left_IR

from cyberbot import *

while True:
    irL = bot(14, 13).ir_detect(37500)
    bot(20).write_digital(irL)
Once the script is fully flashed and running, the cyber:bot board, the LED labeled P20 should come on.
Now it is time to modify the script to test the right-side object detector.
#test_both_IR_indicators

from cyberbot import *

bot(22).tone(3000, 1000)

while True:
    irL = bot(14, 13).ir_detect(37500)
    irR = bot(1, 2).ir_detect(37500)
    bot(20).write_digital(irL)
    bot(21).write_digital(irR)
You might have found that your cyber:bot said it detected something even though nothing was in range. That may mean a nearby device is generating some IR light at a frequency close to 37.5 kHz. It might also mean that direct sunlight streaming through a window is causing false detections.
If you try to have a cyber:bot contest or demonstration near one of these light sources, your infrared systems could end up performing very poorly! So, before any public demo, make sure to check the prospective navigation area with this IR interference “sniffer” script ahead of time.
The concept behind this script is simple: don’t transmit any IR through the IR LEDs, just monitor to see if any IR is detected. If IR is detected, sound the alarm using the piezospeaker.
Many handheld remotes generate IR interference.
Many TVs, VCRs, CD/DVD players, and projectors use the same type of IR detectors you have on your cyber:bot right now. Look at the end of the device's remote for an LED. If it is the kind of remote that must point directly at the device with a clear line of sight to work, it is likely using infrared. Try pointing it at your cyber:bot and repeatedly press/release one of the remote’s buttons to generate IR interference.
With this script, your cyber:bot will play a tone and turn on its indicator LEDs if it detects IR 37.5 kHz infrared signals. Since the script does not turn on the IR LEDs on the cyber:bot breadboard, a response means the IR interference has to be coming from an outside source.
If you are in a classroom, you can test with a separate cyber:bot that’s running test_both_IR_indicators. Just point its IR LEDs into the IR_interference_sniffer bot’s IR receivers.
If you don’t have a second cyber:bot, just use a handheld IR remote for a TV, VCR, CD/DVD player, or projector. Simply point the remote at the cyber:bot and repeatedly press and release one of its buttons. If the cyber:bot responds by sounding the alarm, you know your IR interference sniffer is working.
# IR_interference_sniffer

from cyberbot import *

while True:
    while bot(2).read_digital() and bot(13).read_digital():
        bot(20).write_digital(0)
        bot(21).write_digital(0)
    bot(20).write_digital(1)
    bot(21).write_digital(1)
    bot(22).tone(4000, 20)
    sleep(20)
Always use this IR_interference_sniffer script to make sure that any area where you are using the cyber:bot is free of infrared interference.
When it is dark outside, you may have noticed that a brighter flashlight lets you see objects that are further away. By making the cyber:bot’s infrared LED headlights brighter, you can also increase its detection range. A smaller resistor allows more current to flow through an LED. More current through an LED is what causes it to glow more brightly. In this activity, you will examine the effect of different resistance values with both the red and infrared LEDs.
Parts List
(2) Resistors, 470 Ω (yellow-violet-brown)
(2) Resistors, 220 Ω (red-red-brown)
(2) Resistors, 1 kΩ (brown-black-red)
(2) Resistors, 4.7 kΩ (yellow-violet-red)
(1) Red LED
(1) Misc. Jumper Wire
Piece of white paper
Ruler
First, let’s use a red LED to actually see the difference that a resistor makes in how brightly an LED glows. All we need to test the LED circuit is a script that sends a high signal to an LED.
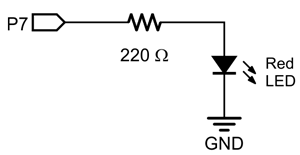
# P7_led_on

from cyberbot import *

bot(7).write_digital(1)
As you work, put the cyber:bot board's power switch in position 0 for changing resistors, and position 1 for running the test. Also, the same script will run when you reconnect power, so you can pick up right where you left off with each test.
We now know that less series resistance will make an LED glow more brightly. A reasonable hypothesis would be that brighter IR LEDs can make it possible to detect objects that are further away.
#test_both_IR_indicators

from cyberbot import *

bot(22).tone(3000, 1000)

while True:
    irL = bot(14, 13).ir_detect(37500)
    irR = bot(1, 2).ir_detect(37500)
    bot(20).write_digital(irL)
    bot(21).write_digital(irR)
You will need two each of the resistor values you used with the red LED test, along with a piece of paper and a ruler. The goal is to measure the object detection distance for different resistor values in series with the IR LEDs. As you work, remember to put the cyber:bot board's power switch in position 0 for changing resistors, and position 1 for running the test. Remember also that the same script will run when you reconnect power, so you can pick up right where you left off with each test.
| Series Resistance on IR LED | Maximum Detection Distance |
| 4700 (yellow-violet-red) | |
| 2000 (red-black-red) | |
| 1000 (brown black-red) | |
| 470 (yellow-violet-brown) | |
| 220 (red-red-brown) |
An interesting thing about these IR detectors is that their outputs are just like the whiskers. When no object is detected, the output is high; when an object is detected, the output is low. You could modify the script roaming_with_whiskers so that it works with the IR detectors with just a few changes. Here are the steps it takes:
    irL = bot(14, 13).ir_detect(37500)
    irR = bot(1, 2).ir_detect(37500)
    if irL == 0 and irR == 0:
        backwards()
        right()
    elif irL == 1 and irR == 0:
        backwards()
        left()
    elif irL == 0 and irR == 1:
        backwards()
        right()
    else:
        forward()
# roaming_with_IR

from cyberbot import *

def forward():
    bot(18).servo_speed(75)
    bot(19).servo_speed(-75)

def backwards():
    bot(18).servo_speed(-75)
    bot(19).servo_speed(75)
    sleep(250)

def right():
    bot(18).servo_speed(75)
    bot(19).servo_speed(75)
    sleep(250)

def left():
    bot(18).servo_speed(-75)
    bot(19).servo_speed(-75)
    sleep(250)

while True:
    irL = bot(14, 13).ir_detect(37500)
    irR = bot(1, 2).ir_detect(37500)

    if irL == 0 and irR == 0:
        backwards()
        right()
    elif irL == 1 and irR == 0:
        backwards()
        left()
    elif irL == 0 and irR == 1:
        backwards()
        right()
    else:
        forward()
The style of pre-programmed maneuvers from the last activity were fine for whiskers, but are unnecessarily slow when using the IR detectors. With whiskers, the cyber:bot had to make contact and then back up to navigate around obstacles. With infrared, your cyber:bot will detect most obstacles before it runs into them, and can just find a clear path around the obstacle.
As your cyber:bot navigates, it will execute a series of small turns to avoid an obstacle before it ever runs into it. With that approach, the cyber:bot never turns further than it has to, and it can neatly find its way around obstacles and successfully navigate more complex courses. After experimenting with this next script, you’ll likely agree that it’s a much better way for your cyber:bot to roam.
# fast_IR_roaming

from cyberbot import *

def forward():
    bot(18).servo_speed(75)
    bot(19).servo_speed(-75)

def backwards():
    bot(18).servo_speed(-75)
    bot(19).servo_speed(75)
    sleep(20)

def right():
    bot(18).servo_speed(75)
    bot(19).servo_speed(None)
    sleep(20)

def left():
    bot(18).servo_speed(None)
    bot(19).servo_speed(-75)
    sleep(20)

while True:
    irL = bot(14, 13).ir_detect(37500)
    irR = bot(1, 2).ir_detect(37500)

    if irL == 0 and irR == 0:
        backwards()
    elif irL == 1 and irR == 0:
        left()
    elif irL == 0 and irR == 1:
        right()
    else:
        forward()
Though this script has a similar structure to roaming_with_IR, there are three key changes that improved performance:
Up to this point in the tutorial, your cyber:bot been been programmed to look slightly upwards and take evasive maneuvers when an object is detected. The component position and code can also be modified to look downward and take evasive maneuvers when an object is not detected, such as the surface it is driving on.
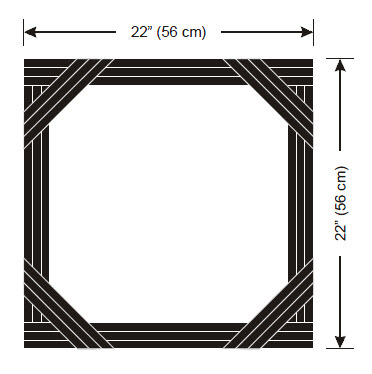
This capability would allow your cyber:bot to roam on a table without driving over the edge. However, driving off a table accidentally while experimenting could certainly be harmful to your cyber:bot. So, we will take advantage of a property of infrared light. Infrared light is absorbed by most black surfaces, and reflects off of most light-colored surfaces. By making a wide black border around a white surface, we can simulate a drop-off without putting the cyber:bot in any danger of falling.
Recommended Materials for a Simulated Drop-off
(1) Roll of black vinyl electrical tape, ¾″ (19 mm) wide, or black tempera paint and brush.
(1) Sheet of white poster board, 22 x 28 in (56 x 71 cm).
Ther are no new components or circuit changes needed for this application, just an adjustment to the position of the existing parts.
A sheet of white poster board with a border made of electrical tape or black tempera paint makes for a handy way to simulate the drop-off presented by a table edge, with much less risk to your cyber:bot.
#test_both_IR_indicators

from cyberbot import *

bot(22).tone(3000, 1000)

while True:
    irL = bot(14, 13).ir_detect(37500)
    irR = bot(1, 2).ir_detect(37500)
    bot(20).write_digital(irL)
    bot(21).write_digital(irR)
If the cyber:bot still "sees" the electrical tape too clearly, here are a few remedies:
If you are using older IR LEDs, the cyber:bot might actually be having problems with being too nearsighted. Here are some remedies that will make it more far sighted:
For the most part, programming your cyber:bot to navigate around the virtual drop-off without going over the simulated edge is a matter of adjusting the if statements from the script fast_IR_roaming.
First of all, instead of backing up, it will need to go forward 20 ms at a time when it sees objects with both detectors.
It will also need to turn toward objects instead of away from them, and it will need to turn for more than 20 ms when it sees the drop-off. 375 ms turns seem to work well, but it will be up to you to adjust that value for best performance.
# avoid_table_edge

from cyberbot import *

def forward():
    bot(18).servo_speed(75)
    bot(19).servo_speed(-75)
    sleep(20)

def backwards():
    bot(18).servo_speed(-75)
    bot(19).servo_speed(75)
    sleep(250)

def right():
    bot(18).servo_speed(75)
    bot(19).servo_speed(None)
    sleep(375)

def left():
    bot(18).servo_speed(None)
    bot(19).servo_speed(-75)
    sleep(375)

while True:
    irL = bot(14, 13).ir_detect(37500)
    irR = bot(1, 2).ir_detect(37500)

    if irL == 0 and irR == 0:
        forward()
    elif irL == 1 and irR == 0:
        right()
    elif irL == 0 and irR == 1:
        left()
    else:
        backwards()
The script avoid_table_edge is just the script fast_IR_roaming with a modified if statement in its while True loop.
The condition that used to go forward for 20 ms now backs up for 250 ms. Likewise, the condition that used to back up now goes forward for 20 ms. Also, the condition that used to call for a 20 ms right turn now calls for a 375 ms left turn, and the condition that used to call for a 20 ms left turn now calls for a 375 ms right turn.
Let’s look at the two statements side by side:
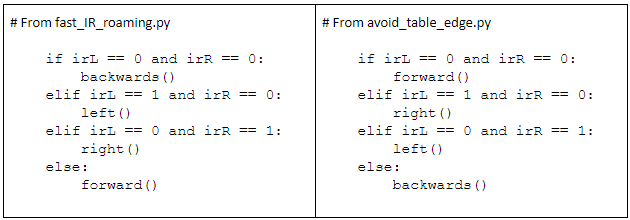
In response to if irL == 0 and irR == 0, the script fast_IR_roaming backs up because both IR detectors see an obstacle. In contrast, the script avoid_table_edge goes forward because both IR detectors see the table, which means it’s safe to move forward for another 20 ms.
In response to else if irL == 0 and and irR == 1, the script fast_IR_roaming turns right for 20 ms, taking a step toward avoiding an obstacle on the left, while avoid_table_edge turns away from a drop-off that must be on its right.
Also, irR == 0 and irL == 1, fast_IR_roaming turns left for 20 ms, taking an incremental step toward avoiding an obstacle on the right while avoid_table_edge has the cyber:bot turning right.
Lastly, any other condition has the fast_IR_roaming driving forward while the avoid_table_edge goes backwards away from the table’s edge.
The turns to avoid the table edge can be adjusted for different applications. For example, if the cyber:bot is supposed to hug the edge of the table, smaller turns might be useful. In a contest where the cyber:bot is supposed to push objects out of an area, a larger turn (but not too large) would be better so that it zigzags back and forth across the table.
You can modify the code to make shallower turns by using a smaller sleep function argument. For example, if you change the 375 in the left()function to 300, it will make shallower left turns. If you change it to 450, it will make sharper left turns.
Drive your cyber:bot on an actual tabletop at your own risk!If you try a tabletop after success with the electrical tape or paint course:

Links
[1] https://learn.parallax.com/tutorials/control-your-cyberbot-infrared-tv-remote
[2] https://learn.parallax.com/tutorials/robot/cyberbot/visible-light-navigation-cyberbot