Each, micro:bit has a built-in radio it can use to exchange data. This tutorial shows how to use the MicroPython radio module’s methods to make micro:bits exchange text. It also includes examples that change the radio channel, and a bidirectional texting app.
You will need:
Complete this tutorial first:
You will be able to write MicroPython scripts that make micro:bit modules send and receive messages with their built-in radios. Your scripts will also be able to change channels to access different data streams.
After this, you will also be ready to move on to the next tutorials (coming soon!):
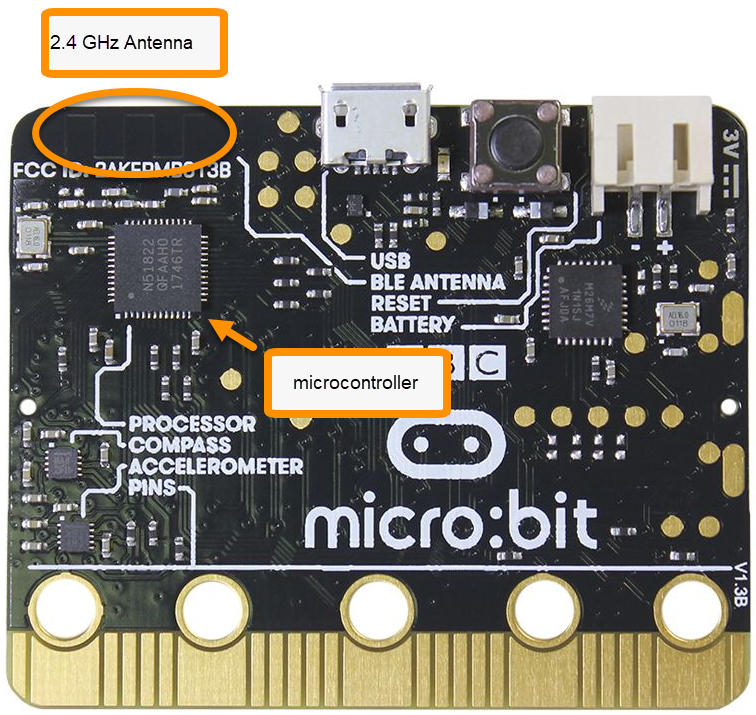
The micro:bit module’s main microcontroller is called the Nordic nRF51822 system on a chip (SOC). It’s the processor that runs your MicroPython scripts, but it also has a built-in radio. In MicroPython, this radio can work with either the Bluetooth or the Nordic Gazell communication protocols.
Bluetooth makes devices like wireless earbuds, mice, and keyboards pair with devices like computers, tablets and phones. After pairing, the two devices work much like their “wired” counterparts.
Nordic’s Gazell protocol allows more than just two micro:bit modules to be part of the conversation, and it also takes fewer memory resources, making room for more statements in your scripts.
A communication protocol is a set of rules two devices can follow to exchange information.
Bluetooth is named after a 10th Century Viking king named Harald “Bluetooth” Gormsson, who brought together various Danish tribes into a kingdom. Now, computers and phones use Bluetooth to bring various other devices together with its radio communication protocol.
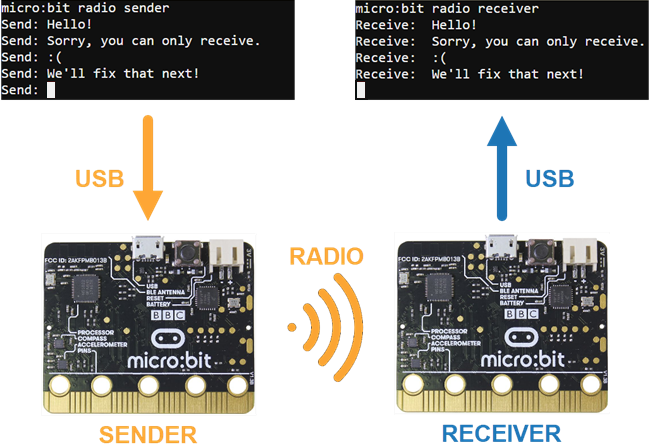
In this activity, a script will make one micro:bit repeatedly send messages through its radio. Another micro:bit will run a different script that receives those radio messages and prints them to its terminal.
This block diagram shows how the one-direction application will work. The sender micro:bit prints its activity to the terminal, but that’s just so you can verify that its script is running. The important part is that the sender micro:bit transmits radio messages to a receiver micro:bit. That receiver micro:bit prints the messages it receives to its own terminal, where you can check and verify the radio data exchange.
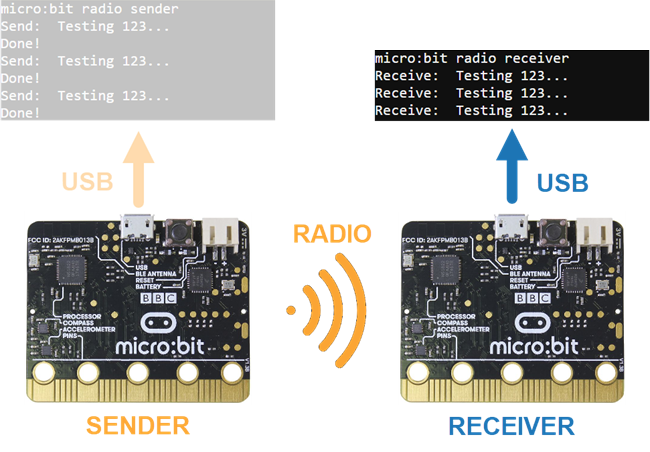
The best way to get started with testing the radio connection is to make one micro:bit module repeatedly broadcast messages. Once this script is running, the next section will have you load a script that receives radio messages and prints messages into a different micro:bit.
IMPORTANT! If you are doing this in a classroom, start with ONLY ONE micro:bit transmitting messages by running the script in this section. All the rest of the micro:bit modules should be running the script in the next section that receives and displays the messages.
Not sure how to connect? Go to the Scripts that Print to Terminal [6] page and follow the instructions in the Make Sure Online Editor Is Connected section.
# send_radio_test_message
from microbit import *
import radio
radio.on()
radio.config(channel = 7)
sleep(1000)
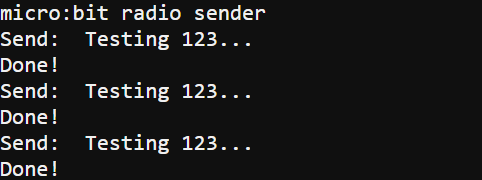
print("micro:bit radio sender")
while True:
message = "Testing 123..."
print("Send: ", message)
radio.send(message)
print("Done!")
sleep(2000)
Let’s take a closer look at statements you probably haven’t seen in earlier activities. The first is:
from microbit import *
import radio
This imports the micro:bit radio module so that your script can call its methods. Like the microbit and display modules, the radio module is part of MicroPython. So, you don’t need to manually add a module to the project. Just type import radio, and move on!
Since the radio takes power to run, it is turned off by default. This makes micro:bit applications that use batteries last longer. The radio.on() method call turns on the radio. After that, the radio can broadcast and receive messages. Keep in mind that it will also draw more current and discharge a battery supply more quickly.
radio.on()
The radio module’s config method allows you to configure the radio in many different ways. Some examples include radio transmit power, maximum message length, maximum number of incoming messages to store, and the channel setting.
In this activity, we are just using the channel setting, which can be set from 0 to 83. Keep in mind that micro:bit modules can only radio-communicate when they are set to the same channel. Let’s say that one pair of micro:bit modules is running scripts with channel = 10, and a second pair is using channel = 20. The channel = 10 micro:bit modules will not receive any messages sent by the channel = 20 micro:bit modules, and vice-versa. The Did You Know section later in this tutorial has more info about channels.
radio.config(channel = 7)
(In later activities, you will use the group and address settings to set up wireless networks. They will allow micro:bit modules to communicate in pairs or groups, even when they are sharing the same channel.)
The message = "Testing 123…" statement creates a variable that stores a string with the “Testing 123…” characters. Next, print("Send: ", message) displays Send: Testing 123… in the terminal. Then, radio.send(message) uses the micro:bit radio to broadcast that “Testing 123…” text in the message variable.
message = "Testing 123..."
print("Send: ", message)
radio.send(message)
What do you think would happen if you replaced the three lines above with this?
radio.send("Testing 123…")
Although it would transmit the same message, you’d also have to update the print statement. When it came time to change the message, you’d also have to do it by hand in two places.
Before repeating the loop, print("Done!") makes the terminal tell you that the script has reached the line that follows radio.send. It’s a way to verify that the message was sent by the radio. The sleep(2000) makes it so messages are only broadcasted every 2 seconds.
print("Done!")
sleep(2000)
Now that we’ve got one micro:bit broadcasting radio messages every 2 seconds, let’s program another micro:bit to receive those messages and display them in the terminal. Both micro:bit modules have to be running their scripts at the same time. The radio receiver micro:bit will also have to be connected to a terminal so that it can print what it receives.
Now, you are ready to load a script into a second micro:bit for receiving radio messages.
# receive_radio_test_message
from microbit import *
import radio
radio.on()
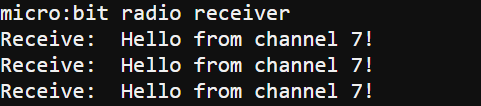
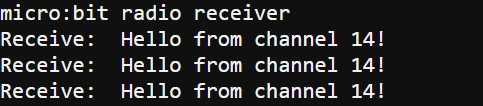
radio.config(channel = 7)
sleep(1000)
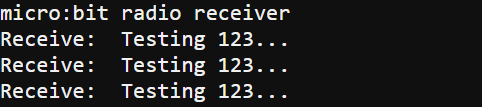
print("micro:bit radio receiver")
while True:
message = radio.receive()
if message is not None:
print("Receive: ", message)
The micro:bit that’s receiving messages has to be set to the same channel as the one that’s sending messages.
radio.config(channel = 7)
Inside this while true loop, the statements will repeatedly check to find out if the radio received a message. It will only print a message it received to the terminal once, and then go back to waiting for the next message.
while True:
A message variable is created and set to the result returned by radio.receive() returns. If a radio message was received, that result is a string. If no radio messages were received, that result is None.
message = radio.receive()
If the message variable is None at this point, the script will skip the statement that displays the message. On the other hand, if message has a string, the script will print it in the terminal. That’s because if message is not None: only executes statements below and indented from it if radio.receive() copied a string into the message variable.
if message is not None:
        print("Receive: ", message)
If the message variable does have a string, display it in the terminal with print(“Receive: “, message).
The channel = 7 setting is actually the default channel. Classrooms with micro:bit modules can set up more than one broadcasting module, each set to a different channel that sends a different message. The rest of the class can run receiver scripts that “tune in” to one of those broadcasting channels. For best results, keep the channels as widely separated as possible. For example, if there are five broadcasting micro:bit modules, use channels 0, 20, 40, 60, and 80. Each one should broadcast a unique message so that students can verify which micro:bit they are receiving messages from.
RF is an abbreviation for radio frequency.
The sender micro:bit is broadcasting. Broadcasting is one-to-many communication. One broadcasting unit, many receivers. True, if you just have one receiver, it’s actually one-to-one communication. However, if you have more than one micro:bit, they can also run scripts that receive and print, which makes it one-to-many.
The micro:bit has other built-in network configurations. The config method also has address= and group= settings. You can use them in scripts to set up networks on the same channel. That way, each micro:bit can use the group and/or address setting to reach only the micro:bit that is in a given group and has a specific address. You will use these in later activities.
Here’s an excerpt from the micro:bit MicroPython Radio reference:
The channel (default=7) can be an integer value from 0 to 83 (inclusive) that defines an arbitrary “channel” to which the radio is tuned. Messages will be sent via this channel and only messages received via this channel will be put onto the incoming message queue. Each step is 1MHz wide, based at 2400MHz.
2400 MHz is a radio frequency that reverses the voltage applied to the antenna at 2400-million times per second. It’s another way of saying 2.4 GHz, which is 2.4-billion times per second. In terms of the numbers:
2400 M = 24 million = 2400 * 1,000,000 = 2,400,000,000
2.4 G = 2.4 billion = 2.4 * 1,000,000,000 = 2,400,000,000
Channel 0 sets the radio frequency to 2400 MHz, channel 1 to 2401 MHz, and so on up to channel 83 at 2483 MHz. In terms of GHz, that’s 2.401, 2.402, and so on through 2.483 GHz.
The channel setting also makes it possible to avoid a particular Wi-Fi network that might be crowding the band with radio traffic. Wireless routers use channels 1 through 14, with frequencies of 2412 through 2484 MHz (2.412 through 2.484 GHz).
Changing frequencies is a common practice for aircraft and watercraft radio operators. As airplanes near certain airports, their pilots will switch their radio frequencies to communicate on the airport’s channel. The same applies to ships which use certain radio channels when communicating offshore and other channels when in certain ports.
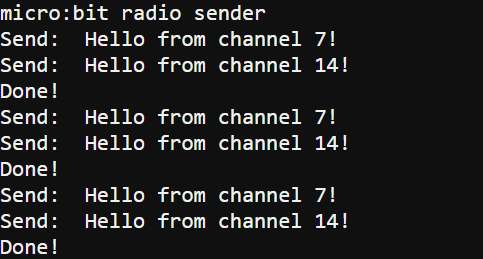
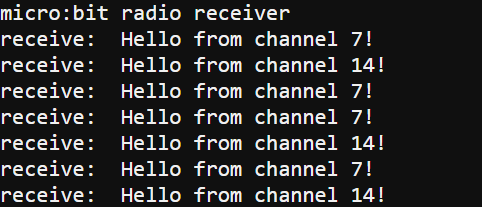
The send_radio_test_message script can be modified to send different messages on different channels. Then, the receiver micro:bit will then display only the messages that go to whatever channel it’s set to.
# send_radio_test_message_try_this      # change

from microbit import *
import radio

radio.on()

sleep(1000)

print("micro:bit radio sender")

while True:
    radio.config(channel = 7)           # move to here
    message = "Hello from channel 7!"   # change
    print("Send: ", message)
    radio.send(message)

    sleep(1000)                         # add

    radio.config(channel = 14)          # add
    message = "Hello from channel 14!"  # add
    print("Send: ", message)            # add
    radio.send(message)                 # add

    print("Done!")
    sleep(1000)                         # change
radio.config(channel = 7)
radio.config(channel = 14)
The transmitter code in the Try This section is frequency hopping. For frequency hopping to work, both the transmitter and the receiver radios automatically cycle through a sequence of frequencies. It’s one step they can take to make it more difficult for others to listen in on conversations, and it’s especially important for law enforcement. In modern radios, the sequence of frequencies changes thousands of times per second.
Can you modify the script receive_radio_test_message_try_this to sync with the send_radio_test_message_try_this script's frequency hopping? If you succeed, your script will capture and display messages from both channels.
Change the radio.config call at the start of the program so that it uses a variable to set the frequency, like this:
ch = 7                                # add
radio.config(channel = ch)            # change
After the print("Receive: ", message) line, add an if...elif... statement that checks the current channel and changes it to the next channel if it recieved a message. Be careful to make sure your if...elif indentation lines up correctly with print so that it’s also part of the if message is not None block:
        print("Receive: ", message)
        if ch == 7:                   # add
            ch = 14                   # add
        elif ch == 14:                # add
            ch = 7                    # add
        radio.config(channel = ch)    # add
In this activity, you will first try an application of one-way (unidirectional) texting between terminals through a micro:bit-to-micro:bit radio link. Then, you will then expand it for two-way (bidirectional) texting.
Here is the block diagram for unidirectional texting. You will type text into the terminal connected to the sender micro:bit. The sender micro:bit's script will input those messages from the terminal and broadcast them with its radio. The receiver micro:bit will receive those messages, and print them to the terminal it’s connected to.
This activity is similar to the previous one since you’ll need to have two micro:bit modules running at the same time. But now, they both have to be connected to USB ports and terminal apps at the same time. So, you will either need to use two computers, each with a micro:bit connected to its USB, or use one computer with two micro:bit modules connected to two USB different ports and two browsers, each with a terminal app.
Time to choose your hardware setup!
If you accidentally connect both browsers to the same micro:bit, you might need to unplug/replug their UB cables and repeat the browser connecting steps.
It is time to decide which micro:bit you want to be the sender and which one you want to be the receiver. You will start with the browser connected to the receiver micro:bit
Now, you will use the browser connected to the sender micro:bit.
# text_terminal_to_radio

from microbit import *
import radio

radio.on()
radio.config(channel = 7)

sleep(1000)

print("micro:bit radio sender")

while True:
    message = input("Send: ")
    radio.send(message)
Sender terminal
Receiver terminal
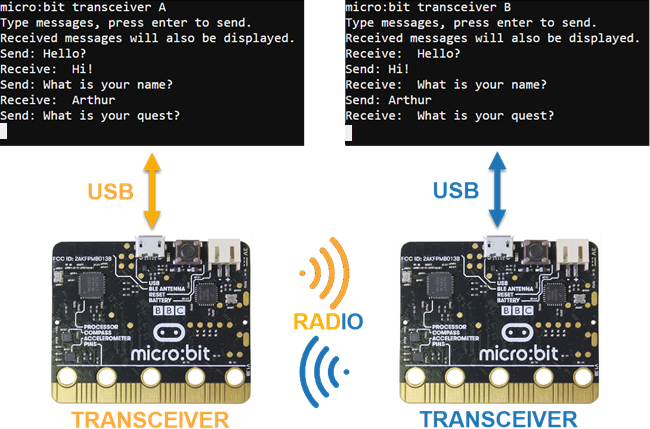
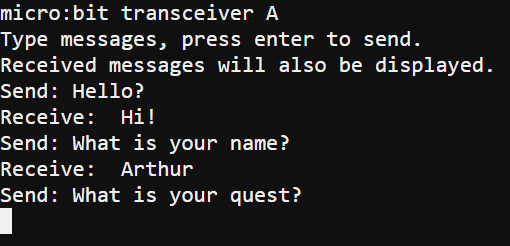
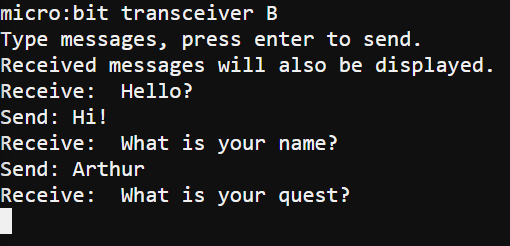
With unidirectional RF text working, the next step is bidirectional texting. Each micro:bit transceiver (transmitter/receiver) will take input that you type into its terminal and send it through the radio. Each micro:bit will also receive radio messages and print them to the terminal.
IMPORTANT: The Send: prompt will not appear until you click inside the terminal and start typing.
# terminal_chat_through_microbits
# learn.parallax.com/cyberbot
# Copyright Parallax Inc 2020 under MIT license

from microbit import *
import radio

radio.on()
radio.config(channel=7)

sleep(1000)

print("micro:bit transceiver A")

print("Type messages, press enter to send.")
print("Received messages will also be displayed.")

while True:
    if uart.any():
        tx = input("Send: ")
        radio.send(tx)
    message = radio.receive()
    if message is not None:
        print("Receive: ", message)
Transceiver A
Transceiver B
The main loop in each program repeatedly and rapidly checks to find out if any characters were typed into the keyboard or received by the radio. If uart.any() is zero, meaning nothing was typed into the terminal, the script moves on to check for messages from the radio. If that’s none too, the while True loop just repeats, rapidly, without doing anything else.
while True:
    if uart.any():
        tx = input("Send: ")
        radio.send(tx)
    message = radio.receive()
    if message is not None:
        print("Receive: ", message)
If uart.any() is something other than zero, meaning you have typed characters into the terminal, tx = input("Send: ") makes the Send: prompt appear. It then stores the characters you type into the tx variable as a string, up until you press the Enter key. Then, radio.send(tx) transmits that string over the radio for another micro:bit to receive and forward to its terminal.
Remember that message = radio.receive() either stores a string or None in message. If message has a string, then print("Receive: ", message) displays it.
UART — it stands for universal asynchronous receiver transmitter. UART communication is one of several common communication protocols that devices use to exchange data.
Buffers — Incoming messages to the UART are stored in a special string called a buffer that is set aside for keeping characters until you need them. The radio object also has a buffer.
TX & RX — The abbreviation tx is short for transmit. If you see tx in scripts, you might also see rx, which is shorthand for receive. For example, the message variable could be named rx instead.
Dropped Packets — In its current form, the application drops packets sometimes. In other words, not every message you type will be received and displayed by the other micro:bit.

Links
[1] https://python.microbit.org/v/2
[2] https://learn.parallax.com/tutorials/robot/cyberbot/computer-microbit-talk
[3] https://learn.parallax.com/tutorials/robot/cyberbot/cybersecurity-radio-data
[4] https://learn.parallax.com/tutorials/robot/cyberbot/cybersecurity-navigation-control-keyboard
[5] https://learn.parallax.com/tutorials/robot/cyberbot/cybersecurity-radio-tilt-control
[6] https://learn.parallax.com/tutorials/robot/cyberbot/computer-microbit-talk/scripts-print-terminal