The three main goals of this activity are to:
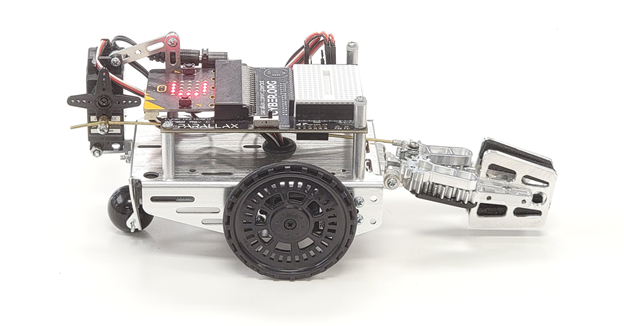
(1) cyber:bot robot with Gripper installed following the instructions in these chapters:
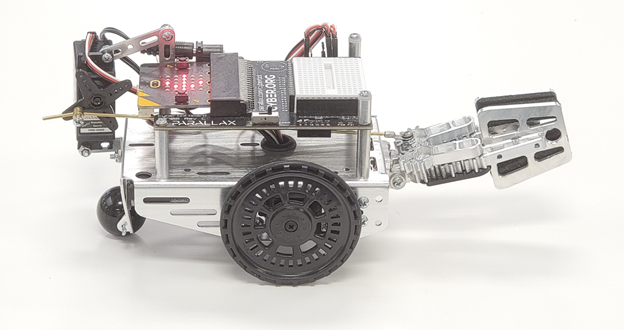
The script will turn the Gripper's standard servo to its 30° position. This will make the Gripper close and lift its paddles. Then it will turn the standard servo to its 150° position to make the Gripper paddles lower and open. If your Gripper does not properly complete both motions, the troubleshooting section on the next page has a script you can run while making mechanical adjustments.
test_gripper_angles_buttons.hex [3]
Note: The script was created by entering the python script below and adding the cyberbot.py module to the Project Files as shown in Add modules to your micro:bit [5]. The Script Name was set to test_gripper_angles_buttons before saving it as a .hex file as shown in How to Save and Reopen a Script in Python Editor v2 [6].
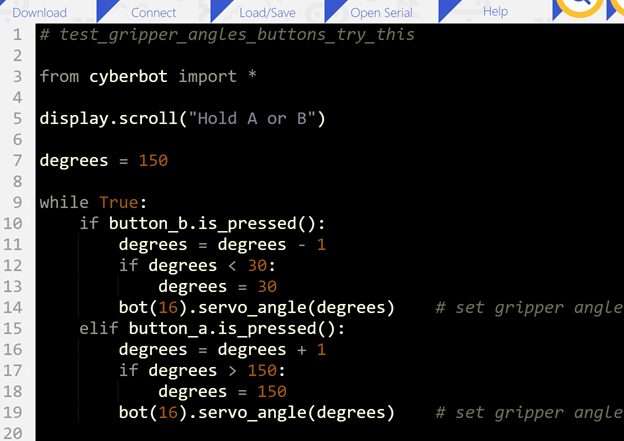
# test_gripper_angles_buttons
from cyberbot import *
display.show(Image.ARROW_E)
while True:
if button_b.was_pressed():
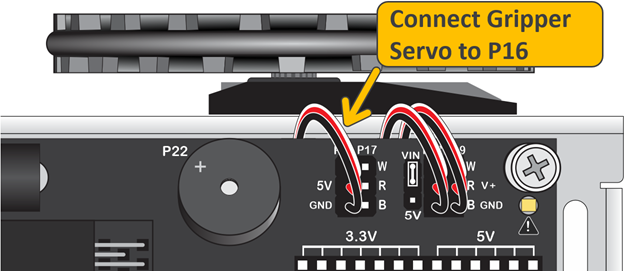
bot(16).servo_angle(30) # close gripper & lift
display.show(Image.ARROW_W)
elif button_a.was_pressed():
bot(16).servo_angle(150) # Lower gripper & open
display.show(Image.ARROW_E)
The main purpose of these tests is to verify that the script makes the Gripper complete both the close/lift and lower/open motions. If it doesn’t do both correctly, try the Troubleshooting section on the next page.
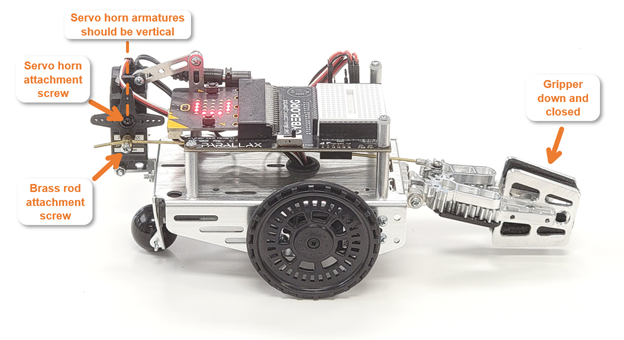
In the Gripper 3.0 Assembly Instructions, there’s a Tuning and Programming [7] activity. The first section contains instructions to physically position the servo and Gripper, including “Move the servo through its range of motion and make sure it is centered when the Gripper is the closed, lowered position.” Here are some steps you can follow to make sure this was done correctly:
Enter and run the center_grippper script:
# center_gripper

from cyberbot import *

display.show('C')

bot(16).servo_angle(90)    # Lower only, leave closed
Now let's make sure the mechanical connections are correct for the Gripper to work properly.
After importing the cyberbot module, the script uses display.show(Image.ARROW_E) to point at the micro:bit module’s B button.
# test_gripper_angles_buttons

from cyberbot import *

display.show(Image.ARROW_E)
The main loop repeatedly checks if either the A or B buttons have been pressed. If the B button was pressed since the last time it checked, the bot(16).servo_angle(30) call closes and lifts the Gripper paddles. If the A button was pressed since the last time it checked, the bot(16).servo_angle(150) call lowers and opens the Gripper paddles.
Both servo_angle calls can be considered “set it and forget it” so the servo will hold the position it was most recently set to. Whenever a particular button is pressed, the arrow is updated to point at the other button.
while True:
    if button_b.was_pressed():
        bot(16).servo_angle(30)     # close gripper & lift
        display.show(Image.ARROW_W)
    elif button_a.was_pressed():
        bot(16).servo_angle(150)    # Lower gripper & open
        display.show(Image.ARROW_E)
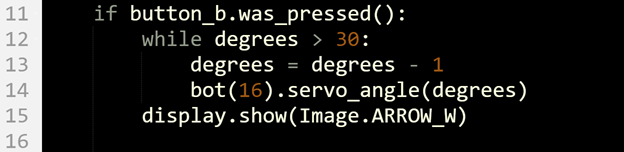
Some objects need to be lifted up and set down more carefully, like objects with narrower bases. Try modifying the test script to make the Gripper close-lift and lower-open more gradually.
Instead of having to hold down the A or B button, a script can make the Gripper complete a close-lift or lower-open maneuver open and close on its own after a button press-and-release. Simply put the statements updating the degrees variable and servo degree angle in a while loop that continues while the angle is greater than 30. A similar loop could also be written for button A that continues while degrees is less than 150.

Links
[1] https://learn.parallax.com/tutorials/robot/cyberbot/build-your-cyberbot-rev-c-board
[2] https://learn.parallax.com/gripper
[3] https://learn.parallax.com/sites/default/files/content/cyberbot/Gripper/Hex/test_gripper_angles_buttons.hex
[4] https://python.microbit.org/v/2
[5] https://learn.parallax.com/tutorials/robot/cyberbot/add-modules-your-microbit
[6] https://learn.parallax.com/tutorials/robot/cyberbot/how-save-and-reopen-script-python-editor-v2
[7] https://learn.parallax.com/tutorials/gripper-30-assembly-instructions/tuning-and-programming
[8] https://learn.parallax.com/sites/default/files/content/cyberbot/Gripper/Hex/center_gripper.hex