An acceleration meter (accelerometer) senses the forces that acceleration and gravity exert on a small mass inside the sensor. Think about that feeling of being pressed into your seat back as your car speeds up rapidly. Now think about the feeling of how gravity pulls you to the ground. Those are examples of the forces that an accelerometer senses and reports.
Accelerometers come in single-axis, two-axis (also called dual-axis), and three-axis varieties. If your application is just measuring the acceleration forces in a drag-racing car driving straight ahead, one axis is all that’s needed for sensing the forward/backward acceleration of speeding up and slowing down. A car driving a flat course with turns can probably be measured with a two-axis accelerometer to sense both forward and backward acceleration and the acceleration involved in left and right turns. If you add hills and banked turns or any other three dimensional measurements into the mix, a three-axis accelerometer becomes the best choice.
In this activity, we’ll use the Propeller microcontroller to measure the effect of gravity on the MMA7455 3-Axis Accelerometer Module.
Parts
For this activity, we’ll use the Parallax MMA7455 3-Axis Accelerometer Module and some jumper wires to connect it to 3.3 V, ground, and Propeller I/O pins.
- (1) MMA7455 3-Axis Accelerometer Module
- (5) Jumper Wires
Circuit
In addition to 3.3 V and GND, this circuit has three connections for SPI communication: DATA, CLK, and /CS.
To learn more about the DATA, CLK, and /CS connections and what they do, see the Simple Protocols - SPI Example tutorial. It uses this same 3-axis accelerometer.
- Build the circuit shown in the schematic and wiring diagram.
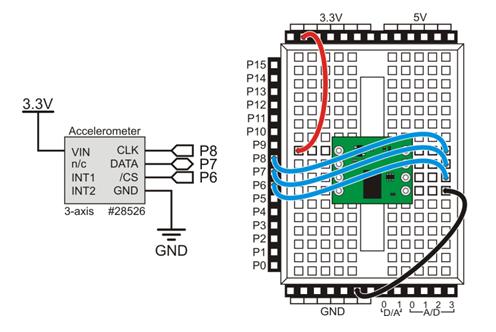
The schematic will work with any Propeller board that has a prototyping area.
Test Code
The test code makes the Propeller display all three acceleration axis measurements:
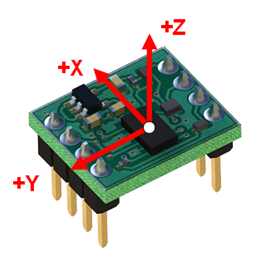
- x – toward/away from you
- y – left/right
- z – up/down
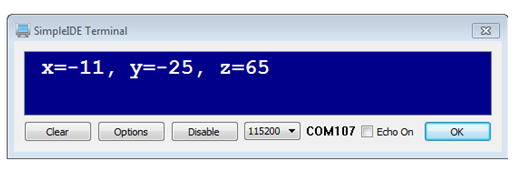
Here is an example of some un-calibrated accelerometer measurements with the board sitting flat on a table. Since this sensor and yours are both un-calibrated at this point, your values may be a bit different from what’s shown here. After calibration, it should read x = 0, y = 0, and z = 64. Reason being, when an accelerometer is sitting flat on a table, it should be sensing force exerted by gravity on its z axis, which is about 1 g (g for gravity, not gram), and no forces on the x and y axes. If you turn the board over so that it is face-down instead of face-up, the z axis should hit the bottom of its measurement range with some negative value. Setting the board on various edges, perpendicular to the table will result in max/min values for the x and y axes.
- Open Test MMA7455.side from ...\Documents\SimpleIDE\Learn\Examples\Devices\Sensor\Accelerometer 3-Axis MMA7455.
- Click the Run with Terminal button.
- With the board flat on the table, check the z axis measurement. It’s indicating + 1 g.
- Turn the board over so that it’s face down and level. The z axis measurement is now indicating -1 g.
- Set the board perpendicular to the table on each edge and check for x and y axis max/min values. Whatever value you get, that corresponds to +/- 1 g.
- Try holding the board flat, and suddenly lifting it upwards. As you lift it, it will increase the acceleration, and when you bring it back to a stop, it will decrease the acceleration.
How it Works
This program includes the mma7455.h library for access to its functions. First, short x, y, z; declares a 16-bit global variable for each sensing axis; these variables will be used by the MMA7455_getxyz10 function later. Inside main, the call MMA7455_init(7, 8, 6) passes a number to each of the functions 3 parameters for telling the library which Propeller I/O pins you connected to the MMA7455’s DATA, CLK and /CS pins. In the main loop, the call MMA7455_getxyz10(&x, &y, &z) passes the address of each axis variable to the function. The function then loads measurement values into each variable.
/*
  Test MMA7455.c

  Test the Parallax MMA7455L 3 Axis Accelerometer module.

  http://learn.parallax.com/propeller-c-simple-devices/mma7455-three-
  axis-accelerometer
*/

#include "simpletools.h"                      // Include simpletools header
#include "mma7455.h"                          // Include mma7455 header

short x, y, z;                                // Axis variables

int main()                                    // Main function
{

  MMA7455_init(7, 8, 6);                      // I/O to: DATA, CLK, /CS

  while(1)                                    // Main loop
  {

    MMA7455_getxyz10(&x, &y, &z);             // Get acceleration measurements
    print("%c x=%d, y=%d, z=%d  %c",          // Display measurements
           HOME, x,    y,    z, CLREOL);

    pause(200);                               // Wait 200 ms before repeat
  }
}
After that, print("%c x=%d, y=%d, z=%d %c", HOME, x, y, z, CLREOL) sends the cursor to SimpleIDE Terminal’s top-left HOME position. Next, it displays the decimal-integer value of the x, y, and z variables, and then clears all characters to the right. After that, pause(200) waits 200 ms before allowing the main loop to repeat.
Did You Know?
Acceleration (a) — the change in speed over time.
Gravity (g) — the attraction between objects that can result in acceleration.
Force (f) — think of it as the push-pull interaction between objects.
Mass (m) — physical matter of an object. Both gravity and acceleration exert forces on masses.
- The force (f) it takes to make an object with a certain mass (m) accelerate at a certain rate (a) is f = ma.
- The force (f) a scale has to push back when you stand on it to check your weight (gravity’s effect on your body mass) is f = mg.
Accelerometer — An accelerometer senses the force that gravity applies on its sensing mass, and reports it as 1 g (one gravity’s worth) of acceleration. To get that same force from a vehicle seat back, it would have to speed up as fast an object accelerates when you drop it (in free fall).
Check Out the Library — The mma7455 library has functions for calibration, measuring over different g ranges, and more. For more info, check …\MMA7455 Test\libMMA7455\Documentation MMA7455 library.html
Try This
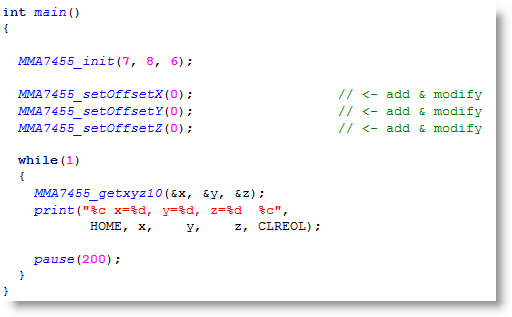
You can calibrate each axis so that your MMA7455L reports zero when the axis is perpendicular to the earth’s gravity and not accelerating in any direction. For example, with the board flat on a level table, both the x and y values should be zero, and when the board is on its edge, perpendicular to the table, the z axis should be zero. The MMA7455_setOffsetX function can fix that, and there’s also a Y and Z version. Adding them to Test MMA7455.c can fix the offset. Start with twice the value you would want to add to get it to report zero. Re-test and fine tune from there.
- Use the Open Project button to reopen the original Test MMA7455 project.
- Use the Save Project As button to save it as Test MMA7455 (Try This).
- Add the MMA7455_setOffset functions shown below.
- Run the code unmodified first.
- Check the x and y offset errors. (For example, the errors shown in the Test Code section are -11 for x and -25 for y).
- Multiply the x and y errors by -2 and use those values in MMA7455_setOffsetX and setOffsetY functions. (For example, to correct the sensor in the screen capture, we’d start with MMA7455_setOffsetX(22) and MMA7455_setOffsetY(50).
- Re-run the program. There will probably still be small errors.
- Add/subtract to correct until you get zero for the x and y measurements.
- Put the board on its edge, and repeat for the z axis.
Your Turn
Want to know how just how tall a building or a tree really is? You can sight the top of the object along the edge of your Activity Board, and measure the tilt angle. That angle and your distance from the object (labeled Adjacent in the picture below) are all the ingredients you’d need calculate the height.
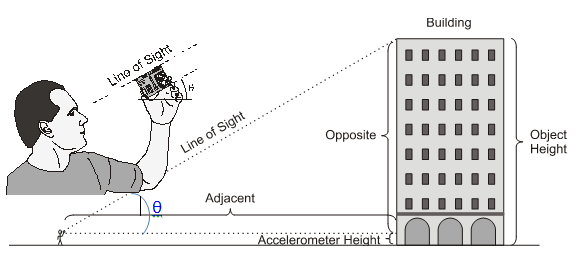
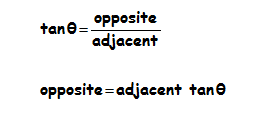
In a right triangle, the angle θ is equal to the opposite side divided by the adjacent side. Multiplying both sides by the adjacent distance results in an expression for solving the opposite height. It's the adjacent distance multiplied by the tangent of the angle.
After determining the opposite height (shown in above), all you have to do is add to that the height at which you held the accelerometer when you took the measurement.

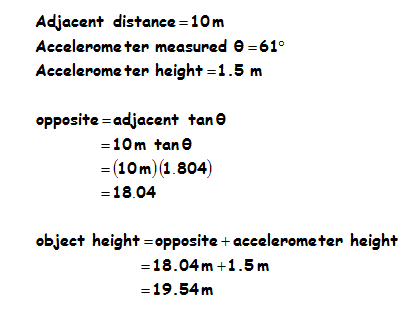
Example
Let's say that the adjacent distance to an object is 10 m, and at that distance the accelerometer was held 1.5 m from the ground to get the line of sight of the top of an object. The angle reported by the accelerometer unit was 61°. From this, we can estimate the height of the object to be 19.54 m, as shown below.
The board needs to be perpendicular to the ground (on its edge and not tilting forward/backward) for the sight measurement to get a good angle. In other words, x and y are used for the θ angle measurement, and we want to make sure z stays at zero.
Here is one way to modify the example code that calculates the x/y tilt angle, and it also reports the z tilt.
- Use Save Project As to save a copy of Test MMA7455 (Try This) into My Projects under the new name Test MMA7455 (Your Turn).
- Make sure you have calibrated all the axes in the Try This section.
- Modify the program as shown below.
- Run the modified test code.
- Hold the board on its edge, and tilt it left/right like a steering wheel. The angleXY value should cange.
- Tilt it toward and away from you and verify that the angleZ value changes.
- Now, try to keep the angleZ at zero while you tilt to get varied angleXY values for sighting the top of an object.
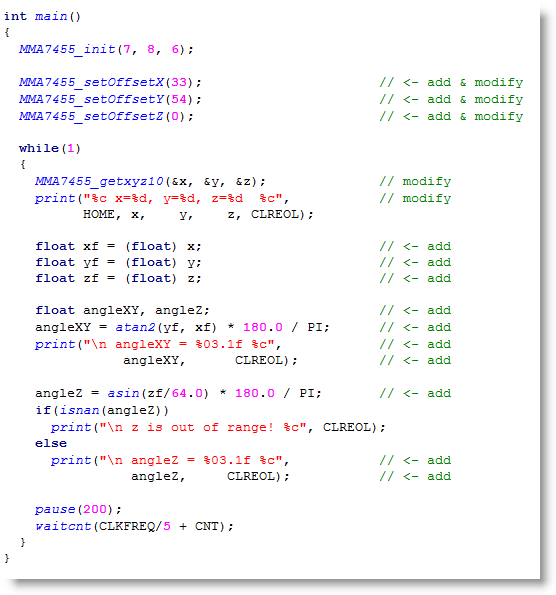
After that, convert to float, and opposite and object height equations for automating the height calculations.
If the zf value is larger than 64.0, the asin(zf/64) will return the nan (not a number) value. The if(isnan(angleZ)) statement checks if this happened, and prints a message if it did, or the result value if it didn’t.