A VGA display can add a nice touch to projects where you would like sensor information to be displayed without having to keep your project connected to your computer. It's a spiffy upgrade for apps that currently display their info with LCDs. Monitors and televisions with VGA inputs are commonplace; if you don't have one at home they are easy to find in second-hand stores.
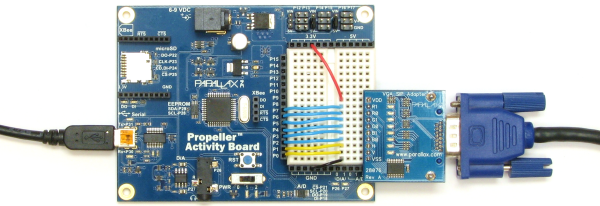
Since the Propeller microcontroller can generate its own video signals, adding a VGA display to a project is pretty simple. The VGA SIP Adapter simplifies wiring to a breadboard or thru-hole board. The vgatext library displays messages with a few simple function calls. This activity shows how to connect the VGA SIP Adapter as well as how to display and customize messages with the vgatext library.
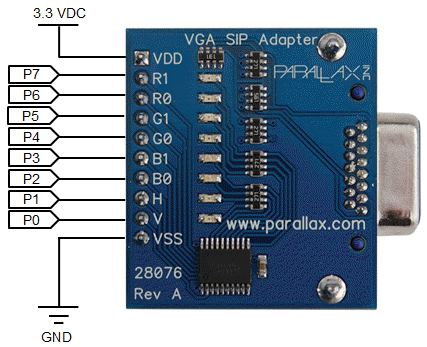
VGA SIP Adapter Circuit
The VGA SIP Adapter has two power and eight signal connections. The power connections are labeled VDD (+3.3 V supply) and VSS (0 V ground supply). The VSS to GND connection is required for sending VGA signals. The VDD to 3.3 V connection is optional for powering the signal indicator LEDs.
The eight signal connections are labeled R1, R0, G1, G0, B1, B0, V, and H. The Propeller sends red, green, and blue pixel signals to the R, G, and B lines, and vertical and horizontal refresh signals to the V and H lines.
These eight signal lines must connect to a contiguous group of eight Propeller I/O pins, starting with P0, P8, P15, or P24. The vgatext library expects to have the vertical V pin connected to the lowest pin number in the group, and the rest of the pins get connected in order upwards. As you can see in the circuit below, V is connected to P0, H is connected to P1, and so on up through R1, which is connected to P7. Although we could have used P8...P15, we chose P0..P8 for our Activity Board (original or WX version) example, to leave the P12…P15 connections available for connecting servos, Ping))) sensors, or other devices to the servo ports.
Parts
- (1) VGA SIP Adapter Board (#28076)
- (10) Jumper wires
- A VGA display with male 15-pin plug
- Set the PWR switch to 0.
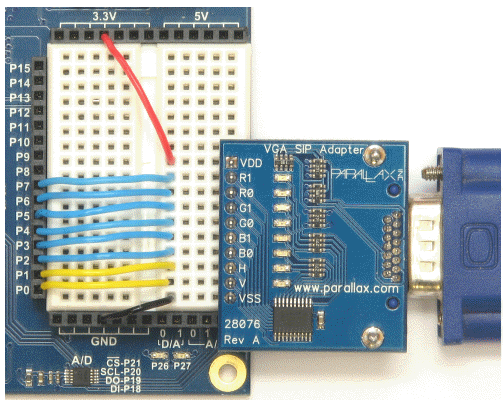
- Build the VGA SIP Adapter circuit shown here on your board.
- Connect your VGA display's cable to the SIP adapter. Don't forget plug it in and turn it on.
Update your vgatext library first! This activity requires the vgatext library updated on 2014-02-13, or later. If the last update listed in the update history of…Documents/SimpleIDE/Learn/Update Your Learn Folder.html is older than 2/13/2014, go to the Update Your Learn Folder page.
Other Propeller Boards: This activity should work on any Propeller development system with a prototyping area. If your Propeller board already has a VGA connector, you can use it instead to try the vgatext library in this activity, but you may need to adjust vga_open() in the example programs to accomodate boards that use different I/O pin groups.
Hello VGA Test Code
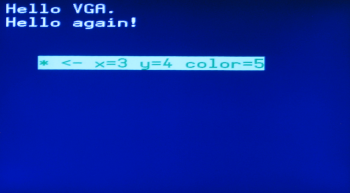
The Hello VGA test code should generate the messages shown below on your VGA display. Two of the messages will have white text on a blue background, and the third will have dark green text on a light green background.
- Click SimpleIDE’s Open Project button.
- Open Hello VGA from ... Documents\SimpleIDE\Learn\Examples\Devices\Display\.
- Set the PWR switch to 1.
- Click the Load EEPROM & Run button.
- Verify that the VGA display resembles the one in the picture.
- Check the lights on the adapter.
If you look at the VGA SIP Adapter, the B LEDs should be quite bright since the most of the displayed pixels are blue. The R and G LEDs won’t be as bright because their signals are only contributing to the other colors, of which there isn’t much. For example, white is displayed as mixture of red, green and blue, but there are only a few of those characters on this display. The yellow H and V sync LEDs will stay the same brightness regardless of the screen color because those signals have to keep going at a constant rate to control which pixels get updated and when.
How it Works
/*
  Hello VGA.c

  Test some of the vgatext library's features with a VGA display.

  http://learn.parallax.com/propeller-c-simple-devices/vga-text-display
*/

#include "simpletools.h"                      // Library includes
#include "vgatext.h"

vgatext *vga;                                 // VGA identifier

int main(void)                                // Main function
{
  vga = vgatext_open(0);                      // Open VGA port with P0 base

  dprint(vga,"Hello VGA.\n");                 // Message + newline
  dprint(vga,"Hello again!\n");               // Another message

  vgatext_setXY(3, 4);                        // Set position
  vgatext_setColors(5);                       // Set color palette

  dprint(vga, "* <- x=3 y=4 color=5");        // Text at position in palette
}
After the code comments, #include "vgatext.h" adds access to the vgatext library’s functions. As usual #include "simpletools.h" is also present. In this example, it gives access to dprint, which makes displaying text on the VGA display almost as convenient as it is with SimpleIDE Terminal.
Next comes vgatext *vga; Like many other text devices, the VGA terminal needs a device identifier that can be passed to functions like dprint to differentiate it from other text devices that might be connected to the Propeller. It’s best to declare this before main and outside of any functions. This way if you add more functions to your project, they’ll all have access to the vga identifier.
The first item inside the main function is vga = vgatext_open(0). The vgatext_open(0) part tells the vgatext library that the eight VGA connections start at P0. (If you were to instead move all the connections upward so that they occupied P8 to P15, you’d have to change it to vgatext_open(8).) Setting this function call equal to vga completes the association between the library and the hardware.
The code is now ready to use the vga device identifier with functions such as dprint to display messages like the ones shown in the next two lines. In dprint(vga,"Hello VGA.\n") and the "Hello again!" message that follows it, the \n operator works the same way you’d expect it to in SimpleIDE Terminal.
The vgatext library has functions for setting cursor positions and choosing up to 8 different color schemes for character printing. The vgatext_setXY(3, 4) statement positions the cursor so that the next character that gets printed will appear at space 3 and row 4 from the top-left corner. Keep in mind that it starts counting from zero, so it’s really the fourth space and fifth row.
The vgatext_setColors(5) statement changes the color scheme from its default of 0 for white text on blue background to 5, which is dark green text on a light green background.
After those two statements, the last dprint places an asterisk at space 3, row 4, and prints its entire message with color scheme 5.
Did You Know?
Libraries are for Reading — Read the vgatext library's documentation to learn more about these special features. In SimpleIDE, click Help, then Library Reference, and find the vgatext link in the list.
Display Area — The VGA library makes your monitor 30 characters wide by 14 lines high.
Display Formatters — You can clear the screen with dprint(vga,"%c", CLS), and HOME also works. You can also use values like 8 for backspace, 9 for an 8-space tab, and 13 for return. Not all of the constants are identical to the SimpleIDE Terminal, though. For example, the value 11 is the same as CLREOL (clear to end of the line) in the SimpleIDE Terminal, but the VGA library uses 11 for setting the cursor’s Y position.
Palettes & Special Features —The vgatext library has functions for special features like custom color schemes (the documentation calls them “palettes”). It also has getX, getY and others.
Output Functions — You can also use output functions in the simpletext library that have a text_t device parameter. The dprint function is just one example.
Try This
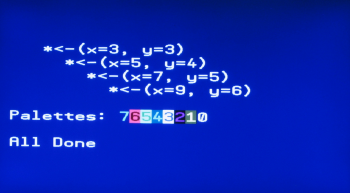
Let’s add some code that waits two seconds, clears the display, and then makes these messages appear.
- Use the Save Project As button to save a copy of your project in …Documents\SimleIDE\My Projects.
- Modify the main function as shown below.
- Run the program and verify the output.
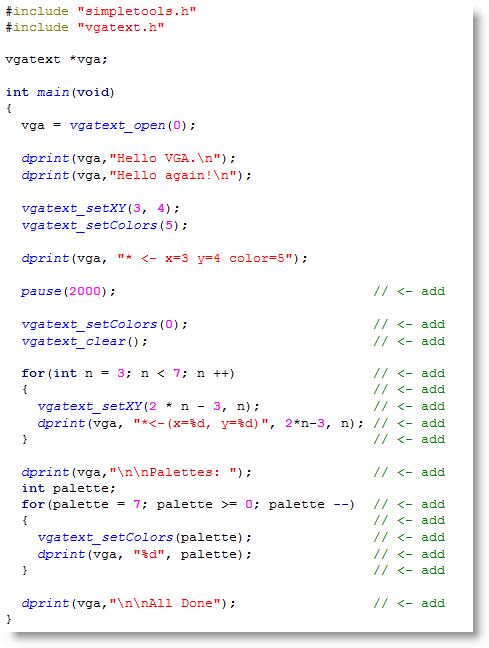
Note that vgatext_setColors(0) resets the display to its original color scheme. Without calling that before vgatext_clear, you’d end up with a light green background because that was the program's previous color scheme. Insetad of using constants like 3, 4, and 5, the two loops you added are using variables to select a variety of cursor positions and color schemes.
Your Turn
Write a for… loop that displays a variable’s value as int counts from 20 to 1 on the same line. Unless you think it through carefully, you might end up with a surprise when the values get to 9 or lower. How will you fix that surprise? Hint: One solution would be to add a call to vgatext_clearEOL. Another solution might be to use one of the simpletext library’s functions that support printing a fixed number of characters.