In the previous tutorial, a function you created only ran when the run function block called it. There are, however, situations where you need a function to run continuously on its own in the background while the rest of the program keeps going. Such a background function might keep watch on a button press or a sensor reading. The Propeller chip can do more than one thing at a time because it is a multicore microcontroller.
Propeller Multicore and BlocklyProp
With BlocklyProp, the CONTROL > new processor block lets you run a function in its core, while the rest of the program keeps on executing at the same time.
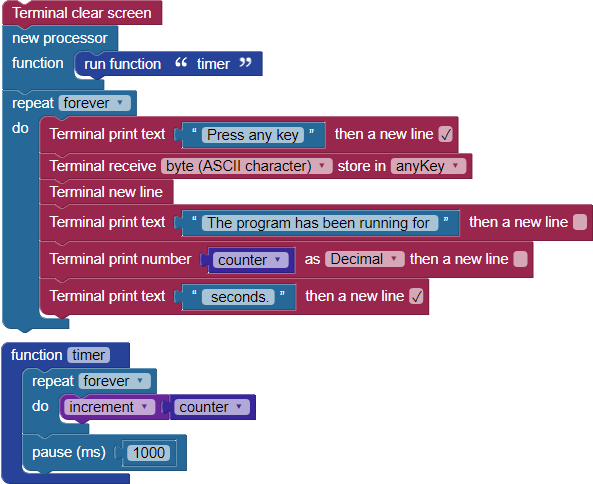
The example below launches a new processor to keep track of how long the program has been running. Because a separate processor is used to keep track of the running time, the main program can stop and wait for the user to press a key before it displays how long the program has been running.
- Make a new project using the blocks shown below, and run it.
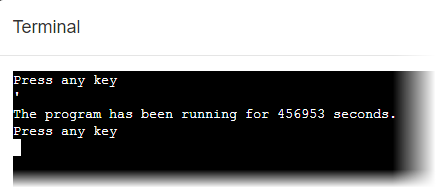
- When the Terminal opens, click on any key. You should see something similar to this in your Terminal:
How it works
IMPORTANT! You may use only ONE run function block inside each new processor block!The new processor block starts the function named "timer" running in its own processor. It will continue to run its repeat forever loop while code execution in the main program continues.
As the function timer continues to run, the variable named "counter" increases by 1 every second. The rest of the program waits for you to press a key and when you do, it displays counter, which equals how many seconds the program has been running.
Try this
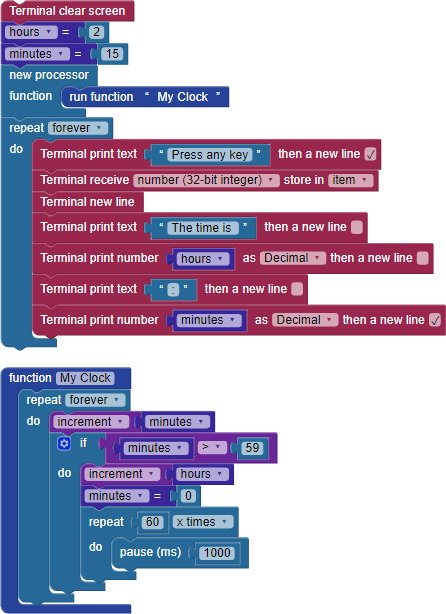
The next program you will create is a basic clock. It will use a new processor block to keep track of the time. The time will be displayed in the Terminal when you press any key.
- Start a new project and build the program below.
- At the top of the program, change the number value blocks that are setting the variables “hours” and “minutes” to your local time.
- Load your program to RAM.
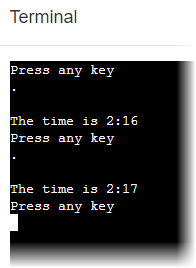
- When the Terminal opens, press any key to display the time, then wait a minute and press it again. It should look something like the image below.
How it Works
The main program initializes the hours and minutes variables then launches the My Clock function into its own processor. After that, a repeat forever loop displays the time in the Terminal when a key is pressed. It is getting the time information from the My Clock function running it its own core, endlessly. That's why the values of minutes and hours are always up to date when you press a key in the Terminal again.
The My Clock functions adds 1 to the variable minutes every 60 seconds. When the variable minutes goes over 59, it adds 1 to the variable hours and sets the variable minutes back to 0.
Did you know?
Variables are still global! Even though the variable counter is set inside a function running in a new processor, it is still accessible from the main program. You can visualize that as though all the variables are written down on the big notepad in the middle of the Propeller that all of the cores can share.
Print from Main ONLY! The Terminal blocks cannot be used in a function that is launched with a new processor block. The same is true for the OLED display module blocks.
Give It Some Time! If you update the value of a variable item in a new processor, add a pause in your main program before trying to print the value of that variable to the Terminal. Otherwise, in rare cases the main program might print the old value before the new processor has a chance to spin up and update it.
Verifying that your new processor started
There are 8 processors in the Propeller microcontroller. Your main program uses one of them, leaving you up to 7 additional processors that you can use for your own functions. However, there is a bit of a catch. The blocks for some of the sensors and devices use their own processors to operate, therefore leaving you with fewer than 7 extra processors.
There is a trick you can use to see if your new processor started, thanks to those global variables: Add a variable item to the top of your main program, update it at the beginning of your new processor's function, and then print the variable from the main program again. If the variable changed, you know the processor launched.
Your Turn
- Add a third set variable block named proof at the top of the main program, and intialize it to zero.
- Duplicate that block, and add it as the first item in the My Clock function, above the repeat forever loop, then change the attached value to 1.
- Add a pause (1000) block, followed by a Terminal print text block, between the new processor block and the repeat forever block in the main program.
- Configure that new Terminal print number block to print the value of proof.