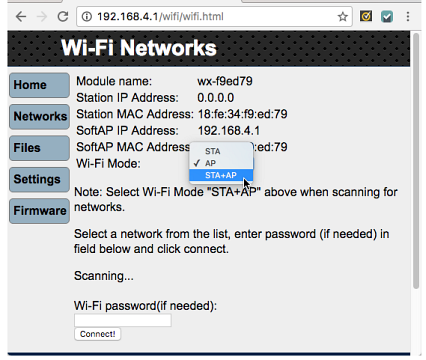
You might have noticed that your computer cannot access the internet while it is part of the Wi-Fi module’s network. So, it’s better to have your computer and the Wi-Fi module both join another network that is able to access the Internet. After you do this, you’ll still be able to do all the same activities with the Wi-Fi module. The only difference will be instead of 192.168.4.1, you will have to use the IP address that the Wi-Fi network assigns your Wi-Fi module.
- Click the Networks button.

- If the Wi-Fi module’s Mode is not already set to STA+AP, select it from the mode drop-down menu now.

You may need to wait for a minute or two for the module to check for and display available networks.
The Wi-Fi module has 3 modes: AP, STA, and STA+AP. AP stands for access point, and that’s when the Wi-Fi module provides its own access point. In this mode, you can make your computer or phone join the Wi-Fi module's network and access its web pages. STA is short for station mode, and that’s when the Wi-Fi module has joined another access point and is a station on its Wi-Fi network. The other access point will assign the Wi-Fi module an IP address. From that point forward, you’ll use the IP address the module was assigned to access its web pages (instead of 192.168.4.1). STA+AP mode allows it to function as both an access point and a station. This mode should only be used for a brief period of time to search access points and join one.
Stay Secure! Once you have made the Wi-Fi module join another access point, you should switch to station mode (STA) immediately after you have noted the station IP address the Wi-Fi module was assigned by the network. This way, you can minimize the likelihood that hackers will try to use the module as a bridge into another network.There may be many networks available; scrolling up and down on the page will help you locate the network you want to join.
- Select your network.
- Enter the password (...and hopefully your network will have a more secure password than “MyPassword”!).
- Click Connect!

After the Wi-Fi module joins another network, it will show you the IP address the network assigned it. Make sure to record the IP address the Wi-Fi access point assigns your Wi-Fi Module. From here on out, you can use that in place of 192.168.4.1.
- Record the IP address that was assigned to your Wi-Fi module.
- Connect your computer to the same Wi-Fi network you just had the ESP module join.

IMPORTANT: After the Wi-Fi Module has joined a network, you should note the Station IP Address, and then immediately switch to STA mode.
- Click the Networks button to return to that page.
- Set the Wi-Fi mode to STA.

After the Wi-Fi module is in station mode, its Wi-Fi access point will no longer be available. So, make sure to connect your computer to the same Wi-Fi network you just connected the Wi-Fi module to. Then, make sure to always use the IP address the Wi-Fi module was assigned.
- Set your computer to the same network you just had the Wi-Fi module join.

- In your web browser, replace 192.168.4.1 with the IP address that the Wi-Fi acces point assigned your module. (In the example above, it’s 192.168.43.64 in this example, but yours may be different. It might even start with values like 10.10.
- Did the configuration page come up? Great! You can continue from here using that IP address instead of the 192.168.4.1 shown in these examples.

