With just a few small tweaks to the JavaScript and PBASIC, that light control with checkboxes app can be transformed into slider control of servo position.

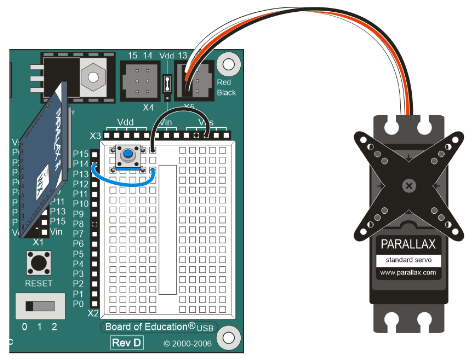
- Connect the servo to your board as shown in the schematic above and wiring diagram below.
- If you want the wire pointer to indicate degrees, try pages 106-108 in What’s a Microcontroller?. IMPORTANT: Make sure to change any PULSOUT 14, 750 to PULSOUT 13, 750 in ServoCenter.bs2.
Keep in mind: If you followed the instructions in the Join Another Wi-Fi Network section, you’ll have to replace 192.168.4.1 with your IP address.
- Go to your Wi-Fi module’s Files page at http://192.168.4.1/update-ffs.html.
- Use the Choose file button to upload page-controls-servo.html to your Wi-Fi module.
- In your web browser, open 192.168.4.1/files/page-controls-servo.html.
- Use your BASIC Stamp programming software to open Page Controls Servo Host.bs2.
- Connect your BOE + BS2 to power and your computer, and set PWR to 2.
- Run Page Controls Servo Host.bs2.
- Verify that the Debug Terminal displays Starting… and servoId = 1.
- Try dragging and releasing the slider control on the web page to various positions, and verify that the servo turns to and holds the corresponding angle.
How it Works
This is the HTML that displays the slider and the angle. When the slider is adjusted, the onchage=”servoPosition(id)” passes the id of the slider to the servoPosition function’s sliderID parameter.
  <H2>Servo</H2>

  Position: 150
    <input type="range" id="position"
    min="30" max="150" value="90"
    onchange="servoPosition(id)">
  30
The servoAngle var get’s the slider’s value with document.getElementById(sliderId).value. The slider actually counts from 30 to 150, so servoAngle = (150 - servoAngle) + 30 calculates what the angle we really want is. For example, when the slider is ⅓ of the way from left to right, the range type returns 70, but we really want that to be 110. With servoAngle = (150 - servoAngle) + 30 we get 110 = 150 - 70 + 30. After that, nameVal = “angle=” + servoAngle creates the name value pair parameter to send to the httpPost function. For example, with the slider set to ⅓ of the way from left to right, it might send “angle=110”. The PBASIC has a listener set up to monitor HTTP POST requests witht he “/servo” path, so the httpPost call is httpPost(“/servo”, nameVal).
  function servoPosition(sliderId)
  {
    var servoAngle = document.getElementById(sliderId).value;
    servoAngle = (150 - servoAngle) + 30;
    var nameVal = "angle=" + servoAngle;
    document.getElementById("servoval").innerHTML = nameVal;
    httpPost("/servo", nameVal);
  }
As with the previous messages and lights, the information about where the web page wants to position the servo will come through as HTTP POST requests, so the #DEFINE POSTS is set to 1. This incorporates the code below the “Wi-Fi support below” line that handles POST requests.
' Page Controls Servo Host Host.bs2
' Allows page-controls-servo.html to control servo position through
' a range (slider) control.

' {$STAMP BS2}                               ' Target = BASIC Stamp 2
' {$PBASIC 2.5}                              ' Language = PBASIC 2.5

' I/O connections & baud rate.
ToDI           CON     2                     ' BS2 P11 -> Wi-Fi DI
FromDO         CON     4                     ' BS2 P10 <- Wi-Fi DO

' Select which features to support.
#DEFINE POSTS        =  1                    ' HTTP POST requests
#DEFINE GETS         =  0                    ' HTTP GET requests
#DEFINE WEBSOCKETS   =  0                    ' WebSockets
#DEFINE PATHS        =  0                    ' Path text comparisons
#DEFINE DEBUGS       =  0                    ' Debug Terminal Info
The setup is also almost the same as the previous two examples, just a different name for the setup string DATA, the ID, and a different path -”/servo”.
' Wi-Fi setup and initialization
ListenSErvo    DATA CMD, LISTEN, HTTP,       ' String to set up listener ID
               "/servo", CR

ServoKey       DATA "angle", CR              ' I/O message key search string

servoId VAR Nib

Restart_Point:                               ' Beginning of program
PAUSE 1000                                   ' Wait for certain OS COM ports
DEBUG "Starting...", CR                      ' Display starting message
GOSUB Break                                  ' Break condition to Wi-Fi module

eeAddr = ListenServo                         ' Prepare Listener setup string
GOSUB Listen_Setup                           ' Set up listener
servoId = id                                 ' Store ID that was returned

IF servoId > 0 THEN                          ' Check if listener setup success
  DEBUG "servoIdId = ", DEC servoId, CR, CR
ELSE
  DEBUG "Error setting up listener!"
  END
ENDIF
The Main loop checks if there are any POST requests coming from with the “/servo” path, and if so, it puts the angle information in its servoAngle variable with SERIN FromDO, Baud, msTimeout, Warning,' Get post data prameters [WAIT(CMD, "="), DEC servoAngle]. Of course, this command comes between the required Post_Reqeust_Start and Post_Request_Stop function calls.
' Servo setup and initialization

servoPin   CON 13                            ' Servo constant and variables
servoAngle VAR Word
servoPulse VAR Word

servoAngle = 45                              ' Initialize servo angle

DO                                           ' Main loop

  GOSUB Poll_Events                          ' POLL for recent events

  IF op = "P" AND id = servoId THEN          ' If POST request pending
    IF(id = servoID) THEN
      eeAddr = ServoKey                      ' Set to filter for txt key
      GOSUB Post_Request_Start               ' Initialize POST request
      SERIN FromDO, Baud, msTimeout, Warning,' Get post data parameters
            [WAIT(CMD, "="), DEC servoAngle]
      GOSUB Post_Request_Ack                 ' Acknowledge POST

      DEBUG "servoAngle = ",                 ' Display LED values
            DEC servoAngle, CR
    ENDIF
  ENDIF                                      ' end op = 0 & id = ledId

  servoPulse = 300 + (servoAngle * 5)
  PULSOUT servoPin, servoPulse

LOOP

' ========[ Your code above ]===============================================

' ========[ Wi-Fi support below ]===========================================
The position the Parallax Standard Servo holds increases by 1 degree per 10 microseconds of pulse width increase with 1500 being about 90 degrees. Since PULSOUT units are in 2 microsecond units, the 0 to 180 range is PULSOUT pin, 300 to PULSOUT pin, 1200. Try substituting some values into servoPulse = 300 + (servoAngle * 5). For example, servoAngle = 0 should make servoPulse 300. Likewise, servoAngle = 180 should make servoPulse 1200, servoAngle = 90 yields 750, and so on... PULSOUT servoPin, servoPulse sends the corresponding control pulse to the servo connected to servoPin (13).