An HTML page that can send “hello” or “bye” to the BASIC Stamp can just as easily control circuits, like indicator lights. For example, with the LEDs connected to P7 and P9 as shown, the web page can send io=pin7state1 to make an LED connected to P7 turn on.
- Add LED circuits to your breadboard so that they match the schematic and wiring diagram.
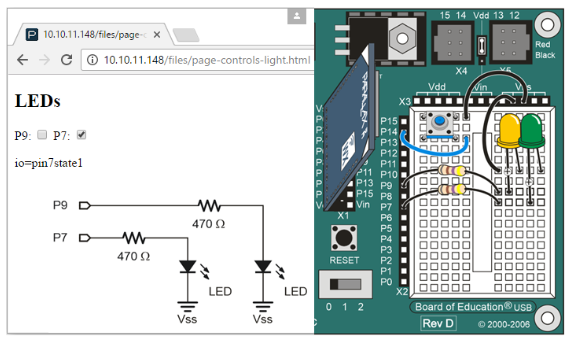
Instead of a text field, this example gets its user input from textboxes. Click the checkbox once, and a checkmark appears and the light turns on. Click it again, and the checkbox disappears and the light turns off. With each click of a checkbox, the message the page sends the BASIC Stamp (like io-pin7,state1) gets displayed in the page too.
Keep in mind: If you followed the instructions in the Join Another Wi-Fi Network section, you’ll have to replace 192.168.4.1 with the Wi-Fi module’s station IP address.
- Go to your Wi-Fi module’s Files page at http://192.168.4.1/update-ffs.html.
- Use the Choose file button to upload page-controls-light.html to your Wi-Fi module and then click Upload.
- In your web browser, open 192.168.4.1/files/page-controls-light.html.
- Use your BASIC Stamp programming software to open Page Controls Light Host.bs2.
- Connect your BOE + BS2 to power and your computer, and set PWR to 2.
- Run Page Controls Light Host.bs2.
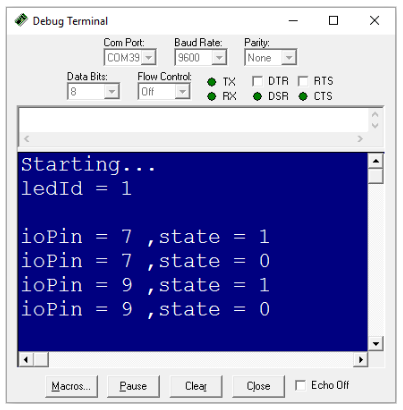
- Verify that the Debug Terminal displays Starting… and ledId = 1
- Try clicking each checkbox to set the checkmark and clear each checkbox.
- Verify that the P7 checkbox controls the light connected to P7 and likewise with the P9 checkbox and P9.
How it Works - the Web Page
The HTML and JavaScript is very similar to the previous example. Aside from some variable and function name changes, the main differences are in how the checkboxes are handled.
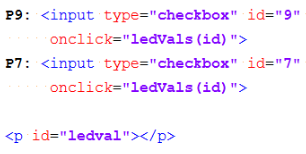
When a given checkbox is clicked, the onclick event calls the ledVals function, passing the button’s id -either 7 or 9. The paragraph with the ledval ID will hold a copy of the text that gets sent to the BASIC Stamp.
The PBASIC program running in the BASIC Stamp will have a listener filtering for HTTP POSTs with a path named “/leds”. It also has code that expects a message like “io=pin7state1” to turn the P7 LED on, “io=pin7state0” to turn it off, and so on. So the ledVals has to assemble a string with that with the io=pin#state# information, and pass that and the “/leds” path to the httpPost function.
When you click one of the checkboxes, html calls ledVals function, passing its checkbox id (either 7 or 9) to the ledVals pinId parameter. Then, var state = document.getElementById(pinId).checked copies the state of that checkbox (true or false) into a variable named state. Next, var nameVal = “io=pin” + pinId “ “state” + Number(state) uses all that information to put together the “io=pin#state#”. After printing the nameVal string to the ledval paragraph with document.getElementById…, the httpPost(“/leds”, nameVal) function call passes the “/leds” path and the nameVal variable to the httpPost function. Remember, the nameVal variable is the one that contains a string that’s something like “io=pin7state1”.
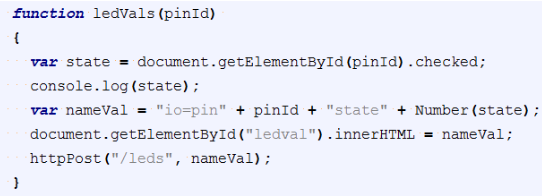
The checked property is boolean, that’s true or false. Number(led) converts it to a 1 or 0. The JavaScript responds to the fact that strings are being added together by automatically converting to “1” or “0” before appending the string.Here’s the httpPost function. It transmits the “/leds” path and the param string, which will contain a string like “io=pin7state1” to the Parallax Wi-Fi module that’s hosting the web page, and the module in turn relays that information to the BASIC Stamp.
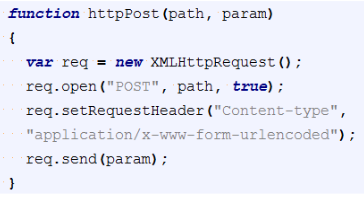
The string “io=pin7state1” is considered a post parameter that consists of a name-value pair. The name is “io” and the value is “pin7state1”.
How it Works - the PBASIC Code
The DATA directive for setting up the HTTP listener is similar to the previous example. Since the web page is sends the posts with the url set to the “/leds” path, the PBASIC DATA directive has “/leds” as part of its ListenerLeds setup string. After sending the break condition, the program sets the HTTP Listener by:
- Setting the eeAddr variable to ListenLeds.
- Calling the Listen_Setup subroutine subroutine
(This subroutine uses eeAddr to set up the listener) - Saving the number of the listener ID
(Stored in id after the call to Listen_setup)

Variables for the actual LED light control are ioPin and state. After initializing them, the main loop repeatedly calls the Poll_Events subroutine. When Poll_Events places “P” in the op variable and a value that matches ledId in the id variable, the program can process the post request. It starts by setting eeAddr to ioKey and then calls the Post_Request_Start subroutine. This tells the Parallax Wi-Fi module to strip the io from the post reply and just send the value part of the name value pair, which will be something like “pin7state1”. Then, a SERIN command that waits for the CMD character, followed by “=”. After that it uses DEC ioPin to throw away the characters in “pin” and just put the 7 or 8 value in the ioPin variable. Then, DEC state throws away the characters in “state” and puts the 1 or 0 following it into the state variable. After that the page needs acknowledgement of the post request, which is completed with a call to the Post_Request_Ack subroutine.
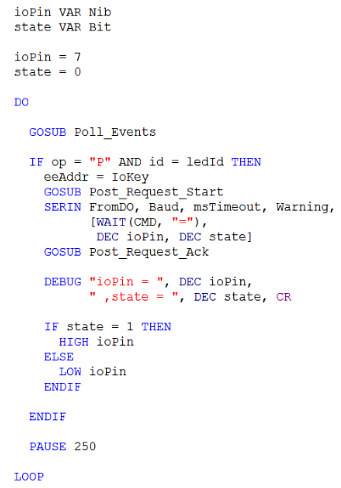
After the ioPin and state variables have been received, they are displayed with a DEBUG command. Then, the if state = 1...endif block turns the light in question on or off. For example, if ioPin is 7 and state is 1, HIGH ioPin becomes HIGH 7. For lots more information on HIGH and LOW turn the lights on/off, see Chapter 2 in What’s a Microcontroller.