Schematics and Building the Circuits
All that is needed for this project is a piezoelectric speaker. Build the circuit as shown below in Figure 1.
Figure 1 - Piezoelectric Speaker Schematic and Wiring Diagram


Reading Sheet Music — The Basics
Before any PBASIC coding can happen, it would be best to cover the basics of reading sheet music. After all, without knowing how to do that, translating it into code would be tricky business! These next sections will introduce the basics of reading sheet music, so the next time you want to feature a favorite song in a BASIC Stamp application, you’ll be ready to go.
The Staff and Clefs
The staff is perhaps the most important building block of reading sheet music. It is a set of 5 lines with 4 spaces in between that holds the information needed for the musician to play the correct notes, in the correct tempo, at the right pitch. Each note on a staff increases by one letter from a line to a space, and by two letters from line to line.
The symbol that appears at the beginning of every staff is known as a clef. This symbol lets the musician know which notes to play as well as the octave to play them in. When reading sheet music, one of two clefs will be used—treble or bass. The treble clef is used for higher notes, such as those for a soprano singer, flute, violin, or for the pianist, any note above “Middle C.” The bass clef is used for lower notes, such as a bass or baritone singer, tuba, trombone, or any note below “Middle C” on a piano.
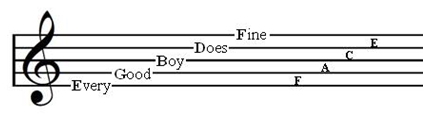
The image below displays how to read notes for the treble clef, and these notes can be easily remembered through the use of mnemonic devices. For example, the staff lines for the treble clef read: E, G, B, D, F—which can be remembered through the phrase “Every Good Boy Does Fine.” You can also memorize the spaces between the lines as they spell the word “FACE.”
Figure 2 - Trebel Clef Order of Notes
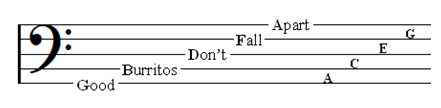
The next image displays how to read notes for the bass clef. Here, the order of notes changes to: G, B, D, F, A which can be remembered the mnemonic device “Good Burritos Don’t Fall Apart.”
Sadly, the spaces between the lines don’t spell anything for the bass clef (A, C, E, G) but you can use the phrase “All Cows Eat Grass” to help you remember.
Figure 3 - Bass Clef Order of Notes
The Octave
Take a look below and see if you can identify the pattern that is beginning to emerge:
Figure 4 - Octave Example
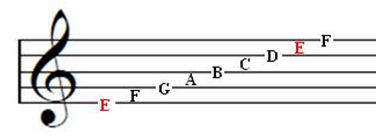
The notes between and including the “E’s” form what’s known as an octave, or a sequence of 8 musical notes. Octaves are measured note to note, for example: C-to-C or A-to-A. As the octaves increase up the staff, the pitch of each note increases. Conversely, as octaves decrease down the staff, the pitches of the notes decrease.
Since the pitch of a note gets higher or lower depending on the octave, a number system exists to help keep track of each octave. Take another look at Figure 4 above. The first highlighted “E” note is considered to be in the 4th octave, while the second highlighted “E” note is in the 5th octave. Octaves increase or decrease in value from note C to note C. So the first half of the staff (E-F-G-A-B) is in the 4th octave, while the second half (C‑D‑E-F) is in the 5th octave.
The Key Signature
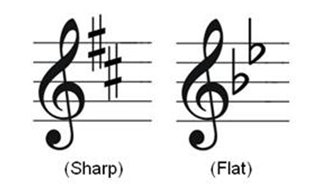
The key signature is a series of sharp or flat symbols located directly to the right of the clef. These symbols tell the musician which notes get played a half-step higher (sharp) or a half-step lower (flat). These notes are then played as sharps or flats throughout the entire piece of music, regardless of the octave. For example, the side by side images below demonstrate examples of both sharp and flat key signatures. See if you can determine which notes will get changed based on the mnemonic devices introduced in the “Staff and Clefs” section above.
Figure 5 - Sharp and Flat Key Signatures
 The Natural Symbol
Sometimes, regardless of the key signature, certain notes need to be played normally. If this is the case, the natural symbol (shown to the left) will be displayed before the note. This signals the musician that even though the key signature shows the note as sharp or flat, it should be played normally.
Note Durations and Rests
One key component to keeping rhythm when playing a piece of music is to know how long a note should last. Note durations are represented by symbols and the best way to remember their ‘values’ is simply through rote memorization. Below is a table of commonly used notes and their durations:
|
Note Symbol |
Duration |
|
|
The whole note is the base note for all other notes in a piece of music. In common time, the whole note lasts 4 beats. |
|
|
The half note is one-half the value of the whole note. In common time, the half note lasts 2 beats. |
|
|
The quarter note is one-fourth the value of the whole note. In common time, the quarter note lasts 1 beat. |
|
|
The eighth note is one-eighth the value of the whole note. In common time, the eighth note lasts half a beat. |
|
|
The sixteenth note is one-sixteenth the value of the whole note. In common time, the sixteenth note lasts a quarter of a beat. |


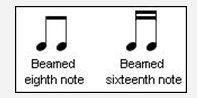 Another Way to Denote Eighth and Sixteenth Notes
Sometimes, a sequence of eighth or sixteenth notes can also be connected or beamed. These notes are typically beamed when they occur within the same measure and/or when the composer wants a more “flowing” feel for the notes. To the left are examples of beamed eighth and sixteenth notes.
When playing sheet music, it is just as important to know how long to stop playing (or rest) as it is to know how long to hold a note. Just like there are note durations, there are also rest durations, or the length of time a musician should pause their playing. The durations of rests are the same as those for notes: a quarter rest would last the same amount of time as a quarter note. Below is a table of commonly used rests:
|
Rest Symbol |
Name |
|
|
Whole Rest |
|
|
Half Rest |
|
|
Quarter Rest |
|
|
Eighth Rest |
|
|
Sixteenth Rest |


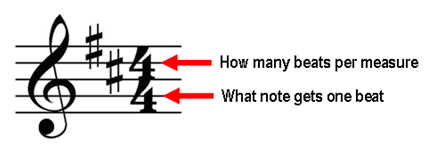
The Time Signature
On most pieces of music, there is a number that looks like a fraction directly to the right of the key signature. This number is known as the time signature and is crucial to keeping the correct tempo when playing a song. Figure 6, below, demonstrates 4/4 time, which is also known as “common time” and is sometimes denoted with a “c.” Common time means that there are 4 beats in every measure, and the quarter note gets a whole beat. In sheet music, measures are separated by vertical lines.
Figure 6 - "Common Time" Time Signature
Sheet Music and the Piezospeaker
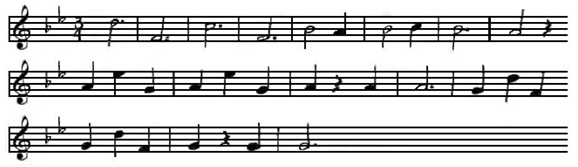
Let’s apply the techniques just learned about reading sheet music to an actual song. Since the start of school is just around the corner, the song “School Days” by Will Cobb and Gus Edwards seems most appropriate for this activity. The sheet music for the song is shown in Figure 7.
Figure 7 - "School Days" Sheet Music
So now that we have the sheet music it’s time to map out the notes and octaves so we can easily translate it into PBASIC to play with the piezospeaker. This next section contains some simple steps that you can take to successfully play sheet music with the piezospeaker and BASIC Stamp 2.
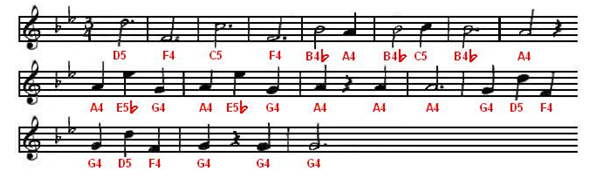
Step 1 – Identify the Notes
The first thing to do when planning to play sheet music with the piezospeaker is to identify the notes to be played. Use the above sheet music and mark the value of each note, and don’t forget to make a note of octave changes and sharps or flats! You can check your work with the filled-in music below.
Figure 8 - "School Days" Sheet Music with Notes
Step 2 – Count out the Beats
Using the time signature, the next step will be to count out the beats for each measure. This will help determine the duration of each note when playing it on the piezospeaker. The time signature for this song is 3/4, which means that there are three beats in each measure and the quarter note gets one beat. Use the “Note Duration and Rests” section above to count the beats for each measure. You can check your work with following:
Figure 9 - "School Days" Sheet Music with Beats
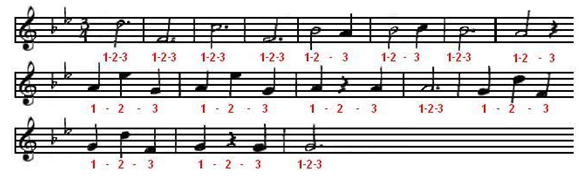
What does the dot next to some notes mean?
You may have noticed the dot next to the notes in the first four measures. Whenever there is a dot next to a note, the duration of the note increases by one-half its value. For example, since this piece of music is in 3/4 time, a half note lasts 2 beats. A dotted half note, therefore, would last 3 beats total—2 for its value plus one extra since 2/2 = 1.
Step 3 – Put it into Code
Congratulations, you have just successfully read a piece of sheet music! Now we’re ready to take what we’ve read and put it into code for the BASIC Stamp. As a quick recap, we need three pieces of information before we can begin our BASIC Stamp code:
- The notes to be played
- The octaves to play them in
- How long each note should last
This information is going to be stored to EEPROM on the BASIC Stamp. That way, we can use the code as a template for any piece of music that we might want to play. If you recall from Chapter 8 of What’s a Microcontroller? that every note corresponds to a specific frequency which can be played by the BASIC Stamp, as seen here:
Figure 10 - Rightmost Piano Keys and Their Frequencies
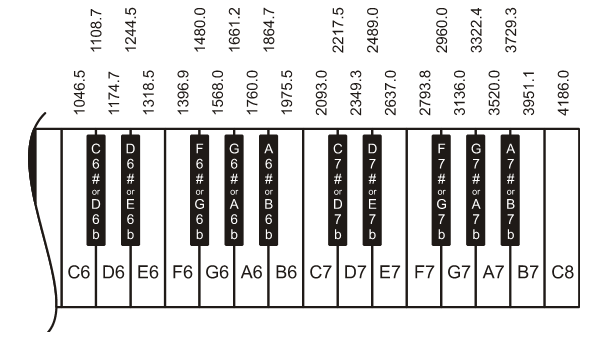
You may notice that the frequencies in the above image are two higher than the ones we made note of on the sheet music. This is because the 6th and 7th octaves sound the best through the piezospeaker. So just remember that anytime you are playing sheet music with the piezospeaker, bump the octave up by two in order to get the best sound.
Armed with this knowledge, let’s take a look at the PBASIC code for playing “School Days” with the piezo speaker:
' SchoolDays.bs2
' Play the 1907 hit "School Days" by Will Cobb and Gus Edwards with the
' piezospeaker.

' {$STAMP BS2}
' {$PBASIC 2.5}

Notes      DATA    "D", "F", "C", "F", "b", "A", "b", "C", "b", "A", "R", "A",
                   "e", "G", "A", "e", "G", "A", "R", "A", "A", "G", "D", "F",
                   "G", "D", "F", "G", "R", "G", "G", "Q"

Octaves    DATA      7,   6,   7,   6,   6,   6,   6,   7,   6,   6,   6,   6,
                     7,   6,   6,   7,   6,   6,   6,   6,   6,   6,   7,   6,
                     6,   7,   6,   6,   6,   6,   6

Durations  DATA      2,   2,   2,   2,   2,   4,   2,   4,   2,   2,   4,   4,
                     4,   4,   4,   4,   4,   4,   4,   4,   2,   4,   4,   4,
                     4,   4,   4,   4,   4,   4,   2

Dots       DATA      1,   1,   1,   1,   0,   0,   0,   0,   1,   0,   0,   0,
                     0,   0,   0,   0,   0,   0,   0,   0,   1,   0,   0,   0,
                     0,   0,   0,   0,   0,   0,   1

index         VAR     Byte
offset        VAR     Nib

noteLetter    VAR     Byte
noteFreq      VAR     Word
noteDuration  VAR     Word
noteOctave    VAR     Nib
noteDot       VAR     Bit

DO UNTIL noteLetter = "Q"
  READ Notes + index, noteLetter

  LOOKDOWN noteLetter, [  "C",  "d",  "D",  "e",  "E",
                          "F",  "g",  "G",  "a",  "A",
                          "b",  "B",  "R",  "Q"     ], offset

  LOOKUP offset,        [ 4186, 4435, 4699, 4978, 5274,
                          5588, 5920, 6272, 6645, 7040,
                          7459, 7902,    0,    0     ], noteFreq

  READ Octaves + index, noteOctave
  noteOctave = 8 - noteOctave
  noteFreq = noteFreq / (DCD noteOctave)

  READ Durations + index, noteDuration
  noteDuration = 1000 / noteDuration

  READ Dots + index, noteDot
  IF noteDot = 1 THEN noteDuration = noteDuration * 3 / 2

  FREQOUT 9, noteDuration, noteFreq

  index = index + 1
LOOP

END