Acceleration is a measurement of how quickly something speeds up or slows down. The ActivityBot's acceleration can be adjusted, which will be important in some robotic applications. Some examples:
- If your ActivityBot is bringing you a drink, you could make the acceleration gradual to prevent spills.
- If your ActivityBot is in a race, it might be more important to make it speed up as quickly as possible.
Adjusting Acceleration
The ActivityBot robot's acceleration can be adjusted with the Robot set acceleration block.

Choose the speed option for use with Robot drive speed blocks, choose distance for use with Robot drive distance blocks. The acceleration setting for distance maneuvers is typically slower to help improve accuracy. The acceleration setting for speed is usually a little faster to give the robot more peppy responses in sensor navigation.
Adjusting Max Speed
You can also change the maximum speed limits for Robot drive speed and Robot drive distance maneuvers.

The default speed limit for Robot drive speed is 128 ticks per second. Even though your code can change the speed at any time, there are some cases when sensors and variables might work together to ask for some unreasonably high speeds. Limiting the speed with this block can prevent some "runaway" conditions.
The default speed limit for Robot drive distance maneuvers is 64 ticks per second. That's the cruising speed the ActivityBot reaches while on its way to its distance goal, unless you use this block to change it. For transporting a drink, it might be safer to pick a slower cruising speed. In a timed dead reckoning navigation contest, you might want to experiment with higher cruising speeds.
Example: Adjusting Distance Maneuvers
This example sets the acceleration and cruising speed for Robot drive distance blocks to high values while it drives forward, then resets to low values while it drives backwards. The overall traveled for both maneuvers is the same, so the ActivityBot returns to where it starts. As you watch your robot go, pay close attention to two things:
- Acceleration - how quickly it speeds up and slows down
- Cruising speed - the top speed it runs at for most of the trip
- In BlocklyPropt, make a new Propeller Activity Board WX program and name it Set Drive Distance.
- Build the project shown below, and save it.

- Connect your ActivityBot to your computer and set the power switch to 1.
- Set the COM port and click Load and run (save code to EEPROM).
- Disconnect your robot and put it on the floor in an open area.
- Press, hold and release the reset button as you set the power switch to 2.
- Watch and verify that the ActivityBot has a high cruising speed on the way out and a lower one on the way back. That is the effect of the Robot set speed (+/-) for distance blocks.
- Also watch and verify that the ActivityBot abruptly sped up and slowed down on the way out, and gradually on the way back. That is the effect of the Robot set acceleration for distance blocks.
How it Works
The first block in the program is a comment noting the project name. The second block is frequency out, which makes a piezospeaker tone. If that tone plays in the middle of the program instead of at the beginning, it could indicate that the batteries are low. The third block is the required ActivityBot initialize. These first three blocks are used in all example programs that make the ActivityBot move.
Next, Robot set acceleration block is configured for distance at 600 ticks/s2. The Robot set max speed block is set for distance, at 128. That determines the Robot drive distance block's target cruising speed, which is 2 full revolutions per second. After these settings, the first Robot drive distance block makes the ActivityBot go 256 ticks forward. The high acceleration setting causes the ActivityBot to speed up and slow down abruptly, while the high Robot set speed setting directs the ActivityBot to use a high cruising speed to travel the distance.
When your robot completes the first maneuver, the next set of Robot set acceleration and Robot set max speed blocks have much lower values. Then, a Robot drive distance block tells the ActivityBot to back up the same distance it just went forward, 256 ticks. You will see that with the new acceleration setting of just just, 50 ticks/s2, the ActivityBot only gradually speeds up and slows down. With the new max speed of just 64, the cruising speed is slower.
Did You Know?
What's in a name? — The acceleration setting in the Robot set acceleration block is in units of ticks per second squared. It does not matter if your Robot drive distance blocks are also using ticks, or centimeters, or inches. The result will be the same.
Try This
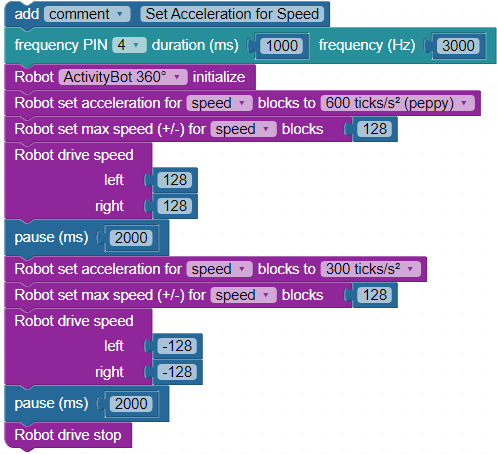
Setting the acceleration Robot drive speed blocks is about the same as it is for distance maneuvers. The next project shows the effect that different acceleration settings have, when speed and drive time are the same.
- In BlocklyProp, make a new project naming it: Set Drive Speed.
- Build the project shown below, and save it.
- Connect your ActivityBot to your computer and set the power switch to 1.
- Set the COM port and click Load and run (save code to EEPROM).
- Disconnect your robot and put it on the floor in an open area.
- Press, hold and release the reset button as you set the power switch to 2.
- Watch your ActivityBot drive forwards for two seconds, then backwards for two seconds.
This time, the robot does not make it back to where it started. The robot drive speeds were the same in both directions (+/- 128) and the drive time was the same, pause (ms) 2000. So what happened? Going forward, the acceleration setting was 600 ticks/s2 but going backwards, the setting was only 300 ticks/s2. The slower acceleration rate makes it take longer for the robot to reach full cruising speed, so it wasn't able to travel the same distance in the same amount of time.
Your Turn
Now, let's add the effect of constraining the max speed in the driving-backward maneuver.
- In the second Robot set max speed block, change the value from 128 to 64.
- Save the modified project to your robot's EEPROM.
- Put the robot back on it's starting point on the floor, run the project, and watch its behavior.
After driving forward the same distance as last time, how far did it make it back? It should stop even further from the starting point. Why?