The 3-Position Power Switch
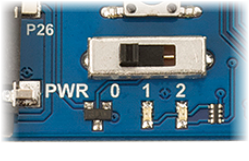
All versions of the Propeller Activity Board have a 3-position power switch:
- Position 0 — for building and modifying circuits. Position 0 turns off power to the circuits on the board. (If you plug your board into a USB port, you might see little lights near the USB connector, since it is receiving power from your computer).
- Position 1 — for programming and breadboard circuits. Position 1 connects power to most of the board, including the black sockets along the three edges of the white breadboard where you build circuits. It does NOT connect power to the 3-pin servo ports labeled P12-P17 that are above the white breadboard. Put the switch in Position 1 before loading a navigation program that will make the robot's wheels turn, and then load the program into EEPROM. This will keep the robot from driving off the table as soon as the program is loaded.
- Position 2 — for making the ActivityBot move. Position 2 powers all the circuits on the board, including the 3-pin servo ports labeled P12-P17. After loading a navigation program into EEPROM, you can put the robot on the floor, hold the reset button down, and put the switch in position 2. When you let go of the reset button, the program will start running and the robot will drive in the (hopefully) safe place you placed it.
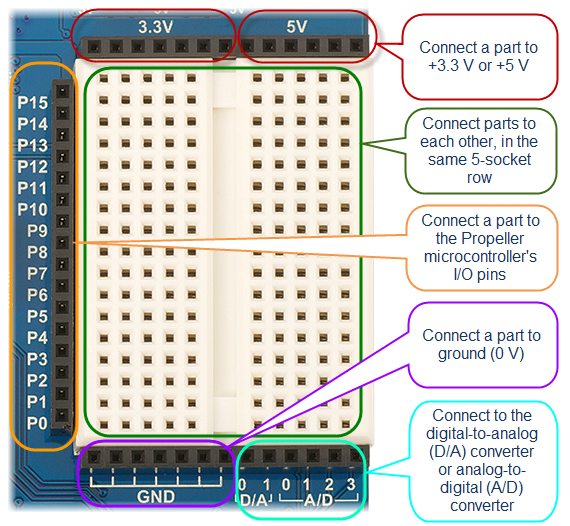
The Breadboard
The breadboard lets you build your own circuits with common electronic components. It's a great way to learn about electricity, and to experiment with making your own inventions. Building experimental circuits to design your own projects is called prototyping, and it is a real-world engineering skill.
The Propeller Activity Board's breadboard is surrounded on three sides by black sockets. These make it convenient to connect circuits on the breadboard to power, ground, and the Propeller I/O pins. There are also sockets to connect to a digital-to-analog converter and an analog-to-digital converter.
If you have never built circuits on a breadboard before, watch this video about breadboards and how to build circuits on them. History can be pretty interesting!
- Follow the links below to continue with the ActivityBot tutorial.