The example program on the previous page moved the ActivityBot's wheels at the same speed but opposite directions - one forward and one backward - to make the robot turn. Other wheel speed/direction combinations perform other kinds of turning maneuvers. Turning maneuvers can be grouped into three general categories:
Rotation turns
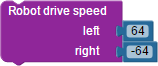
Wheel speeds are equal, but velocity is opposite to make the ActivityBot turn about its center. This rotation is great for making the robot face a new direction in a tight place and without changing its position. Imagine a pen going through the center of the ActivityBot's "axle." A rotating turn would not draw any curved lines; it would just rotate on this point making the dot darker! You could think of this as an arc with a radius of zero.
Pivot turns
One wheel turns forward or backward while the other stays still. Now the center of the circle is the wheel that is not moving, and the ActivityBot pivots about this point. An imaginary pen through the center of the robot would draw a circle with a radius equal to half of the ActivityBot's wheelbase of about 106 mm.

Arcs
With arcs, both wheels are turning but at different speeds. They may be moving in the same or opposite directions.
Opposite-direction tight arcs: If the wheels are going in opposite directions, the arc created by our imaginary centroid-pen would have a radius between zero (if the speeds were almost the same like a rotating turn) and 53 mm (if one wheel speed is set to almost zero, like a pivot turn).
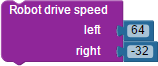
Same-direction wide arcs: If the wheels are turning different speeds but the same direction. Going back to the imaginary centroid-pen, the radius of such arcs can be anything from about 53 mm to theoretically infinite. The closer the speeds are to each other, the larger the arc radius will be. (Of course, if the speeds are equal, the trajectory is straight.)
Example Code
This program progresses through the four types of turns described above. The ActivityBot will come to a stop and beep between each type of turn so you can more easily see the relationship between the blocks and the maneuvers.
- In your BlocklyProp account, create a new project and name it Taking Turns.
- Build the project shown below, and save it.
- Be sure to set the Robot initialize block's dropdown to your particular robot: ActivityBot or ActivityBot 360°.

- Connect your ActivityBot to your computer and set the power switch to 1.
- Set the COM port and click Load and run (save code to EEPROM).
- Disconnect your robot and put it on the floor in an open area.
- Press, hold and release the reset button as you set the power switch to 2.
How it Works
After the required Robot initialize block, the rest of the code is divided into four sections of five blocks each.
- A frequency out block to signal a new maneuver is starting. The frequency (Hz) value is lower each time so you can tell them apart.
- A comment block noting the type of turn in that maneuver.
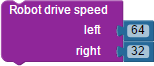
- A Robot drive speed block, with the left and right wheel speeds set to perform that particular maneuver.
- A pause (ms) 2000 block, which lets each maneuver last for two seconds.
- A Robot drive stop block, to end the current maneuver before moving on to the next section.
Did You Know?
Variable Speeds — The Robot drive speed block will accept any block for its left or right fields that resolves into a number value, such as variables and equations. Using a variable for a driving speed can allow the maneuvers to change during runtime without additional blocks. Remember also that the block's underlying C code libraries automatically limit the range to +/- 128, and that you can limit the range further with the Robot set max speed block.
Try This
The following example project keeps one wheel's speed steady while gradually reducing the other with a variable. Can you predict what the maneuver will be like?
- Create a new project and name it Taking Turns Try This.
- Build the project shown below, and save it.
- Be sure to set the Robot initialize block's dropdown to your particular robot: ActivityBot or ActivityBot 360°.

- Connect your ActivityBot to your computer and set the power switch to 1.
- Set the COM port and click Load and run (save code to EEPROM).
- Disconnect your robot and put it on the floor in an open area.
- Press, hold and release the reset button as you set the power switch to 2.
Did your ActivityBot do what you predicted?
Your Turn
To thoroughly understand turning maneuvers, make copies of the Taking Turns project under new names, and try the following variations:
- Perform all four types of maneuvers turning left instead of turning right.
- Perform all four types of maneuvers with the robot moving backward (though, which way is backward for the first one?)
- Make each of the four maneuvers drive the ActivityBot for one complete rotation or complete circle. How do the pause times compare to each other?
- Modify the last one to increase one wheel speed from 64 to 128. What do you have to do to the pause times to make the ActivityBot complete just one rotation or circle for each maneuver?