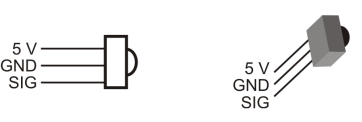
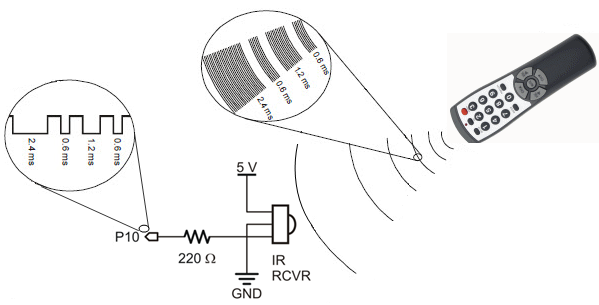
IR Receiver Circuit
If you have not used the IR Receivers with your ActivityBot before, take a look at the pictures below. The infrared receiver needs three connections: 5 V, GND, and an I/O pin to read the signal it sends. The circuitry inside the infrared receiver makes it safe to connect its signal pin to the Propeller I/O pin with a small resistor, even though the sensor is powered by 5 V.
- If you already have ActivityBot whisker circuits, or a PING))) Distance Sensor, or a piezospeaker on your ActivityBot, leave them there! You can add code for those to your project.
- Build the IR receiver circuit on the Activity Board (original or WX version) breadboard.


Prepare your Remote
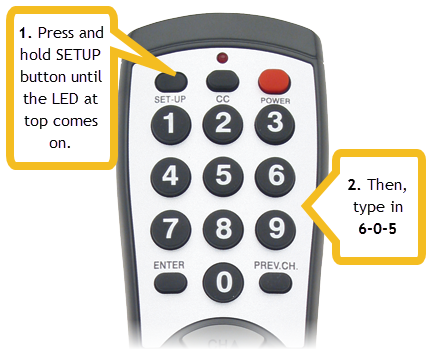
- Configure your remote for Sony protocol, following its manufacturer instructions. If you have the Brightstar brand remote from Parallax, hold the Setup button until the light near it comes on, and then Enter 6-0-5 and the light should go off. Done!
IR Receiver Test Code
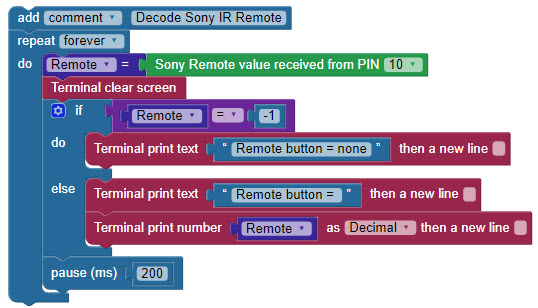
The test program decodes signals received the SONY remote and displays them in the BlocklyProp Terminal.
- Log into your BlocklyProp account, and make a new Propeller C project.
- Build and save the project shown below.
- Connect your ActivityBot to the computer and put its power switch in Position 1.
- Run the program, and the Terminal should open.
- Point the remote at the IR receiver, and push some buttons.
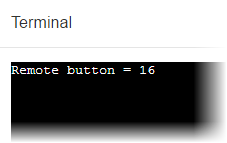
You should see the remote button number displayed in the Terminal. Note that the Channel up/down, Volume up/down, and Mute buttons also return numbers. When no button is pressed you should see Remote button = none." You may also see this message if the IR signal of the button that is pressed is not one that is recognized by this block's library. Some remotes have a LOT of buttons!!!
- Write down the numbers that you see when you push the Channel Up, Channel Down, Volume Up, and Volume down buttons on your remote.
How it Works
The IR receiver is looking for infrared light (in the 980 nanometer range) that is pulsing at around 38 kHz. The IR remote sends short bursts of this pulsing 38 kHz infrared light, in a different on-off pattern for each button on the remote. While the IR receiver detects these bursts it sends a 0 the Propeller I/O pin, and a 1 when it does not. The C code underneath the BlocklyProp Sony Remote value block does the work of decoding the on-off pattern conveyed by the Propeller I/O pin.
The projects's blocks are all inside a repeat forever loop (except for the comment at the top!)
The first action is for the Sony remote value block to check PIN 10, and then store the number it receives into the Remote Button variable. Next, a Terminal clear screen block is there to wipe away the old message each time through the repeat loop to make way for a new one.
Next, an if...do...else loop checks to see if Remote Button equals -1. If this is true, it means no recognized button on the remote is pressed, and the if...do block is executed. That is just a Terminal print text block with the message "Remote button = none. "
If Remote Button does NOT equal -1, the if...condition is NOT true, so a recognizable button must be pressed! In that case code execution drops to the else blocks. Here, a Terminal print text block and prints "Remote button = " which is immediately followed by the decimal value stored in Remote Button.
After the if...do...else block, pause (ms) 200 gives the Terminal time to display the message before code execution returns to the top of the repeat forever loop.
- Ready to make the ActivityBot roll with the remote? Follow the link to the next page.