Schematics and Building the Circuits
The schematic for the RF tilt controller and the schematic for the radio controlled Boe-Bot are below.
- Build the first circuit shown in Figure 2 on a separate Board of Education (or on a BASIC Stamp HomeWork Board).
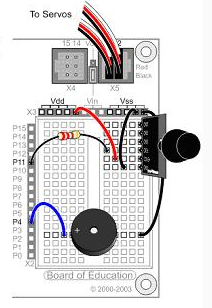
- Build the second circuit, shown here in Figure 3, on your Boe-Bot.
Figure 2 - RF Tilt Controller (Transmitter) Schematic and Wiring Diagram
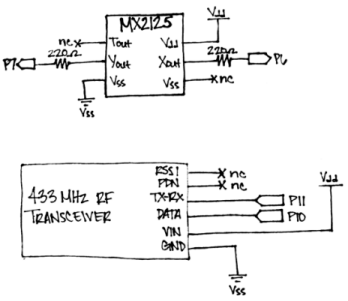
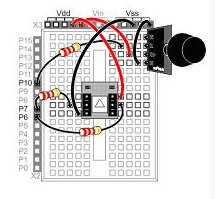
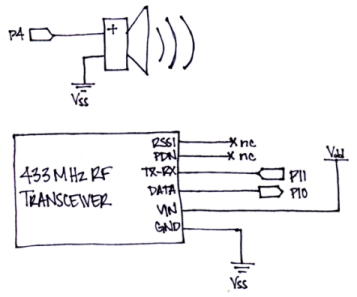
Figure 3 - Radio-Controlled Boe-Bot (Receiver) Schematic and Wiring Diagram
BASIC Stamp Modules Exchanging Serial Messages with SEROUT and SERIN
The same kind of serial communication the BASIC Stamp uses to send messages to the computer with the DEBUG command can be used to exchange messages between BASIC Stamp modules. The DEBUG command is actually a special case of a more general command called SEROUT. For example, you can use the command SEROUT 16, 16468, ["Hello"] in place of the command DEBUG "Hello". The DEBUGIN command is also a special case of the SERIN command. For example, the command DEBUGIN DEC3 value can be replaced by the command SERIN 16, 16468, [DEC3 value].
When SEROUT or SERIN use 16 as a Pin argument, it makes the BASIC Stamp send or receive the serial message on its SOUT or SIN pins. Those pins are connected to the programming cable by the Board of Education. To send or receive the same serial message on P10, use 10 as your Pin argument, like this: SEROUT 10, 16468, [Hello]. If you want to receive a serial message with a 3-digit number on P11, the command SERIN, 11, 16468, [DEC3 value] will do the trick.
The second number used in the example SEROUT and SERIN commands has been 16468, which is called the baudmode argument. In this case, the baudmode argument tells the BASIC Stamp to transmit and receive messages at 9600 bits per second (bps). You can change the baudmode argument to 16780, and then the SERIN and SEROUT commands will send and receive data at 2400 bps instead. The example programs in this activity use a baudmode of 16780 for 2400 bps.
More about SEROUT and SERIN
There’s more to learn about the SEROUT and SERIN commands. The BASIC Stamp Syntax and Reference Manual and BASIC Stamp Editor Help give the SEROUT and SERIN commands extensive coverage.
Understanding Serial Communication Signals
The Understanding Signals text explains how asynchronous serial communication works and shows you how to monitor serial communication signals with the Parallax USB Oscilloscope. This is just one of the many electronics topics introduced in this book, which is available as a download from Parallax.com (PDF only).
Testing the Accelerometer, Transmitter, and Receiver
You can test the system with the RF tilt controller disconnected from the programming cable while it's running TestTiltTransmitter.bs2. The radio-controlled Boe-Bot has to be connected to the programming cable during this test, and it has to be running TestTiltReceiver.bs2. The test involves tilting the RF tilt controller and checking to make sure radio-controlled Boe-Bot receives and displays the correct tilt information in the Debug Terminal.
TestTiltTransmitter.bs2 is a test program for testing the tilt radio controller. It displays the accelerometer measurements with a DEBUG command, and then sends those same measurements to the RF transmitter with a SEROUT command. The DEBUG command will allow you to make sure the accelerometer is working properly before disconnecting it from the programming cable. The SEROUT command sends the x and y-axis values to the RF transmitter, which in turn broadcasts these values at 433 MHz for any 433 MHz receiver to receive. Both the x and y-axis values are stored in word variables. Since a word is really two bytes, the .HIGHBYTE and .LOWBYTE modifiers are used to send the upper byte of the word variable, followed by the lower byte.
SEROUT 10, 16780, [ "!",

                    x.HIGHBYTE, x.LOWBYTE,

                    y.HIGHBYTE, y.LOWBYTE ]
TestTiltReceiver.bs2 is a test program for the radio-controlled Boe-Bot, and it receives messages from the 433 MHz receiver with a SERIN command. It then displays the values it receives with the DEBUG command. Since the SEROUT command in TestTiltTransmitter.bs2 sends an exclamation point to indicate that the next four bytes will contain the x-axis and y-axis measurements, the SERIN command in TestTiltReceiver.bs2 uses the WAIT() formatter to wait for the exclamation point before storing any data. It also uses the .HIGHBYTE and .LOWBYTE operators to store the values it receives into the x and y word variables in the same order that they were transmitted by the RF tilt controller.
SERIN 11, 16780, [ WAIT("!"),

                   x.HIGHBYTE, x.LOWBYTE,

                   y.HIGHBYTE, y.LOWBYTE ]
Example Program – TestTiltTransmitter.bs2
- Connect your programming cable to your tilt controller.
- Enter, save, and run TestTiltTransmitter.bs2.
- Test and verify that the accelerometer is reporting correct measurements for its x‑axis and y-axis in the Debug Terminal.
- Make sure it's working right; troubleshoot the circuit and/or code if necessary.
- Disconnect your programming cable from your tilt controller, but leave the battery (or DC supply) connected so that the program keeps running.
- Move on to the instructions in ”Example Program – TestTiltReceiver.bs2.”
' TestTiltTransmitter.bs2

' Test accelerometer readings.


'{$STAMP BS2}

'{$PBASIC 2.5}


x              VAR     Word                  ' Left/right tilt

y              VAR     Word                  ' Forward/backward tilt


HIGH 11                                      ' T/R Line High - Transmit


DEBUG "Beep!!!"                              ' Test piezospeaker

FREQOUT 4, 2000, 3000

DEBUG CLS, "  x     y", CR                   ' Axis headings


DO                                           ' Begin main routine


  PULSIN 6, 1, x                             ' Get X-axis tilt

  PULSIN 7, 1, y                             ' Get Y-axis tilt


  PULSOUT 10, 1200                           ' Sync pulse for the receiver

  ' Send tilt at 2400 bps, non-inverted.

  SEROUT 10, 16780, [ "!",                   ' Start character

                      x.HIGHBYTE, x.LOWBYTE, ' X-axis word

                      y.HIGHBYTE, y.LOWBYTE ]' Y-axis word


  ' Display x AND y tilt measurements.

  DEBUG CRSRX, 0, "(", SDEC3 x, ", ", SDEC3 y, ")", CLREOL


  PAUSE 100                                  ' Pause 1/10 s


LOOP                                         ' Repeat main routine
Example Program – TestTiltReceiver.bs2
- Connect your programming cable to your radio-controlled Boe-Bot.
- Enter, save, and run TestTiltReceiver.bs2.
- This is the cool part—try tilting your RF tilt controller and observe the Debug Terminal, which is now receiving messages from your radio controlled Boe-Bot. The Debug Terminal should still report the correct measurements for its x-axis and y-axis that are wirelessly transmitted by your RF tilt controller.
- Make sure it's working right; troubleshoot the circuit and/or code if necessary.
' TestTiltReceiver.bs2

' Test accelerometer readings.


'{$STAMP BS2}

'{$PBASIC 2.5}


x              VAR     Word                  ' Left/right tilt

y              VAR     Word                  ' Forward/backward tilt


LOW 11                                       ' T/R Line low - receive


DEBUG "Beep!!!"                              ' Test piezospeaker

FREQOUT 4, 2000, 3000

DEBUG CLS, "  x     y", CR                   ' Axis headings


DO                                           ' Begin main routine


  ' Get serial measurements from RF receiver.


  SERIN 10, 16780, [ WAIT("!"),              ' Wait for start character

                     x.HIGHBYTE, x.LOWBYTE,  ' Get x-axis word

                     y.HIGHBYTE, y.LOWBYTE ] ' Get y-axis word


  ' Convert raw tilt measurements to a convenient scale.

  x = (x MIN 1875 MAX 3125) - 1875 / 5 - 125

  y = (y MIN 1875 MAX 3125) - 1875 / 5 - 125


  ' Display x AND y tilt measurements.

  DEBUG CRSRX, 0, "(", SDEC3 x, ", ", SDEC3 y, ")", CLREOL


  PAUSE 100                                  ' Pause 1/10 s


LOOP                                         ' Repeat main routine
Your Turn – SEROUT vs. DEBUG
The .HIGHBYTE and .LOWBYTE operators are not often used in DEBUG commands because they really don't cause the Debug Terminal to display meaningful data. With DEBUG and DEBUGIN commands, formatters such as SDEC and DEC4 are the more common choices for displaying the x-axis and y-axis measurements. Let's take a closer look at the DEC4 operator. It takes four characters to send the x-axis measurement, and four more to send the y-axis measurement. That's a total of eight bytes, nine if you add the exclamation point. In contrast, the .HIGHBYTE and .LOWBYTE modifiers get the job done with only two bytes each, so that's five bytes including the "!".
Why does this matter? Because we really don't want to exceed 40 ms between servo pulses, and guess what: two accelerometer axis measurements and five bytes at 2400 bps takes a total of 40 ms. In the serial messages we are using, each byte has a start bit, stop bit, and eight data bits. So, how much longer would it take if the programs were to use the DEC4 formatter? Since the transmit rate is 2400 bits per second, each bit takes 1/2400 of a second, or 0.417 ms. Multiply this by 40 more bits, and that's 16.7 more ms for a total of almost 57 ms. So, adding four more bytes causes too much time to elapse between servo pulses, which will cause the servos to perform very poorly.
All that said, it's still a good idea to see how it can work while there are no servos running.
- Modify the SEROUT command in TestTiltTransmitter.bs2 so that it looks like this:
SEROUT 10, 16780, [ "!", DEC4 x, DEC4 y]
- Modify the SERIN command in TestTiltReceiver.bs2 so that it looks like this:
SERIN 11, 16780, [WAIT("!"), DEC4 x, DEC4 y]
- Repeat the tests for the modified versions of TestTiltTransmitter.bs2 and TestTiltReceiver.bs2.