In this activity, you will put the micro:bit into REPL mode and make it evaluate MicroPython statements that you type into the terminal pane.
Looking at your editor’s terminal pane, you can tell if it’s in REPL mode by looking for the REPL prompt symbol >>>. This prompt shows you where to type a MicroPython statement, just to the right of the symbol. Then, when you press Enter the micro:bit will evaluate the statement and you’ll be able to see the result immediately in the same terminal. No need to flash a script!
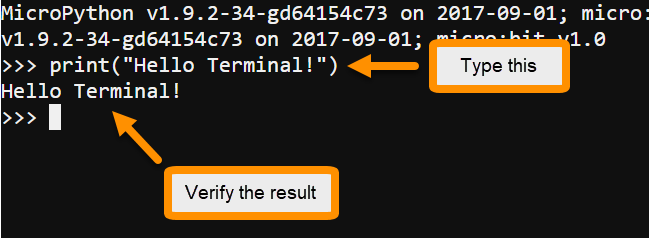
In the example below, print("Hello Terminal!") was typed at the REPL prompt. After pressing the Enter key, the micro:bit evaluated it, and printed "Hello Terminal!" on the line below. The online editor is shown on the left, Mu on the right.

Get Ready to REPL!
For either the online editor or Mu:
- Connect your micro:bit to your computer with a USB cable. For this activity, it can be either the entire cyber:bot, or just the micro:bit on its own.
IMPORTANT: If you are using the python.microbit.org online editor:
- Use a Google Chrome browser to go to python.microbit.org. (This link is to version 2 to match the screencaptures here).
- Make sure your firmware is up-to-date. This page has instructions for checking and updating. It’s easy: https://microbit.org/guide/firmware/.
The python.microbit.org online editor and Mu editor terminal panes look different, and the steps to enter REPL mode also differ.
- If you are using Mu, skip down to the section titled REPL with Mu.
- If you are using the python.microbit.org online editor, continue from here.
REPL with the python.microbit.org online editor
In the online editor, you need to start a WebUSB connection before opening the terminal. You will only have to do this once per session, and also every time you disconnect and reconnect the USB cable.
- Click Connect, select your micro:bit, and then confirm with the Connect button.
- Open the terminal by clicking the Open Serial button.
The online editor’s terminal opens into “Serial” mode. In this mode, the terminal will only display messages from a script that’s running. When the terminal is open, switching to REPL is easy. Either click CTRL + D for REPL button, or click the terminal pane and press CTRL + C on your keyboard.
- Check that the >>> REPL prompt is not yet visible.
- Click the CTRL + C button to put the micro:bit into REPL mode.
- Check to make sure the REPL prompt appears.
- Skip past Repl with Mu and go to the Code Interactively with REPL section, below.
TIP: After clicking Open Serial, the label on the button will change to Close Serial. When you click Close Serial, the terminal pane will disappear, and you will be able to work with code in the editor pane again. Close Serial does not disconnect WebUSB.
REPL with Mu
In Mu, the REPL button opens a terminal pane and puts the micro:bit into REPL mode.
- Click the REPL button.
- Verify that a pane opens in the bottom section of Mu with some text and the >>> REPL prompt.
Code Interactively with REPL
Now that you’ve got REPL open, it’s time to type some MicroPython statements and see the results.
- Click the terminal just to the right of the >>> REPL prompt.
- Type the statement print("Hello Terminal!") and then press Enter.
- Check to make sure the micro:bit responded with Hello Terminal! on the next line.
As of this writing, the micro:bit module hosts MicroPython v.1.9.2. For more information on MicroPython and the REPL feature, please see the information located here: https://docs.micropython.org/en/v1.9.2/esp8266/reference/repl.html
Meet the Print Function
The print function is similar to some of the display methods you experimented with in Writing micro:bit Programs. The main difference is that instead of outputting characters or images to the micro:bit module’s LED display, the print function transmits characters to a terminal.
The print function can display a variety of objects as text in a terminal, and it can also accept more than one object separated by commas. For example, if a variable named n stores the value 5, you can write a statement like print("n = ", n), and it will display n = 5.
Tip: The print function is built into the python interpreter, so your sketches won’t have to include any modules to use it.
Try This: Print something different
You might have noticed that another REPL prompt appeared below the result of your last print statement. Let’s try making REPL print something different.
- Type print(" your custom message ")
- Press Enter and check the result that appears on the next line. Does it match the custom message you thought up and entered?
Your Turn: Multiple Statements with REPL
REPL is not limited to single lines. For example, if you type from microbit import * at the REPL prompt, the MicroPython interpreter in the micro:bit will import the micro:bit module. Then, you can type statements that use MicroPython functions and methods. The next example makes use of the microbit module’s sleep function.
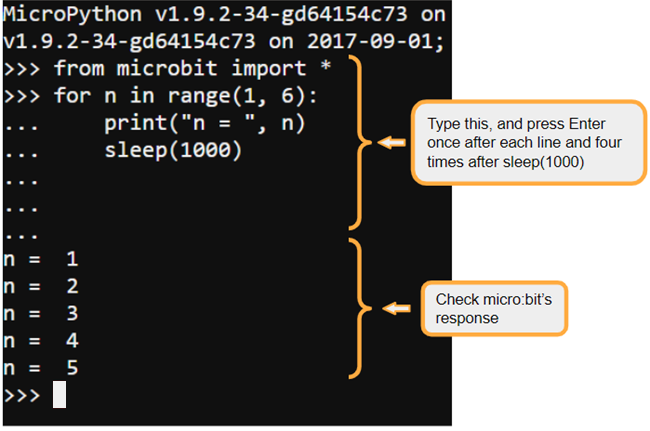
You can also type compound statements into REPL. Compound statements are ones where one line has a colon and the lines below it are indented. Some examples include if… statements and for… loops. This next example also has a for… loop.
- At the REPL prompt, type from microbit import * and press Enter. If a >>> REPL prompt appears on the next line, it means the micro:bit executed the statement.
- Type for n in range(1, 6): at the next REPL prompt, and press Enter. The REPL prompt that appears on the next line should be … instead of >>>. This indicates that you are adding a statement that’s an indented part of the compound statement.
- Type print("n = ", n) at the indented … REPL prompt.
- Another indented … REPL prompt should appear. Type sleep(1000) and press Enter.
- Press Enter three more times to exit the compound statement and make REPL evaluate the loop.
- Verify the terminal displays the result, which should be n = 1 followed by n = 2 on the next line a second later. The terminal should display a new n = value once per second on each new line until it reaches 5. Then, it should display another >>> REPL prompt.