Now that you know how to write and save, and load a simple “Hello” program for your S3 robot using BlocklyProp, what’s next? Now, you will take it one step further and learn how to change an existing program by adding LED blocks.
Note: Most programs already loaded to EEPROM can be run again by simply pressing the blue reset button on the S3. Some very short programs like the one above do not activate the part of the S3's system that monitors the reset button, so pressing it will not reset the S3.
:
Modifying a Program
Now, let’s say you want to do a bit more by adding other blocks to a program.
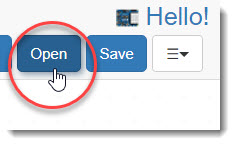
- Click the Open button and browse to the Hello program you wrote and saved from the previous page.
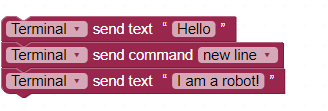
- Your project should look something like this. If it does not, update it to match and save it before continuing.
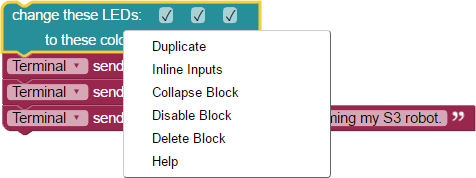
- Click on the ACTIONS > LEDS category, then on the change these LEDs block.
- Drag the box to the workspace, and snap it into place at the bottom of the program.

- When it is in place, right click the newly-added block. A drop down menu will appear from to the change these LEDs block.

This menu lets you do many useful things (try them out, if you're curious – but be careful not to delete blocks you want to keep!):
- Duplicate: Make a copy of the block
- Inline Inputs: Change the style of the block from a tall to a wider view.
- Collapse Block: Graphically consolidate a block, or group of blocks, creating a simpler looking outline.
- Disable Block: Make the block inactive and “grays” it out to let you know it has been disabled. The program will no longer execute this block until it is re-enabled.
- Delete Block: Throws the block in the trash. (Hint: You can also drag the block to the bottom-right trash can icon. Right-clicking on the trash and click "Undo" will recover a deleted block.)
- Help: Accesses our Help files.
- On the menu, right-click on the change these LEDs block, and click “Duplicate.” Place the copy at the top of the program. When you let it go, it will audibly “snap” into place (if sound is enabled on your device).
- On the upper change these LEDs block, move your cursor to the center black box and click in that square. A drop down color selection menu appears. Select green. Repeat this process for the bottom identical block, but this time select red. Your program should now look like Chip’s.

- Drag out the the wait block in the CONTROL category and snap it into to place between the top change these LEDs block and the send message block.
- Duplicate the wait block and snap the duplicate between the lower send text block and the change these LEDs block. Here is the fully edited program:

You’ve just edited your first BlocklyProp LED program! Now let’s see if it works.
- First save by clicking the Save button and giving your project a new name.
- Confirm the save, and then Load and run EEPROM (remember that your S3 needs to be powered on with its USB cable plugged in).
- Now, watch your S3’s LEDs and the Terminal.
You should see the USB TX/RX flashing amber, the blue charging and power LEDs glowing. How about the center bicolor indicator LED? Did it light up green first and then turn red as planned? Did you see your message on the Terminal? Did you see it all? It happens quickly.
- To look again you can click on Close to close the Terminal. On the menu, click Load and run EEPROM once more. Did you see it that time?
Let’s try again. This time using a different method.
- Close the Terminal.
- This time, from the menu, click on Open Serial Terminal and a refreshed Terminal will open.

- Now, press the blue reset button on the S3 robot, and watch the S3's LEDs and the Terminal closely. Did it work then?
Special thanks to Parallax friend Whit Stodghill for his assistance in writing, editing, and testing material for these S3 tutorials.