Now that you’ve gotten BlocklyProp setup to program your S3 robot, we can dive in! Programming, and the ability to change and write new programs, is what makes robotics so amazing. We will begin learning to use BlocklyProp by learning to control the S3’s lights, or LEDs.
Finding All the LEDs
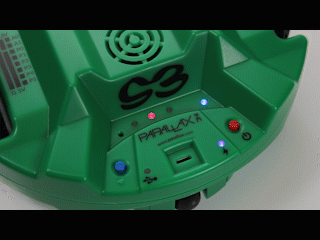
You have likely already noticed that your S3 has several lights, especially if you’ve gone through the S3’s 8 pre-programmed demonstration programs. Each of these lights is an LED. There are more inside the shell that you cannot see. What are they for? What do they mean and how can you learn to use them?
Below are photos of some of the S3’s LEDs. We will begin with those that are easiest to find. You can also follow along with the S3 startup guide that came with your robot, which has a section labeling the different parts of your S3.

Bi-color Indicator LEDs - These are the three LEDs at the back of the robot, directly below the S3 logo. In this tutorial, you will learn how simple and useful they are to program. In their simplest use they can be off, red, amber, or green. They are called bi-color because they combine the ability to emit two colors (in this case red or green, depending on the direction that electrical current flows through the LED). These two colors can be mixed as well, forming the color amber.
Power LED - When your S3 is powered on, you will see the blue power LED light up and stay on. When it blinks, this means your battery is getting low and needs to be recharged. When you turn off your S3, the power LED turns off along with everything else. This particular LED is also bi-color in blue/red.
Note that if a very short program has been loaded to the S3, this light may not come on.
Charging LED - This LED is solid blue when the power is on, solid red when charging, and blinking blue/red when there is a charge fault or something wrong with your robot. This LED gives you useful feedback for charging your S3’s rechargeable battery. As you might guess, it is bi-color too in blue/red.
USB TX/RX LED - This is an amber LED that indicates the USB port is transmitting or receiving.

Other LEDs - There are other LEDs on the S3 that are more difficult to see. We will find and learn about them in later tutorials.
Did You Know?
A light-emitting diode (LED) is a light source that is also a semiconductor. It emits light when voltage is applied to its leads.
The first LEDs were used in 1962 and emitted low-intensity infrared light. Infrared LEDs are still frequently used today and are more common now than ever before. They are used as sensors when paired with receivers – your TV remote control is a good example of this. The first visible-light LEDs were also of low intensity, and limited to the color red. Modern LEDs are available in virtually all visible (and some invisible) colors - in single, bi-color (two color), or multi-color types, in all kinds of shapes and sizes with greatly varying brightnesses.
Early LEDs were used mostly as indicator lights in electronic devices and replaced small incandescent bulbs. You may be used to seeing them in multi-segment displays like digital clocks or on your microwave. These days, virtually all devices have LED indicators or displays as they are becoming an inexpensive replacement for the light bulbs we all use in our homes. LEDs are dependable and have long lifespans, making replacement less frequent.
Using the Bi-Color LEDs
BlocklyProp makes programming your S3’s three bi-color indicator LEDs easy. These LEDs are useful for providing visual feedback to the robot programmer. For example, you could use the three LEDs to show which of the S3’s light sensors detects the most light. They are also helpful as turn signal indicators and backup lights. You could use the right green LED for a forward right turn, and make it red for a backwards turn.
- Locate the change LED block in the BlocklyProp ACTIONS > LEDs category. In the default configuration, the three LEDs are black (OFF). The block lets you set each of the left, center, and right indicator LEDs.
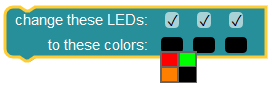
- To select the LEDs you want to change, use the checkmarks. If you remove a checkmark, your program will ignore the unchecked LED when running the block. Verify that the checkmark is visible for the LED(s) you want to modify.
- Click on the box below the checkmark to select the color you want to use. For example look at the block shown below. If you want to change only the left LED to red, click to uncheck the boxes for the center and right LEDs, and pick red in the color block below the left LED (notice that the other LEDs are OFF when you run this program).

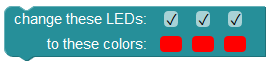
- If you would like to set left, center, and right LEDs to red, make sure all boxes are checkmarked and set their colors to red.
Wait and Timing
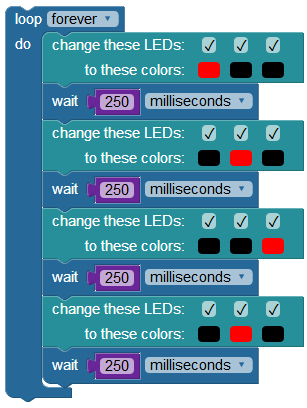
Suppose you wanted to create a program that made all lights turn red, then amber, and finally green (like a reversed traffic light). Your first thought might be to build it like this:

If you create and download this program, you will only see green LEDs. Why? Each change of LED colors takes only a millisecond or less, so you are unable to see the LEDs in their red or amber states. That is how quickly the Propeller Microcontroller inside the S3 executes the program. You could remedy this by adding some wait blocks from the CONTROL category. The wait block has several unit choices which you can use to add delays to slow the program - second(s), tenth(s) of a second, and millisecond(s). Choose the unit you want to use by selecting it in the dropdown menu. Change how long to wait by clicking in that box and typing a number. Simple!
- Adding a wait block between each of the change LED blocks will make it possible to see the color changes in the LEDs. Give it a try!

- If you wanted to turn the LEDs all off after five more seconds you could simply add the following two blocks to the above program:

Did You Know?
As you saw above, one of the wait block's time units is millisecond(s). A millisecond (ms) is 1/1000th of a second. Your program is going to pause for period of time and in a unit you set. In order to make programs do what you want them to do and when you want them to, you need to determine how long of a wait you need to create. If you set the wait (or delay) to 5 tenth(s) of a second, that is the same as half of a second or 500 ms. Waits or delays are measured in these tiny increments of time because your robot’s Propeller Multicore processes things very quickly (in a few ms or less).
An MIT study in 2014 found that the human brain can “see” and “process” images flashed before the eyes for as little as 13 milliseconds (remember that a millisecond is 1/1000th of a second). That is eight times faster than scientists previously thought – before, it was believed that it took around 100 milliseconds. Even though our human processing speed is quite fast, the S3’s “brain”, the Propeller Microcontroller, is considerably faster.
Try This
Create a continuous LED "scanner" that bounces a red LED from side to side. This is a simple program to build, as shown below. Notice that to accomplish this, you will use another block and programming tool called a loop block.
There are two basic loop blocks:
- The first loop block with a dropdown can repeat the blocks it encloses forever, x times, until, or while. With the exception of forever, each of the other options require a condition to be added that indicates when the loop should end.
- The second loop block has a space to insert a number value block, variable, or certain math blocks, and will repeat the loop the number of times specified by that inserted block.
We'll go over more complex loops, and how to break out of a loop, in a later tutorial.
- Change the program so that the LEDs which were off are now amber.
- Experiment with different values in the wait block. How fast can you make it run before you cannot see the changes?
Your Turn!
- Write a program that flashes all LEDs, alternating between red and off. Start with a one second wait, or delay, and make wait time shorter and shorter until the LEDs appear as though they never turn off. What is that setting? How does it compare to the 13 milliseconds the MIT study cited above?
- Write a program that cycles the left LED through all its possible colors and then off (with wait times of your choosing), then do the same with the center LED, and finally the same with the right LED. After you’ve done that, put the program inside a loop. Turn off the lights in your room and enjoy the show.
- Make a "traffic light" with your three LEDs. Start with a go or green light, move next to the caution or amber light, and then finally to the red or stop light. Make your program repeat in a loop. Fun fact: this is just like how real traffic lights are programmed. Add to the challenge by making sure your red light is the LED nearest the red on/off button on your S3. How might you program your traffic light to simply flash amber for a certain number of times during the middle of the program (like real traffic lights often do late at night) and then return to its normal function?
Special thanks to Parallax friend Whit Stodghill for his assistance in writing, editing, and testing material for these S3 tutorials.