In this tutorial, you will look at the line sensor reading block from the SENSORS > LINE menu. While the detect line block gives us data about whether the sensor is or is not over a line, the light sensor reading block gives us more detailed information:
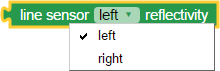
It provides a value of 0% to 100% that tells us how reflective the material under the Scribbler Robot is for either the left or right line sensors.
Understanding and Measuring Line Reflectivity
- To better understand how this block works, build the following program.
This program uses blocks from the CONTROL, VARIABLES, SENSOR > LINE, and ACTIONS > COMMUNICATE categories. The Terminal send blocks will send the sensor values to your computer so that you can see what they are returning.

Inside the loop forever block, the values for both the right and left line sensors from the light sensor reading blocks are stored in variables. The values in those variables are then sent to the terminal so that you can see the measurements.
- Print out the Scribbler Printable Line Following Tracks pdf if you don't already have some on hand. Make two copies of page 11, as you will need them later on.
- Build the program above.
- Save, compile, load to EEPROM, and run the program. This time the USB cable must remain connected between your computer and the S3 robot. Your BlocklyProp workspace should still be open and visible.
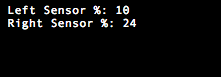
The cable provides a link between the robot and the BlocklyProp Terminal software. When the program begins, the Terminal window will open. When the S3 makes a connection with the Terminal, you should see something like this (your numbers may differ):
- Place your Scribbler robot on a flat surface on top of a piece of paper with a printed black line in its center.
- Slide the Scribbler robot from left to right, back and forth across the line, very close to the paper.
Now, you can experiment with the S3's line sensors to try and understand how they work.
- Observe how the percentage values change as the S3’s line sensors moved over the white paper and black line.
If you want, conduct similar tests with a 3/4” black masking tape line, 3/4” black electrical tape line, or a 3/4” wide Sharpie® marker line - all on white paper or poster board. You can also try white lines on a dark or black surface.
- Make a note of your readings for the various line types and surfaces for future reference.
An example chart is below, with extra spaces for additional line types you might want to try:
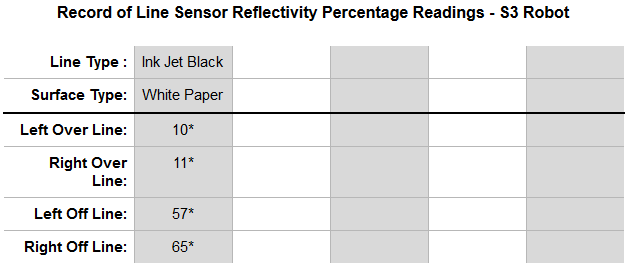
*Example readings in the "inkjet black/white paper" column are in the example code illustrations. Your results will vary.
Putting Our Information to Work
Now, you need to find the middle point between dark and light for the left sensor and the middle point between dark and light for the right sensor, separately.
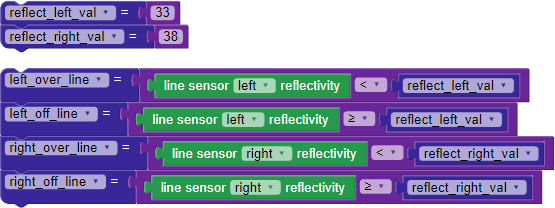
The left sensor got a low reading of 10% and a high reading of 57%. The midpoint (average) is 33% (rounded to a whole number). Left sensor readings below 33% mean it's above a dark color, and readings at or above 33% indicate it's above a light color.
The right sensor had a low reading of 11% and a high reading of 65%. The midpoint (average) is 38%. Right sensor readings below 38% indicate a dark color, and readings at or above 38% indicate a light color.
Remember, the midpoints for your S3 robot will probably be different.
Using VARIABLES blocks, MATH blocks, and the line sensor reading block, you can create a line sensing program optimized for your unique Scribbler robot. The variables are as below. Remember that creating a new variable creates both a set variable and a use variable block.
Using Light Sensor Variables and Inserts with LED Feedback
To check the function of the variable blocks you just created, let’s add some LED feedback. Using what you've made so far, along with additional blocks from the CONTROL and ACTIONS > LEDs categories, construct the BlocklyProp code below:

- Save, compile, load to EEPROM, and run the program.
- Test the variables, inserts, and code by placing your S3 on a flat surface on top of a piece of paper with a printed black line in its center. Slide the S3 from left to right, and back and forth.
Do you get the correct LED feedback as the robot moves relative to the black line? If not, recheck your work against the examples and try again. If yes, let's try following a line.
Creating a Line Following Program
In the following Try This and Your Turn sections, you will be programming the S3 to follow lines using more advanced BlocklyProp blocks. It may require some experimentation with different settings and different blocks to get the program working. To be successful, and to avoid becoming overwhelmed, make sure you test your program after every change keeping track of what works and what doesn't. When you have things functioning as you want them to, be sure to save the program.
The most common approach to dealing with a large task you are unfamiliar with is with trial and error - by trying different ideas, failing, and then learning from your mistakes. This approach works best when you carefully work through problems and solve them in small, manageable steps. If you have a pen and paper handy, writing your desired program steps down first can also help you determine how to set up your program in the Blockly workspace.
Try This
Using the code you created above along with blocks from the ACTIONS > MOTORS category, add the following blocks below the change LEDs blocks to create a line following program in BlocklyProp.

- Save, compile, load to EEPROM, and disconnect your S3 from the programming cable.
- Piece together pages 11, 2, 8, 3, and another copy of 11 of the line following track from the pdf resource.
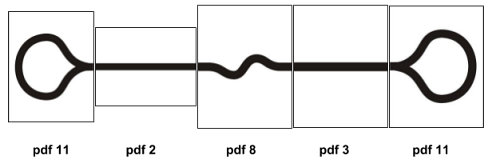
- Tape them together on a hard, flat, smooth surface as shown below and place your S3 on top of the black line. Run the program.
How did it work? How might you improve it? If you are like most experimenters, your S3 may have stopped as soon as it reached any gap in the black line. Remember that the S3 processes info very quickly, so as soon as both sensors simultaneously see a value over your middle threshold, it stops.
Placing the printed sheets edge-to-edge or overlapping them as they are will leave gaps in the line. This is because most printers do not print to the edge of the paper. If you want to create a program that does not stop on these gaps, you are going to have to figure out how to program that in or physically work around them.
Here are some possible solutions:
- Remove the stop driving block. Occasionally, the sensors read a "false positive." Removing this block can help.
- Eliminate the gaps by trimming the paper, or by filling these gaps using a Sharpie® or black masking tape.
- Improve your program by making it more tolerant of gaps in the line or by programming it to find the line again. Such a solution would allow you to use unmodified line following tracks like page 7 from the pdf resource.
- Try the first two solutions outlined above, in order.
- Run tests and observe how your S3 performs on the line following track for each. How did the solutions work? Which did you prefer?
- Using your code as a starting point, try a different block from the ACTIONS > MOTORS category for the left and right functions. Can you make the S3 move more smoothly? What did you do?
Your Turn
- Combine this example with the obstacle sensor blocks to make your Scribbler stop and turn around if there is an obstacle in the way. You could even make your Scribbler make a sound if something is in the way.
- Make a custom line path with tape (black masking or black electrical tape, or white tape on a dark surface), or draw a line, about 3/4" wide, with black markers. Develop your own program using what you have learned.
Hint: You will need to re-check reflectivity and possibly determine a new middle threshold value if you make a line from a different material or ink. You may have already done this at the beginning of this tutorial.
Special thanks to Parallax friend Whit Stodghill for his assistance in writing, editing, and testing material for these S3 tutorials.