This sketch is a modified version of RoamingWithWhiskers, so we’ll just look at the new code for detecting and escaping corners.
First, three global byte variables are added: wLeftOld, wRightOld, and counter. The wLeftOld and wRightOld variables store the whisker states from a previous whisker contact so that they can be compared with the states of the current contact. Then counter is used to track the number of consecutive, alternate contacts.
byte wLeftOld;                // Previous loop whisker values
byte wRightOld;
byte counter;                 // For counting alternate corners
These variables are initialized in the setup function. The counter variable can start with zero, but one of the “old” variables has to be set to 1. Since the routine for detecting corners always looks for an alternating pattern, and compares it to the previous alternating pattern, there has to be an initial alternate pattern to start with. So, wLeftOld and wRightOld are assigned initial values in the setup function before the loop function starts checking and modifying their values.
  wLeftOld = 0;               // Initialize previous whisker
  wRightOld = 1;              // states
  counter = 0;                // Initialize counter to 0
The first thing the code below // Corner Escape has to do is check if one or the other whisker is pressed. A simple way to do this is to use the not-equal operator (!= ) in an if statement. In English, if(wLeft != wRight) means “if the wLeft variable is not equal to the wRight variable…”
  // Corner Escape

  if(wLeft != wRight)         // One whisker pressed?
If they are not equal it means one whisker is pressed, and the sketch has to check whether it’s the opposite pattern as the previous whisker contact. To do that, a nested if statement checks if the current wLeft value is different from the previous one and if the current wRight value is different from the previous one. That’s if( (wLeft != wLeftOld) && (wRight != wRightOld)). If both conditions are true, it’s time to add 1 to the counter variable that tracks alternate whisker contacts. It’s also time to remember the current whisker pattern by setting wLeftOld equal to the current wLeft and wRightOld equal to the current wRight.
    if((wLeft != wLeftOld) && (wRight != wRightOld))
    {
      counter++;              // Increase count by one
      wLeftOld = wLeft;       // Record current for next rep
      wRightOld = wRight;
If this is the fourth consecutive alternate whisker contact, then it’s time to reset the counter variable to 0 and execute a U-turn. When the if(counter == 4) statement is true, its code block tricks the whisker navigation routine into thinking both whiskers are pressed. How does it do that? It sets both wLeft and wRight to zero. This makes the whisker navigation routine think both whiskers are pressed, so it makes a U-turn.
      if(counter == 4)      // Stuck in a corner?
      {
        wLeft = 0;          // Set up whisker states for U-turn
        wRight = 0;
        counter = 0;        // Clear alternate corner count
      }
    }
But, if the conditions in if((wLeft != wLeftOld) && (wRight != wRightOld)) are not all true, it means that this is not a sequence of alternating whisker contacts anymore, so the BOE Shield-Bot must not be stuck in a corner. In that case, the counter variable is set to zero so that it can start counting again when it really does find a corner.
    else                      // Not alternate from last time
    {
      counter = 0;            // Clear alternate corner count
    }
  }
One thing that can be tricky about nested if statements is keeping track of opening and closing braces for each statement’s code block. The picture below shows some nested if statements from the last sketch. In the Arduino editor, you can double-click on a brace to highlight its code block. But sometimes, printing out the code and simply drawing lines to connect opening and closing braces helps to see all the blocks at once, which is useful for finding bugs in deeply nested code.
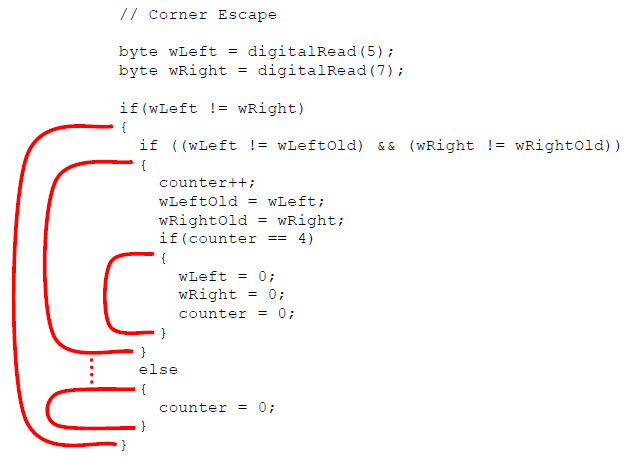
In this picture, the if(wLeft != wRight) statement’s code block contains all the rest of the decision-making code. If it turns out that wLeft is equal to wRight, the Arduino skips to whatever code follows that last closing brace }. The second level if statement compares the old and new wLeft and wRight values with if ((wLeft != wLeftOld) && (wRight != wRightOld)). Notice that its code block ending brace is just below the one for the if(counter==4) block. The if ((wLeft != wLeftOld) && (wRight != wRightOld)) statement also has an else condition with a block that sets counter to zero if the whisker values are not opposite from those of the previous contact.
- Study the code in the picture carefully.
- Imagine that wLeft = 0 , wRight = 0 and counter == 3, and think about what this statement would do.
- Imagine that wLeft = 1 , wRight = 0 , wLeftOld = 0 , wRight = 1 and counter == 3. Try walking through the code again line by line and explain what happens to each variable at each step.
Your Turn
One of the if statements in EscapingCorners checks to see if counter has reached 4.
- Try increasing the value to 5 and 6 and test the effect. Keep in mind that it will either count to the number of alternate whisker contacts, or maybe one more than that depending on which side you start.