What if you have to test the whiskers at some later time away from a computer? In that case, the Serial Monitor won’t be available, so what can you do? One solution would be to use LED circuits to display the whisker states. All it takes is a simple sketch that turns an LED on when a whisker is pressed or off when it’s not pressed.
Parts List:
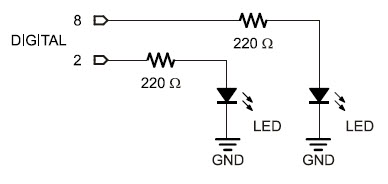
(2) resistors, 220 Ω (red-red-brown)
(2) LEDs, red
Build the LED Whisker Testing Circuits
- Unplug the BOE Shield-Bot’s battery pack and USB cables.
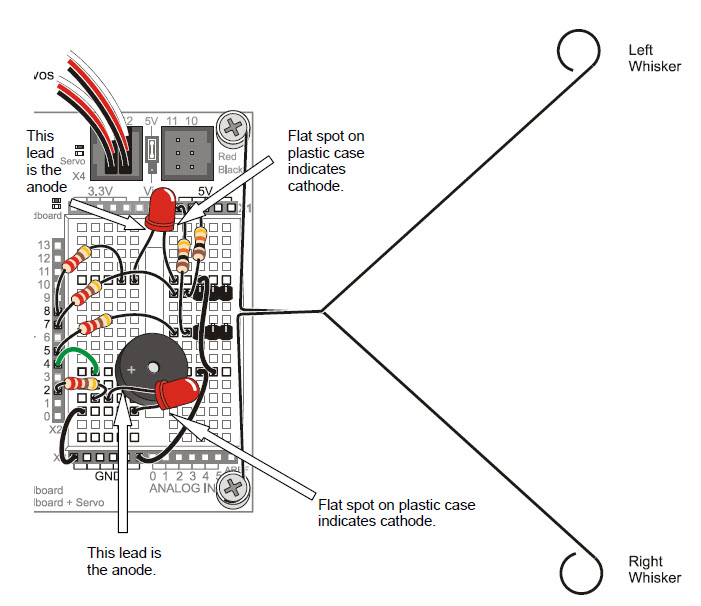
- Add the circuit shown below.
Programming the LED Whisker Testing Circuits
- Re-save WhiskerStates as TestWhiskersWithLEDs.
- Add pinMode calls to the setup function, setting digital pins 8 and 2 to output.
  pinMode(8, OUTPUT);         // Left LED indicator -> output
  pinMode(2, OUTPUT);         // Right LED indicator -> output
- To make the whisker input states control the LEDs, insert these two if...else statements between the Serial.println(wRight) and delay(50) commands:
  if(wLeft == 0)              // If left whisker contact
  {
    digitalWrite(8, HIGH);    // Left LED on
  }
  else                        // If no left whisker contact
  {
    digitalWrite(8, LOW);     // Left LED off
  }

  if(wRight == 0)             // If right whisker contact
  {
    digitalWrite(2, HIGH);    // Right LED on
  }
  else                        // If no right whisker contact
  {
    digitalWrite(2, LOW);     // Right LED off
  }
Recall that if...else statements execute blocks of code based on conditions. Here, if wLeft stores a zero, it executes the digitalWrite(8, HIGH) call. If wLeft instead stores a 1, it executes the digitalWrite(8, LOW) call. The result? The left LED turns on when the left whisker is pressed or off when it’s not pressed. The second if…else statement does the same job with wRight and the right LED circuit.
- Set the BOE Shield’s power switch to position 1.
- Reconnect the Arduino’s programming cable.
- Save and upload TestWhiskersWithLeds to your Arduino.
- Test the sketch by gently pressing each whisker against its 3-pin header post in the breadboard. The red LEDs on the side of the breadboard where you pressed the whisker should emit light to indicate that the whisker has made contact.
- If both LEDs light up and just stay on no matter what, your power switch is probably in position 0. Switch it to position 1 and try again.
/*
 * Robotics with the BOE Shield - TestWhiskersWithLeds
 * Display left and right whisker states in Serial Monitor.
 * 1 indicates no contact; 0 indicates contact.
 * Display whisker states with LEDs.  LED on indicates contact;
 * off indicates none.
 */

void setup()                                 // Built-in initialization block
{
  pinMode(7, INPUT);                         // Set right whisker pin to input
  pinMode(5, INPUT);                         // Set left whisker pin to input
  pinMode(8, OUTPUT);                        // Left LED indicator -> output
  pinMode(2, OUTPUT);                        // Right LED indicator -> output

  tone(4, 3000, 1000);                       // Play tone for 1 second
  delay(1000);                               // Delay to finish tone

  Serial.begin(9600);                        // Set serial data rate to 9600
}

void loop()                                  // Main loop auto-repeats
{
  byte wLeft = digitalRead(5);               // Copy left result to wLeft
  byte wRight = digitalRead(7);              // Copy right result to wRight

  if(wLeft == 0)                             // If left whisker contact
  {
    digitalWrite(8, HIGH);                   // Left LED on
  }
  else                                       // If no left whisker contact
  {
    digitalWrite(8, LOW);                    // Left LED off
  }

  if(wRight == 0)                            // If right whisker contact
  {
    digitalWrite(2, HIGH);                   // Right LED on
  }
  else                                       // If no right whisker contact
  {
    digitalWrite(2, LOW);                    // Right LED off
  }

  Serial.print(wLeft);                       // Display wLeft
  Serial.println(wRight);                    // Display wRight
  delay(50);                                 // Pause for 50 ms
}