Instead of finding and avoiding obstacles, this next project makes the ActivityBot follow a target. The same sensor system, using different code. The code checks for the desired distance, and if the object is further away than that, the ActivityBot moves forward. If the object is closer than the desired distance, the AcitivityBot moves backward. If the object’s distance is equal to the desired distance, the ActivityBot will maintain its position.
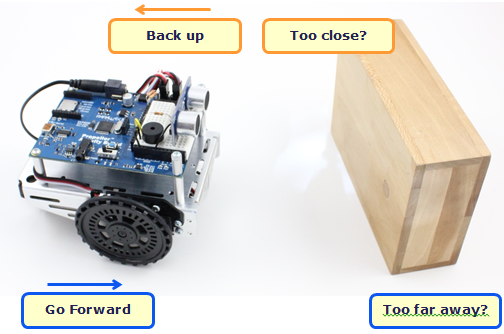
This example makes the ActivityBot try to keep a 32 cm distance between itself and an object in front of it. With no object detected, the robot will go forward until it finds one, then maintain that 32 cm distance. If you pull the object away from the ActivityBot, it will go forward again to catch up. Likewise, if you push the object toward it, it will back up to restore that 32 cm distance.
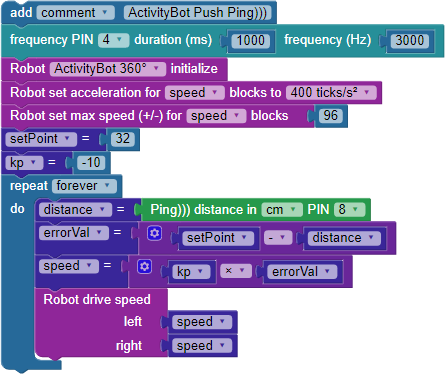
The program declares five variables: distance, setPoint, errorVal, kp, and speed.
The program starts off with the familiar comment block for the project title and frequency out block for the brownout indicator piezospeaker on P4.
After the required Robot ActivityBot initialize, two more blocks contribute to the robot's behavior. Robot set acceleration is set to 400 ticks/s2 which will help cushion sudden changes in speed. Robot drive max speed 96 makes sure that the Robot drive speed block caps its left and right inputs at +/-96, even if the attached speed variable exceeds 96 during runtime.
Two set variable blocks with number values attached come next: setPoint = 32 and kp = -10. These values do not change during runtime.
The rest of the code is inside a repeat forever block. This routine makes the ActivityBot maintain a distance between itself and the target object by repeating four steps very rapidly:
An automated system that maintains a desired physical output level is called a control system. In the case of our ActivityBot, maintained level is the distance between itself and the object in front of it. Many control systems use a feedback loop to maintain the level, and our ActivityBot is a prime example of this. The measured distance is fed back into the system and compared against the set point for calculating the next speed, and this happens over and over again in a process called a control loop.
Engineers use drawings like this block diagram to think through a control loop’s design and also to convey how it works to technicians and other engineers. If the set point (distance the ActivityBot tries to maintain) is 32 and the measured distance is 38, there is an error value. This error value is the set point – measured distance. That’s 32 – 38 = -6. This error is multiplied by a proportionality constant (kp) for an output that’s the speed to correct the error this time through the loop. That’s speed = kp x error value, or 60 = -10 x -6.
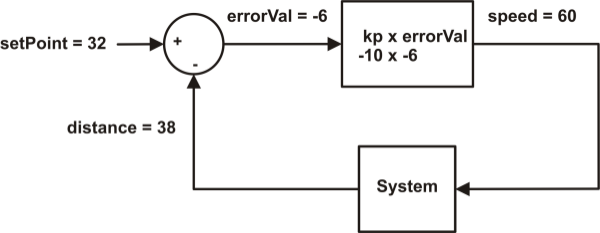
The circle is called a summing junction (for addition or subtraction), and the rectangular blocks designate operations that can vary. In this example, the top one is a proportional control block that multiplies error by a proportionality constant. The System block represents things we do not necessarily have control over, like if you move the object toward or away from the ActivityBot. Other common control blocks that were not used in this example are Integral, which allows corrections to build up over loop repetitions, and Derivative, which responds to sudden system changes.
It’s instructive to watch the relationship between errorVal and speed as the value of distance changes. We can use the Terminal to do this.
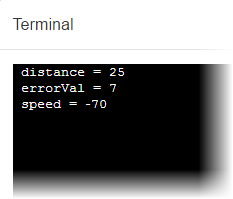
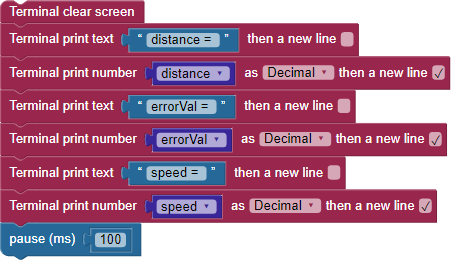
This modified project is for looking at data, not for navigation! Go back to Push Ping, or comment out the Terminal and pause blocks, if you want to return to the navigation activity.
There are lots of values to experiment with here. For example, if you change the setPoint variable from 32 to 20, the ActivityBot will try to maintain a distance of 20 cm between itself and an object in front of it. The value of kp can be increased to make it go faster to correct with smaller error distances, or slower to correct over larger error distances.
If you decrease the Robot set acceleration value, it will cushion the changes but could cause it to respond so slowly that it runs into the object. If you increase it, it will respond more abruptly. Too large, and it could change direction so fast that it could eject the Ping))) sensor from the breadboard.
Would increasing the Robot drive max speed help the ActivityBot keep up with a retreating object? Could decreasing Robot drive max speed too much hamper its response?
