One convenient way to execute pre-programmed maneuvers is with functions. In the next chapter, your BOE Shield-Bot will have to perform maneuvers to avoid obstacles, and a key ingredient for avoiding obstacles is executing pre-programmed maneuvers.
The setup and loop functions are built into the Arduino language, but you can add more functions that do specific tasks for your sketch. This activity introduces how to add more functions to your sketch as well as a few different approaches to creating reusable maneuvers with those functions.
The diagram below shows part of a sketch that contains a function named example added at the end, below the loop function. It begins and gets named with the function definition void example(). The empty parentheses means that it doesn’t need any parameters to do its job, and void indicates that it does not return a value (we’ll look at functions that return values in a later chapter). The curly braces {} that follow this definition contain the example function’s block of code.
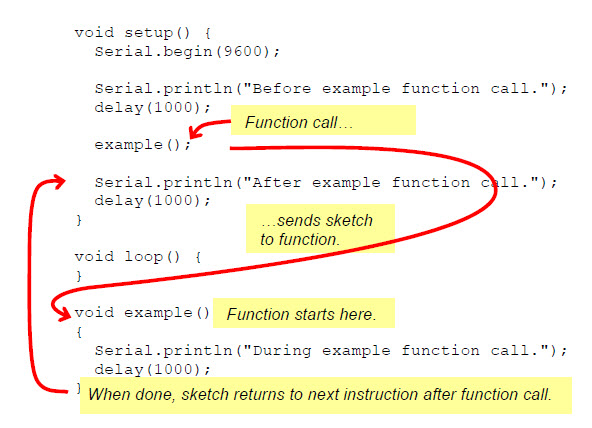
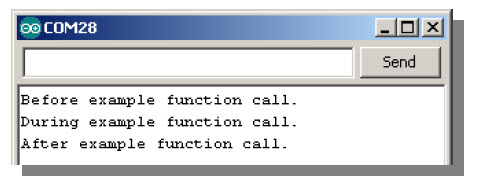
There is a function call to example in the setup function, labeled in the diagram above. That example() line tells the sketch to go find the function with that name, execute its code, and come back when done. So, the sketch jumps down to void example() and executes the two commands in its curly braces. Then, it returns to the function call and continues from there. Here is the order of events you will see when you run the sketch:
// Robotics with the BOE Shield – SimpleFunctionCall
// This sketch demonstrates a simple function call.

void setup() {
  Serial.begin(9600);

  Serial.println("Before example function call.");
  delay(1000);

  example();                              // This is the function call

  Serial.println("After example function call.");
  delay(1000);
}

void loop() {
}

void example()                            // This is the function
{
  Serial.println("During example function call.");
  delay(1000);
}
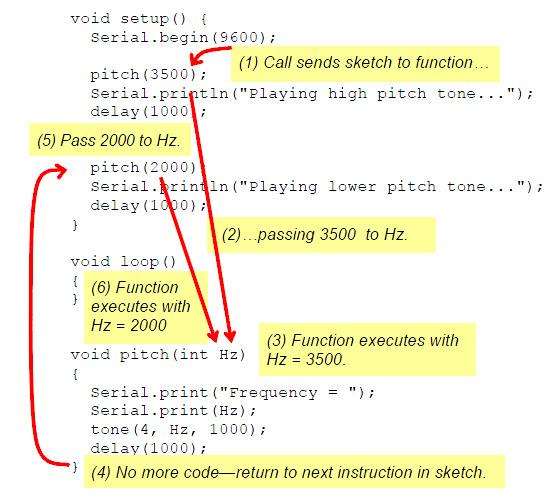
Remember that a function can have one or more parameters—data that the function receives and uses when it is called. The diagram below shows the pitch function from the next sketch. It is declared with void pitch(int Hz). Recall from Chapter 1, Activity #3 [1] that the Arduino stores variable values in different data types, with int specifying an integer value in the range of -32,768 to 32,767. Here, the term int Hz in the parentheses defines a parameter for the pitch function; in this case, it declares a local variable Hz of data type int.
Local variables, remember, are declared within a function, and can only be seen and used inside that function. If a local variable is created as a parameter in the function declaration, as void pitch(int Hz) is here, initialize it by passing a value to it each time the function is called. For example, the call pitch(3500) passes the integer value 3500 to the pitch function’s int Hz parameter.
So, when the first function call to pitch is made with pitch(3500), the integer value 3500 gets passed to Hz. This initializes Hz to the value 3500, to be used during this trip through the pitch function’s code block. The second call, pitch(2000), initializes Hz to 2000 during the sketch’s second trip through the pitch function’s code block.
// Robotics with the BOE Shield – FunctionCallWithParameter
// This program demonstrates a function call with a parameter.

void setup() {
  Serial.begin(9600);

  Serial.println("Playing higher pitch tone...");

  pitch(3500);         // pitch function call passes 3500 to Hz parameter

  delay(1000);

  Serial.println("Playing lower pitch tone...");

  pitch(2000);         // pitch function call passes 2000 to Hz parameter

  delay(1000);
}

void loop()
{
}

void pitch(int Hz)     // pitch function with Hz declared as a parameter
{
  Serial.print("Frequency = ");
  Serial.println(Hz);
  tone(4, Hz, 1000);
  delay(1000);
}
Here is a modified pitch function that accepts two parameters: Hz and ms. This new pitch function controls how long the tone lasts.
void pitch(int Hz, int ms)
{
  Serial.print("Frequency = ");
  Serial.println(Hz);
  tone(4, Hz, ms);
  delay(ms);
}
Here are two calls to the modified pitch function, one for a 0.5 second 3500 Hz tone, and the other for a 1.5 second 2000 Hz tone:
pitch(3500, 500);
pitch(2000, 1500);
Notice that each of these calls to pitch includes two values, one to pass to the Hz parameter, and one to pass to the ms parameter. The number of values in a function call must match the number of parameters in that function’s definition, or the sketch won’t compile.
Let’s try putting the forward, turnLeft, turnRight, and backward navigation routines inside functions. Here’s an example:
// Robotics with the BOE Shield - MovementsWithSimpleFunctions
// Move forward, left, right, then backward for testing and tuning.

#include <Servo.h>                           // Include servo library

Servo servoLeft;                             // Declare left and right servos
Servo servoRight;

void setup()                                 // Built-in initialization block
{
  tone(4, 3000, 1000);                       // Play tone for 1 second
  delay(1000);                               // Delay to finish tone

  servoLeft.attach(13);                      // Attach left signal to pin 13
  servoRight.attach(12);                     // Attach right signal to pin 12

  forward(2000);                             // Go forward for 2 seconds
  turnLeft(600);                             // Turn left for 0.6 seconds
  turnRight(600);                            // Turn right for 0.6 seconds
  backward(2000);                            // go backward for 2 seconds

  disableServos();                           // Stay still indefinitely
}

void loop()                                  // Main loop auto-repeats
{                                            // Empty, nothing needs repeating
}

void forward(int time)                       // Forward function
{
  servoLeft.writeMicroseconds(1700);         // Left wheel counterclockwise
  servoRight.writeMicroseconds(1300);        // Right wheel clockwise
  delay(time);                               // Maneuver for time ms
}

void turnLeft(int time)                      // Left turn function
{
  servoLeft.writeMicroseconds(1300);         // Left wheel clockwise
  servoRight.writeMicroseconds(1300);        // Right wheel clockwise
  delay(time);                               // Maneuver for time ms
}

void turnRight(int time)                     // Right turn function
{
  servoLeft.writeMicroseconds(1700);         // Left wheel counterclockwise
  servoRight.writeMicroseconds(1700);        // Right wheel counterclockwise
  delay(time);                               // Maneuver for time ms
}

void backward(int time)                      // Backward function
{
  servoLeft.writeMicroseconds(1300);         // Left wheel clockwise
  servoRight.writeMicroseconds(1700);        // Right wheel counterclockwise
  delay(time);                               // Maneuver for time ms
}

void disableServos()                         // Halt servo signals
{
  servoLeft.detach();                        // Stop sending servo signals
  servoRight.detach();
}
You should recognize the pattern of movement your BOE Shield-Bot makes; it is the same one made by the ForwardLeftRightBackward sketch. This is a second example of the many different ways to structure a sketch that will result in the same movements. There will be a few more examples before the end of the chapter.
Want to keep performing that set of four maneuvers over and over again? Just move those four maneuvering function calls from the setup function into the loop function. Try this:
Cut the function calls to forward(2000), turnLeft(600), turnRight(600), and backward(2000) out of the setup function and paste them into the loop function. It should look like this when you’re done:
void setup()                    // Built-in initialization block
{
  tone(4, 3000, 1000);          // Play tone for 1 second
  delay(1000);                  // Delay to finish tone

  servoLeft.attach(13);         // Attach left signal to pin 13
  servoRight.attach(12);        // Attach right signal to pin 12

  // disableServos();             // Stay still indefinitely
}

void loop()                     // Main loop auto-repeats
{
  forward(2000);                // Go forward for 2 seconds
  turnLeft(600);                // Turn left for 0.6 seconds
  turnRight(600);               // Turn right for 0.6 seconds
  backward(2000);               // go backward for 2 seconds

Links
[1] https://learn.parallax.com/node/146