In this activity, you will run a BlocklyProp program that tells the SumoBot’s servo motors to stay still. When you load that program into the SumoBot, its servos will probably move slowly. If that’s the case, you can “center” each servo by adjusting its set screw with a screwdriver to make it stay still.
When the servos are centered, it will allow your SumoBot to briefly stop moving during competitions. It will also reduce its tendency to curve in one direction in response to a program that’s telling it to travel in a straight line.
Over time, motor vibration can cause the servo’s set screw to drift away from the center setting you adjusted. If that ever happens, just repeat this activity to re-center the servos.
Follow the steps below to create a program to center the servos.
 to load the program into your SumoBot. The button looks like this:
If your servos are new, they should start moving slowly at this point. If they were used in a previous term at your school, they might or might not already be centered, and so may or may not turn.
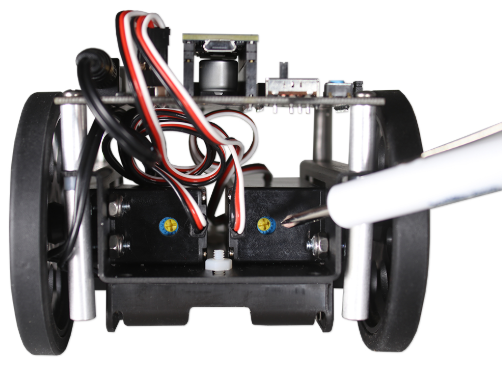
If you turn the screwdriver slightly in one direction, the servo should speed up, and in the other, it should slow down. It might even stop and then start turning the opposite directions if the set screw passes the center (stay still position) as you adjust it.
CAUTION - BE GENTLE! The set screw is part of a potentiometer and it is very delicate. Do not press hard on the screwdriver, and only turn it slightly and gently.
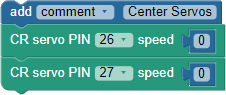
The topmost block is called a comment. It’s a block where you can notes that don’t have any other effect on the program. This comment just contains text to record the Project name.
There are two CR servo PIN speed blocks in the program. CR stands for continuous rotation, which is different from the Servo block, which is made for a standard servo that simply holds certain angles instead of turning at certain speeds.
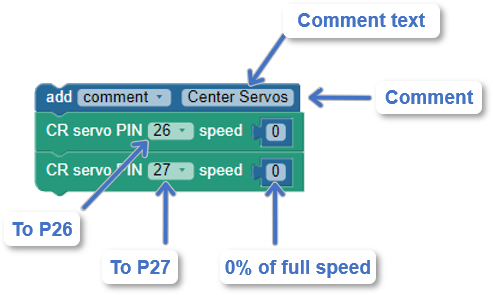
The CR servo PIN 26 speed 0 block tells the Propeller to send servo control signals to its P26 servo port. Those signals tell the continuous rotation servo connected to that port to hold a speed of zero. The last block is CR servo PIN 27 speed 0, which tells the Propeller to send those same zero speed signals to the servo connected to the P27 servo port.
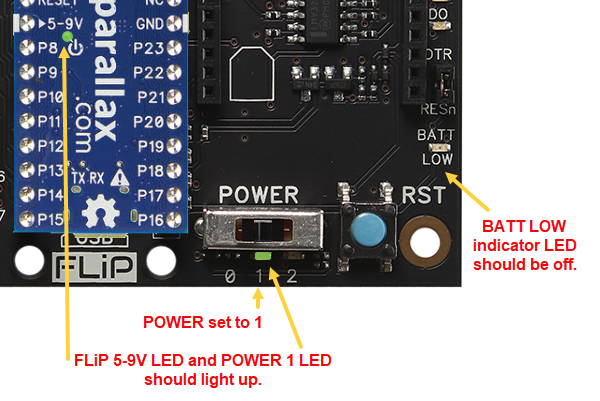
The POWER switch is designed so that 0 shuts everything off. This includes the Propeller FLiP. Even if it’s connected to USB, it will not accept a program until you set POWER to 1 or 2. The POWER 1 setting turns everything on except the servos. The POWER 2 setting turns everything on, including the servos.
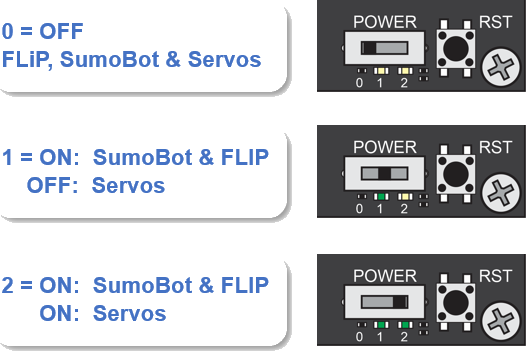
You will typically use POWER 1 to load programs at your computer. Since the POWER 1 doesn’t supply the servos, it will prevent your SumoBot WX from trying to roll away and off the table when the code starts.
If you used the Load & run (store in EEPROM) button to load the program into the SumoBot, you can take it to your SumoRing and then start the program from the beginning like this:
After you release the reset button, the program will start from the beginning.
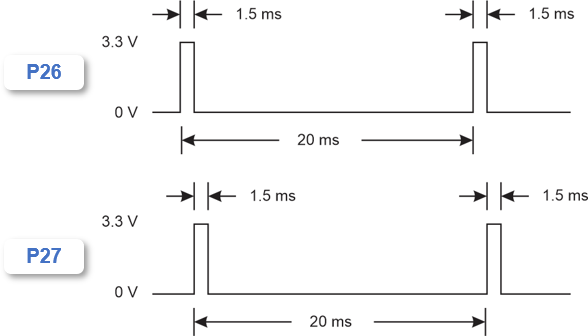
The signal that controls a servo’s speed and direction is a brief high signal that has to be repeated every 20 ms. That’s 50 times per second. The stay-still signal stays high for 1.5 ms and low for the remaining 18.5 ms. If you connected a light emitting diode (LED) circuit’s input to the P26 pin and the other end to ground, the light would glow during those brief 1.5 ms high signals and stay off the rest of the time.

Links
[1] https://learn.parallax.com/tutorials/robot/sumobot-wx/build-your-sumobot-wx