Whisker sensors allow your ActivityBot 360° to detect obstacles by bumping into them. When the robot's whisker bumps into an object, it makes an electrical connection between the whisker and a circuit on the breadboard. In this lesson, you will program your robot’s Propeller microcontroller to detect those contacts and make the robot avoid obstacles.
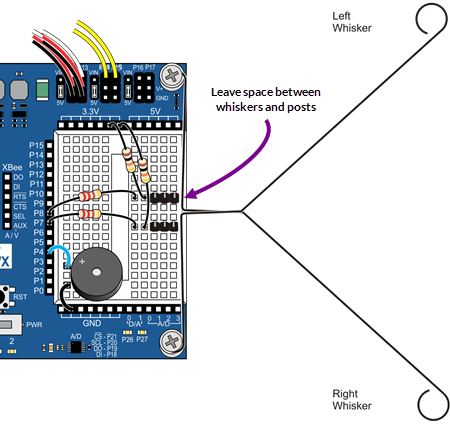
The next picture shows whisker wiring. Along with the whisker circuits, it has the same piezospeaker we've been using.
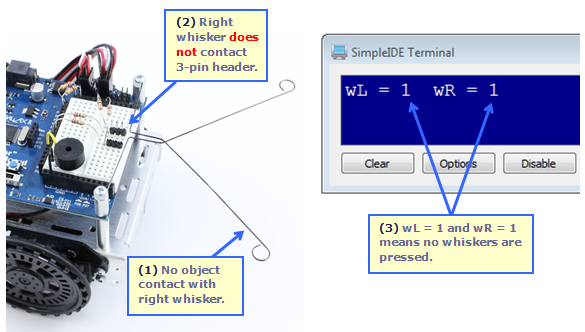
It’s important to test the whisker contacts before programming your robot to navigate with them. That way, you can be sure the whiskers are sending the right messages. Otherwise, they might be telling the Propeller that they detect something even though they didn't, or vice-versa.
If either of the numbers are zeros, or if either of them flicker between 1 and 0, there's probably a circuit error.
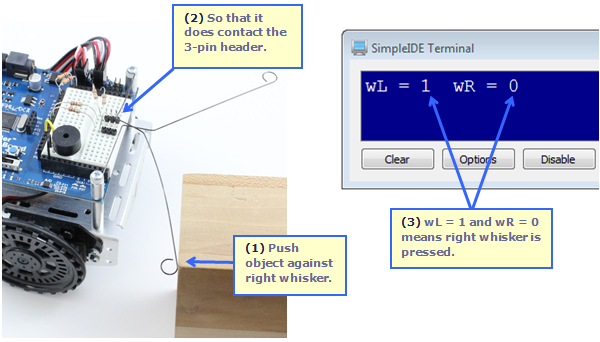
Next, let's check to make sure the Propeller chip detects when the right whisker is pressed or makes contact with an obstacle.
The main function starts with our now-familiar reset indicator code: freqout(4, 2000, 3000) makes the speaker connected to P4 beep for 2 seconds at a frequency of 3 kHz.
After that, the program enters a while(1) loop that repeats endlessly. Inside that loop, int wL = input(7) copies the value that input(7) returns into an int variable named wL (short for whisker-Left). The input(7) call might return a 1, which would indicate that the left whisker is not pressed. Or, it might return a 0, indicating that it is pressed. In either case, that 1 or 0 value gets copied to the wL variable. The int wR = input(8) statement works roughly the same way, except that it stores the 1 or 0 value for the right whisker circuit, which is connected to P8, into a variable named wR (short for whisker-Right).
/*
  Test Whiskers with Terminal.c

  Display whisker states in terminal.  1 = not pressed, 0 = pressed.

*/

#include "simpletools.h"                      // Include simpletools header

int main()                                    // main function
{
  freqout(4, 2000, 3000);                     // Speaker tone: P4, 2 s, 3 kHz
  while(1)                                    // Endless loop
  {
    int wL = input(7);                        // Left whisker -> wL variable
    int wR = input(8);                        // Right whisker -> wR variable
    print("%c", HOME);                        // Terminal cursor home (top-left)
    print("wL = %d  wR = %d", wL, wR);        // Display whisker variables
    pause(50);                                // Pause 50 ms before repeat
  }
}
After storing the whisker states in the wL and wR variables, print("%c", HOME) sends the cursor to the home position. The %c format string tells the print function to send the value of a char variable. HOME is the number 1, and when print sends that value to the SimpleIDE Terminal, the terminal moves its cursor to the top-left “home” position. After that, print("wL = %d wR = %d", wL, wR) displays the values of the wL and wR variables. This time, the %d format string made the print function display values as decimal characters, in this case, either 1 or 0 for the whisker states.
The simpletools library has 16 control characters you can use to do things like clear the screen and position the cursor.
| Name | Value | Description |
| HOME | 1 | Send cursor to the top-left (home) position |
| CRSRXY | 2 | Position the cursor. Follow with x and y values. Example places cursor 10 spaces in and 5 lines down: print("%c%c%c ", CRSRXY, 10, 5); |
| CRSRLF | 3 | Move cursor one space to the left |
| CRSRRT | 4 | Move cursor one space to the right |
| CRSRUP | 5 | Move cursor one line up |
| CRSRDN | 6 | Move cursor one line down |
| BEEP | 7 | Make the host computer beep |
| BKSP | 8 | Backspace |
| TAB | 9 | Tab |
| NL | 10 | Send cursor to next line |
| CLREOL | 11 | Clear text to right of cursor |
| CLRDN | 12 | Clear text below cursor |
| CR | 13 | Carriage return |
| CRSRX | 14 | Position cursor x spaces to the right |
| CRSRY | 15 | Position cursor y lines down |
| CLS | 16 | Clear the display |
Here is a program you can try that positions the cursor at 10 spaces over and 5 lines down before printing the whisker states.


Let's take a look at the right whisker and see what happens when it is not pressed, and then pressed.
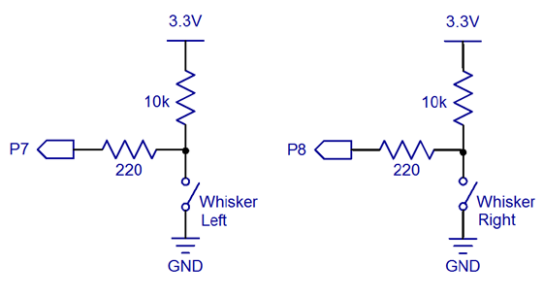
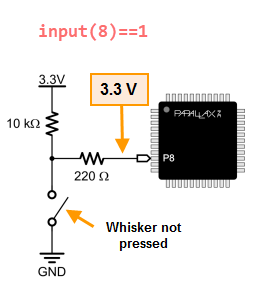
When it's not pressed the whisker does not touch the 3-pin header on the breadboard, so there is no electrical contact between the two. Because of that, the 10 kΩ resistor that’s connected to the 3.3 V socket above the breadboard applies 3.3 V to the breadboard row with the 3-pin header post. The 220 Ω resistor that connects that row to P8 applies the 3.3 V to P8.
The whisker is like a normally open switch. In the schematic, P8 detects 3.3 V through the 220 Ω and 10 kΩ resistors. Whenever a circuit applies 3.3 V (or anything over 1.65 V) to P8, input(8) returns 1. That's why wR = input(8) copied the value of 1 to the wR variable (and you saw it displayed in the SimpleIDE Terminal).
Why 3.3 V at P8? In case you’re wondering why the voltage at P8 is the same as the voltage above the 10 kΩ resistor, here’s what’s going on:
First of all, the schematic shows an open switch with the “Not pressed” label. That open switch is the whisker, which is not in contact with the 3-pin header, and it keeps ground (GND = 0 V) out of the circuit. So, all we have is 3.3 V on one end of a pair of resistors, and P8 on the other end. Since P8 is set to input, it looks invisible to the circuit. As far as the circuit’s concerned, the right side of that 220 Ω resistor might as well be disconnected from everything and sticking up in the air. When only one voltage is applied to a resistor, or even a chain of resistors, that same voltage will appear at the other end as well. So, P8 as an input is invisible to the circuit, but it can detect the voltage the circuit applies to it. In this case, that voltage is 3.3 V, which causes the Propeller to store 1 in its P8 input register, and so input(8) returns the value 1.
When the right whisker is pressed because the robot has bumped into an obstacle, then the right whisker makes contact with the front post on the 3-pin header. The whisker is electrically connected to that plated hole on the corner of the board, which eventually makes its way to the battery's negative terminal. That negative terminal is commonly called ground, and has a value of 0 V. Since the whisker touches that 3-pin header post, it connects that row to ground, so P8 sees 0 V through the 220 Ω resistor.
Take a look at this schematic. It shows how the whisker connects that node where the 10 kΩ and 220 Ω resistors meet to ground (0 V). ...and that's what P8 detects. As a result, a call to input(8) returns zero. That zero value gets copied to wR with wR = input(8), and that’s what gets displayed by the Parallax Terminal Window when the whisker is pressed.
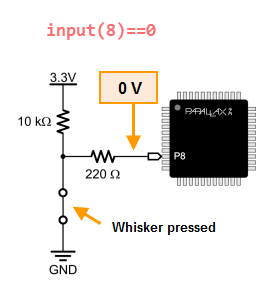
Why 0 V at P8? Now that the whisker is pressed, the schematic above shows 0 V applied to P8. That’s because pushing the whisker up against the post connects GND (0 V) to the node where the 10 kΩ and 220 Ω resistors meet. Now, instead of 3.3 V, the circuit applies 0 V to P8. Reason being, 0 V is being applied to the left side of the 220 Ω resistor, and the circuit still thinks the right side of that resistor is floating in the air. So, the rule for a high impedance input still applies, and the voltage that’s on the right side of the 220 Ω resistor will be the same as the voltage applied to its left side.
Now that there’s 3.3 V on one end of the the 10 kΩ resistor and 0 V on the other end, it applies electrical pressure that causes current to flow through that resistor. You can use the Ohm’s Law equation of V = I x R to figure it out. This equation says the voltage (V) difference at two ends of a resistor is equal to the current (I) pasing through it multiplied by the resistor’s resistance (R). With a little algebra, we have I = V ÷ R = 3.3 V ÷ 10,000 Ω ≈ 0.00033 A. That’s 0.00033 A, or in terms of milliamps, 0.33 mA, a very small amount of current, especially compared about 140 mA, which is what the servos need to make the Propeller ActivityBot move.
The 10 kΩ resistor is called a pull-up resistor. It pulls the voltage at P8 up to 3.3 V when the whisker is not pressed. It's important to have either a pull-up or pull-down resistors in switch circuits. A pull-up or pull-down resistor applies a voltage that’s opposite of the voltage the I/O pin will detect when the switch/button contact is made. Without it, the I/O pin will allow nearby electric fields to affect whether it reports 1 or 0 to the input function. For example, without that pull-up/pull-down resistor, simply putting your hand near the 220 Ω resistor might change the value the input function reports.
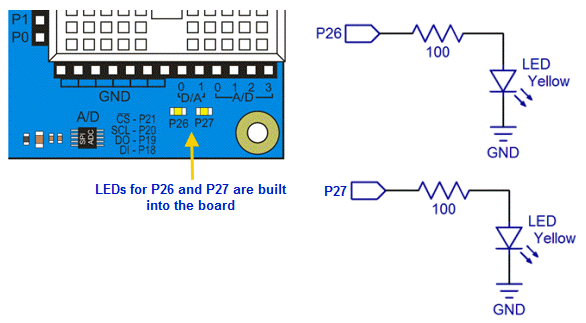
As you built the whisker circuits on your board, you connected two Propeller I/O pins to LEDs that are built into the circuit board. That means you can program the Propeller to send high/low signals to these I/O pins, which will turn the connected LEDs on/off.
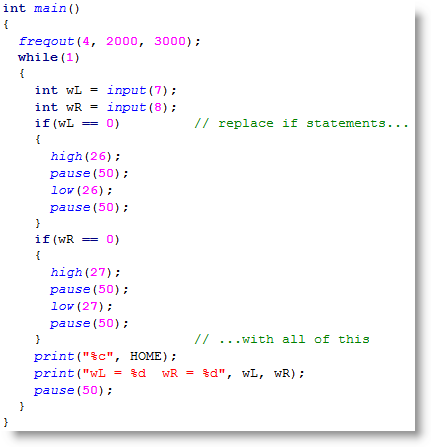
Test Whiskers with LEDs.c is just the previous program with two if...else statements added. First, if(wL == 0) high(26); else low(26) does one of two things. If wL stores 0, it means the left whisker is pressed, so high(26) turns on the P26 LED. If wL stores 1, it means the whisker is not pressed. In that case, low(26) turns the LED off. The second line that was added is if(wR == 0) high(27); else low(27). It does the same job, except that it turns the P27 LED on/off depending on whether wR stores a 1 or 0.
/*
  Test Whiskers with LEDs.c

  Display whisker states in terminal.  1 = not pressed, 0 = pressed.

*/

#include "simpletools.h"                      // Include simpletools header

int main()                                    // main function
{
  freqout(4, 2000, 3000);                     // Speaker tone: P4, 2 s, 3 kHz
  while(1)                                    // Endless loop
  {
    int wL = input(7);                        // Left whisker -> wL variable
    int wR = input(8);                        // Right whisker -> wR variable
    if(wL == 0) high(26); else low(26);       // Light for left whisker
    if(wR == 0) high(27); else low(27);       // Light for right whisker
    print("%c", HOME);                        // Terminal cursor home (top-left)
    print("wL = %d  wR = %d", wL, wR);        // Display whisker variables
    pause(50);                                // Pause 50 ms before repeat
  }
}
You can modify the program to make the lights blink when the whiskers are pressed like this:
Your challenge is to modify the Your Turn code to make it blink 10 times each time you press a whisker.
Hint: Review Counting Loops [3]. You can nest a for loop inside an if statement.
Now let's try a program that makes the robot back up while you push and hold a whisker up against its breadboard post.
Before starting the while(1) loop, the program has its usual freqout call to make the speaker beep.
Inside the main function’s while(1) loop, the first two lines should look familiar: they test the whisker input states and assign the result to wL and wR.
Next, we have if((wL == 0) || (wR == 0)) followed by a code block. It means, “if wL stores 0 OR wR stores 0, do what is inside the code block.” So, if either variable does store 0, then, drive_speed(-64, -64) runs the robot's servos backwards for 20 ms.
If neither whisker variable stores a 0, the program execution skips that if... code block and moves on to the else code block below. There, it stops both servos with drive_speed(0, 0).
/*
  Whiskers Push Bot.c
  Push the whiskers to make the Propeller ActivityBot back up.
*/

#include "simpletools.h"                      // Include simpletools header
#include "abdrive360.h"                       // Include abdrive360 header

int main()                                    // main function
{
  freqout(4, 2000, 3000);                     // Speaker tone: 2 s, 3 kHz

  while(1)
  {
    // Check whisker states.
    int wL = input(7);                        // Left whisker -> wL variable
    int wR = input(8);                        // Right whisker -> wR variable

    // If whisker pressed, back up
    if((wL == 0) || (wR == 0))                // Either whisker detects
    {
      drive_speed(-64, -64);                  // Back up
    }
    else                                      // Neither whisker detects
    {
      drive_speed(0, 0);                      // Stay still
    }
  }
}
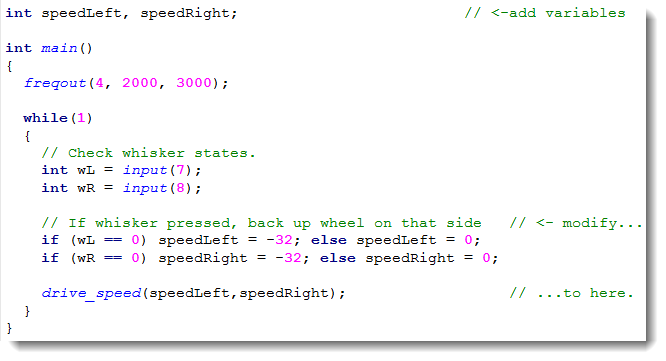
Here is a modified loop for your main function. It replaces the if...else statements with code that allow you to push one whisker at a time to make it turn away to one side or the other, or both whiskers to make it move straight backwards.
Now that you've learned how to make the robot react to its whiskers, let's expand on that and make it roam with whiskers.
To roam, the robot needs to go forward until it bumps into something. When that happens, it needs to back up, turn away from the obstacle, and then go forward again. While the robot is going forward, it should repeatedly check its whiskers with minimal delays between whisker checks. That way, it can know right away when it has encountered an obstacle.
Look at the two lines inside the while(1) loop. drive_speed(100, 100) makes the robot go full speed forward for a 50th of a second.
The next two lines copy the whisker states to the wL and wR variables.
Next, two else if statements check in turn to see if just one whisker or the other is pressed. If just one whisker is pressed, the robot will back up straight for one second, and then turn away from the pressed-whisker side for 0.6 seconds. If both whiskers are pressed, the robot will back up and then decide to turn either left or right.
If no whiskers are pressed, none of the conditions in the entire set of if...else if...else if statements will be true, so none of those code blocks will get executed. The result is that the robot just keeps rolling forward and checking its whiskers every 20 ms.
/*
  Roaming with Whiskers.c
  Go forward until object detected by whisker(s).  Then, back up, turn
  and go a new direction.
*/

#include "simpletools.h"                        // Include simpletools library
#include "abdrive360.h"                         // Include abdrive360 library

int main()                                      // main function
{
  freqout(4, 2000, 3000);                       // Speaker tone: 2 s, 3 kHz

  while(1)                                      // main loop
  {
    // Go forward for 1/50th of a second.
    drive_speed(100, 100);                      // Go forward

    // Check whisker states.
    int wL = input(7);                          // Left whisker -> wL variable
    int wR = input(8);                          // Right whisker -> wR variable

    // If whisker(s) pressed, avoid obstacle.
    if(wR == 0)                                 // Just right whisker
    {
      drive_speed(-100, -100);                  // Back up 0.5 seconds
      pause(500);
      drive_speed(-100, 100);                   // Turn left 0.22 seconds
      pause(220);
    }
    else if(wL == 0)                            // Just left whisker
    {
      drive_speed(-100, -100);                  // Back up 0.5 seconds
      pause(500);
      drive_speed(100, -100);                   // Turn right 0.22 seconds
      pause(220);
    }
  }
}
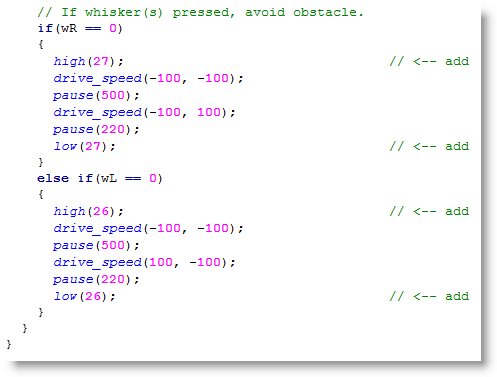
It’s nice to have the lights turn on to indicate which whisker the robot is avoiding. Here is a modified code block for the if... statement that makes the LEDs light up for the whiskers that have been pressed.

Links
[1] http://learn.parallax.com/activitybot/software-and-programming
[2] http://learn.parallax.com/propeller-c-set-simpleide/update-your-learn-folder
[3] https://learn.parallax.com/propeller-c-start-simple/counting-loops