Build the Caroler
Build the Circuit
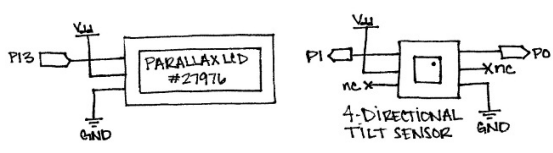
Figure 1 is the schematic and Figure 2 shows the parts placement for this circuit.
- Build your circuit as shown below.
Figure 1 - Christmas Caroler Schematic
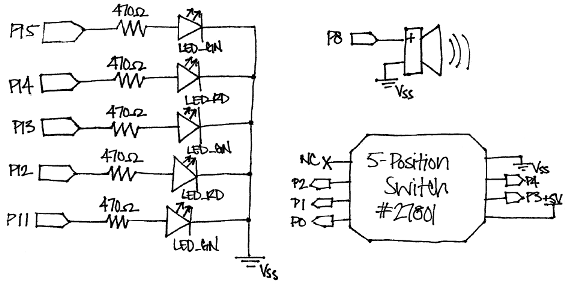
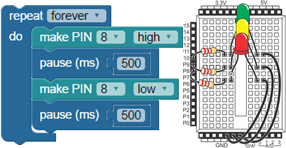
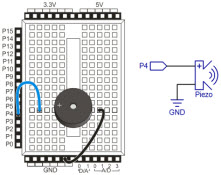
Figure 2 - Christmas Caroler Wiring Photo
Figure 1 is the schematic and Figure 2 shows the parts placement for this circuit.
Figure 1 - Christmas Caroler Schematic
Figure 2 - Christmas Caroler Wiring Photo
 Learn to build simple circuits on a Propeller Activity Board or breadboard with a Propeller FLiP module. Create BlocklyProp graphical programs for blinking LEDs, controlling LEDs with pushbuttons, playing notes on a piezo speaker, and more. You will be building real-world STEM skills!
Build simple circuits on the Propeller Activity Board, and write Propeller C programs to interact with them. Blink lights, beep a speaker, measure voltage, and more.
 Ever wondered how your fitness tracker is able to measure your heart rate? Learn how build a finger-clip device to observe and measure your heart rate using LEDs and a light sensor.
Each QTI sensor is connected to a post that is mounted on the underside of the chassis. This positions the sensors right above the ground surface.
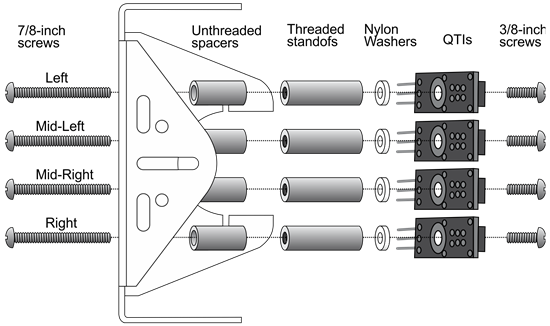
Figure 1 below shows the schematic for the Magic BS2 board, and Figure 2 displays the optional mounting bracket assembly for the LCD display.
Figure 1 – Magic BS2 Board Schematic
The three main goals of this activity are to:
(1) cyber:bot robot with Gripper installed following the instructions in these chapters:
The three main goals of this activity are to:
(1) Resistor - 220 Ω (red-red-brown-gold)
(1) 3-pin header
(1) Jumper wire - red
(1) Jumper wire - black
(1) cyber:bot robot with micro:bit v2, and with the Gripper kit installed following the instructions in these chapters:
It is essential to test the whisker switches before programming your robot to navigate with them. That way, you can be sure the whiskers are sending the right messages. Otherwise, they might be telling the Propeller that they detect something even though they didn't, or vice-versa.
It is essential to test the whisker switches before programming your robot to navigate with them. That way, you can be sure the whiskers are sending the right messages. Otherwise, they might be telling the Propeller that they detect something even though they didn't, or vice-versa.