The Robot drive distance block was good for fixed courses and maneuvers. The Robot drive speed block lends itself to navigation with sensors. The simplest way to use it is to attach a number value block to its left and right fields. Each number indicates how fast each wheel should turn in units of ticks per second. Remember, each tick is 1/64th of a wheel turn and moves the ActivityBot's wheel by 3.25 mm.
After setting the wheel speeds, the Robot drive speed block allows the Propeller to execute whatever block comes next immediately. So, if you want your ActivityBot 360° to keep going at a specific speed for a certain amount of time, add a pause (ms) block between Robot drive speed and the next block that sets wheel speeds.
Here are some other tips to remember:
- Positive numbers make the robot wheels turn forward.
- Negative numbers make the robot wheels turn backward.
- 0 makes a wheel stay still.
- A positive number on one side and negative on the other makes the ActivityBot 360° turn toward the wheel that's negative (going backward).
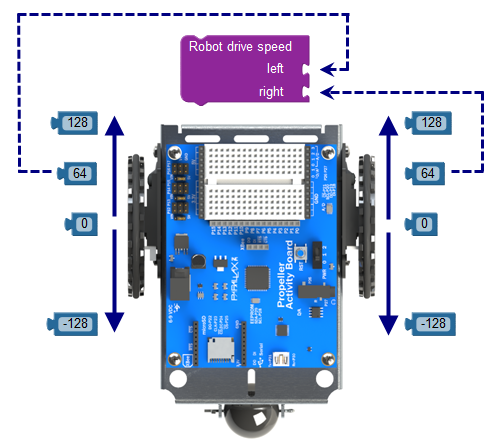
Wheel direction in the rest of this tutorial refers ONLY to turning forward with positive speed values, or backward with negative speed values. It does NOT refer to clockwise or counterclockwise rotation of the individual wheel. A positive value will cause a wheel to turn in the robot's forward direction. A negative value will make it turn in the robot's backward direction.
Speed Control Example
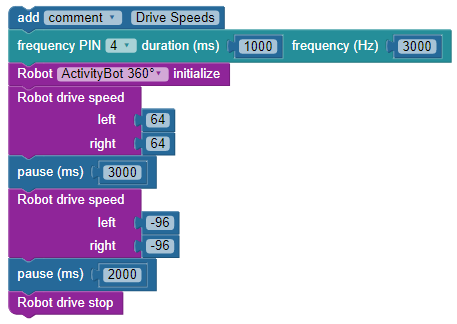
This short example makes the ActivityBot 360° go straight forward at medium speed (64 ticks/s) for 3 seconds. After that, it makes the robot go backward faster (-96 ticks/s) for 2 s. After that, it stops.
- In BlocklyProp, make a new Propeller Activity Board project named Forward Backward Stop.
- Build the project shown below.
- Connect your robot to your computer and set the power switch to 1.
- Set the COM port and click Load and run (save to EEPROM).
- Disconnect your robot and put it on the floor in an open area.
- Press, hold and release the reset button as you set the power switch to 2.
Your ActivityBot 360° should drive forward for 3 seconds, then backward more quickly for 2 seconds.
Did you expect your robot to return to its exact starting position? It stands to reason since 64 x 3 = 192 and -96 x 2 = -192. In a perfect world, that would be 192 ticks forward followed by 192 ticks backward.
In reality, it takes time to speed up during the 3 seconds. During the next 2 seconds, the ActivityBot has to slow down, then speed back up in reverse. So, its reverse distance traveled will be a little less. As was stated previously, when the goal is to travel a certain distance, you should use the Robot drive distance block. It accounts for speeding up, cruising speed, and slowing down. The Robot drive speed block only works to maintain wheel speeds.
How it Works
The comment block holds the project's name. Next, the frequency out block makes a beep on the P4 piezospeaker to let you know the program has started running. The Robot initialize block is required before using other robot navigation blocks. These three blocks will appear together at the top of most programs that make the ActivityBot move.
The next five blocks define the ActivityBot's maneuvers.
- The Robot drive speed left 64 right 64 block makes both wheels go forward at 64 ticks (one full turn) per second.
- The pause (ms) 3000 block makes the program wait for 3000 ms (three seconds). Meanwhile, the wheels keep turning forward at 64 ticks per second.
- The Robot drive speed left -96 right -96 block makes both wheels go backward at a speed of 96 ticks (1 1/2 turns) per second.
- The pause (ms) 2000 block makes the program wait for 2000 ms (two seconds). Meanwhile, the wheels slow down, stop, then speed up to and hold -96 ticks per second velocity.
- The Robot drive stop block stops the wheels from turning. Without this block, the ActivityBot would keep backing up indefinitely, even after it comes to the pause block. The Robot drive stop block has the same effect as Robot drive speed left 0 right 0.
Did You Know?
Enforcing the speed limit — No matter what values you attach to Robot drive speed left and right, the C code underlying BlocklyProp will use a maximum value of +/- 128. For most applications, +/- 96 is a better maximum value. If you want to lower the maximum value, you can put a Robot set max speed block at the top of your project, which can be useful if you attach variables or equations for the left and right speed values.
Just keep on rolling — Robot drive speed is a "set-it-and-forget-it" block. It starts the wheels turning at the chosen speed, and then code execution immediately continues with the next block that follows. The wheels will keep turning at that speed until another Robot drive block changes or stops them.
Speed vs. velocity — Velocity is like speed, but it can be either positive (forward motion) or negative (backward motion). Speed itself is just velocity without the sign that indicates direction; velocity's absolute value.
Little things add up — A small variation between what you want your ActivityBot to do and what it does may go unnoticed once or twice, such as going just beyond a target distance or stopping short of a rotation angle. But when these small differences happen one after another, their accumulated effect can be noticeable. Sometimes referred to as error propagation, it is an important concept in robotics, programming, and engineering. And, you may run into it sooner than you think!
Try This
Later, your ActivityBot will have to do things such as executing turns until its obstacle sensor gives the all clear. In that kind of situation, the Robot drive speed block will set the servo speeds to make the ActivityBot turn in place. Since Robot drive speed is "set-it-and-forget-it," the program can immediately move on to blocks that monitor sensors. After the sensor detects an opening, the program can go back to a Robot drive speed block that makes the ActivityBot drive forward again.
So, let's try making the ActivityBot turn in place after going forward by using left 52 and right -52 in the second Robot drive speed block. The left 52 will cause the left wheel to slow slightly, from 64 to 52 ticks per second. The right -52 will cause the left wheel turn backward at 52 ticks per second, making the robot turn right. In this example, we are using a pause (ms) 500 block to make the robot turn in place for a fixed amount of time. Just keep in mind that later, this turning in place time will be determined other things, for example when a sensor detects an opening.
- Save your project, and rename a copy called Drive Speeds - Try This.
- Modify the code by changing the second Robot drive speed block's left value to 52 and its right value to -52.
- Change the second pause from 2000 to 500.
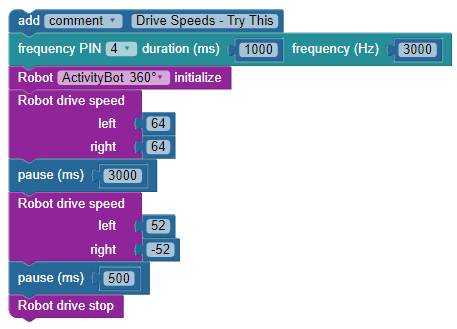
- Save, load, and test-drive the modified project. Your ActivityBot should go forward for 3 seconds and then turn right.
- Try changing the pause (ms) 500 block to pause (ms) 1000. Approximately how much further did the robot turn?
- Change the second pause (ms) back to 500, and then change Robot drive speed left 52 right -52 to Robot drive speed left 104 right -104.
- What do you think will happen if you use Robot drive speed left -52 right 52? Try it and see.
Your Turn
Without any stops and pauses, the ActivityBot's motions seem to blend. If you ever need motions to be more distinct while using the Robot drive speed block, you can add a Robot drive stop and a short pause (ms) block after each maneuver.
- Try adding these two blocks between the Robot drive speed left 64 right 64 and pause (ms) 3000 blocks.
- Robot drive stop
- pause (ms) 400
Doing this will give the ActivityBot time to stop after going forward for 3 seconds, and before making the turn.
- Can you see the difference?
Another example of something your ActivityBot might do with sensors is to go down a corridor, check for openings to the left and right, and then return. You can make the ActivityBot do this by combining portions of the two example programs on this page.
- Save a copy of Drive Speeds - Try This, and name it Drive Speeds - Your Turn.
- Modify the program that makes the ActivityBot go:
- Straight ahead for 3 seconds
- Face left
- Face right
- Face forward
- Reverse to about the same start position