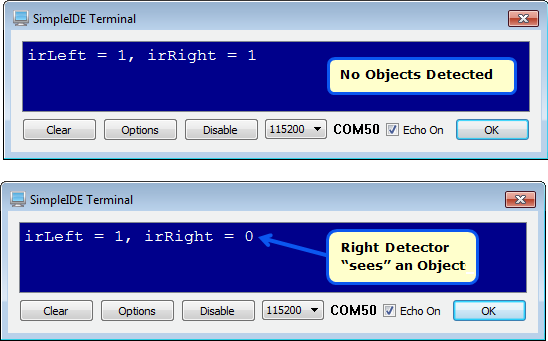
The test code displays the state of each IR detector: 1 = no infrared reflection detected, 0 = yes, infrared reflected from an object is detected. Before continuing, make sure that both sides can reliably detect objects.

Test Code
- Click SimpleIDE’s Open Project button, and open Test IR Detectors from ...Documents\SimpleIDE\Learn\Examples\Robots\ActivityBot.
- Click the Run with Terminal button.
- Point your ActivityBot so that both IR detectors are pointing away from any objects, and verify that both detectors report 1.
- Place your hand in front of (and facing) the right IR detector, about 10 cm (≈ 4 in) away. This should display irLeft = 1, irRight = 0.
- Repeat for the left IR detector and verify that the display updates to irLeft = 0, irRight = 1.
- Repeat for both, and verify that both display 0.
- If all the tests worked, you’re ready to continue to the next section.
Troubleshooting
It's important to make sure both IR detectors work properly before continuing.
- If your IR output is stuck at 1 or 0, it usually indicates a wiring problem. Go back and check your wiring.
- If the IR flickers to zero when it shouldn’t (because there are no objects in range) try turning off any nearby fluorescent lights, and retest.
- If the IR only sporadically detects when an object is right in front of it, check the color codes on the resistors connected to P11 and P1. They should be brown-black-red for 1 kΩ. Also, make sure your ActivityBot is not in direct sunlight.
- Make sure both IR sensors are working well before continuing to the next activity.
What the IR Sensors Can't See
Remember, the IR sensor system is looking for reflected infrared light. Light-colored objects reflect infrared light well, while dark-colored objects absorb infrared light instead of reflecting it. So, if your IR sensors can't see your black shoes, or a black plastic wastebasket, don't worry, that is normal!
How it Works
First, int variables irLeft and irRight are declared to hold the IR detector output states. Then, inside main, the code sets P26 and P27 low to make sure that the D/A terminals are both providing 0 V to the IR LED cathodes.
The IR receivers are designed to only send detect signals if they see infrared light that flashes on/off at 38,000 times per second (38 kHz). So, in the main function’s while loop, freqout(11, 1, 38000) sends sends high/low signals that repeat 38000 times per second to the IR LED’s anode. This makes it flash on/off at that rate.
Next, irLeft = input(10) saves the IR receiver’s output in the irLeft variable. If the IR receiver’s output is high, meaning no IR reflection detected, input(10) returns a 1. If the receiver’s output is low, meaning reflected IR was detected, intput(10) returns a 0. The same process repeats for the right IR detector with freqout(1, 1, 38000) and irRight = input(2).
/*
  Test IR Detectors.c
*/

#include "simpletools.h"                        // Include simpletools

int irLeft, irRight;                            // Global variables

int main()                                      // main function
{
  low(26);                                      // D/A0 & D/A1 to 0 V
  low(27);

  while(1)                                      // Main loop
  {
    freqout(11, 1, 38000);                      // Left IR LED light
    irLeft = input(10);                         // Check left IR detector

    freqout(1, 1, 38000);                       // Repeat for right detector
    irRight = input(2);

    print("%c irLeft = %d, irRight = %d",       // Display detector states
           HOME,       irLeft,       irRight);
    pause(100);                                 // Pause before repeating
  }
}
After the two infrared detection results are stored in irLeft and irRight, print(%c irLeft = %d, irRight = %d”, HOME, irLeft, irRight) does several things. The %c makes it send the HOME value (1) to SimpleIDE Terminal. That sends the cursor to the top-left position. After that, irLeft = %d, irRight = %d displays irLeft = followed by the 1 or 0 that irLeft stores, then irRight = followed by the 1 or 0 that irRight stores. Last, pause(100) keeps the rate that the SimpleIDE Terminal is updated down in the 10 times per second neighborhood.
Did You Know?
Infrared — It means “below red”, and it refers to the fact that the light’s frequency is below that of red on the color spectrum.
Filtering — The IR receiver has a filter built in that makes it look for infrared that flashes on/off 38000 times per second (38 kHz). This allows it to differentiate between infrared coming from the TV remote and other IR sources such as halogen and incandescent lamps as well as sunlight streaming in through a nearby window.
Sunlight — Even though the IR receiver filters for sunlight, direct sunlight can often swamp the IR LED’s signal. Try to keep it indoors and out of any sunlight streaming in through windows.
Try This
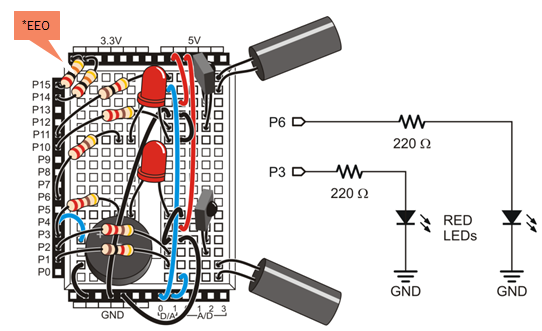
The P26 and P27 lines are currently in use providing 0 V to the IR LED cathodes, so we cannot use their LEDs for indicating the IR detector states like we did with whiskers. So, let’s build some LEDs on the breadboard for indicators.
- Collect two red LEDs, two 220 Ω resistors (red-red-brown), and two black jumper wires from your kit.
- Use those parts to build the two added LED indicator circuits shown here.

*P14/P15 resistors are only needed for ActivityBot kits using External Encoders (#32500).
Next, modify the code to turn a given light on if its IR receiver returns 0, or off if it returns 1.
- Use the Save Project As button to make a copy of your project, and name it Test IR Detectors (Try This).
- Add two if statements between the print and pause function calls, as shown below.
- Run the program and verify that each light turns on when you put an obstacle in front of the IR object detector that’s next to it.

Your Turn
You can further modify your IR detection code from Try This so that it sounds an alarm if it detects IR interference from the environment. This is a useful test to find out if nearby fluorescent lights are sending out signals that are interfering with your detector. The key is to not emit any infrared with the IR LEDs. If the receivers still send a low signal, there must be IR interference coming from another source. If interference is detected, make the piezospeaker get your attention with a series of six 50 ms, 4 kHz chirps separated by six 50 ms pauses. You can use a TV remote to test this.
- Use the Save Project As button to save a copy of Test IR Detectors (Try This) and rename it Test IR Detectors (Your Turn).
- Comment out both freqout function calls, along with print and pause.
- Point a TV remote at your IR receivers, and press and hold a button. Verify that the indicator lights come on.
- Add an if block that plays the series of six 50 ms, 4 kHz chirps separated by six 50 ms pauses if either irLeft or irRight hold a 1.
- Try adding in blinking lights along with the audio alarm.
