Meet the ActivityBot
This is the LEGACY VERSION that supports the original ActivityBot with external encoders. If you or your class are entirely using the ActivityBot 360° with Feedback 360° servos that have yellow signal wires like the ones shown below, use the updated Propeller C Programming with the ActivityBot 360° tutorial.
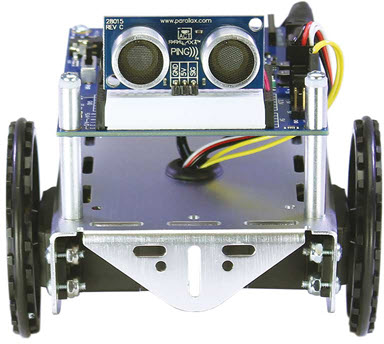
This compact, zippy robot matches a multi-core Propeller microcontroller brain with great hardware:
- Versatile Propeller Activity Board (original or WX version) perched atop our classic, sturdy aluminum chassis
- Custom-made High Speed servos
- Optical encoders and wheels with secure O-ring tires ensure straight straightaways and consistent maneuvers
- SD card for datalogging and file storage
- Electronic components for building navigation systems using touch, visible light, infrared light, and ultrasonic sensors
What It’s About
This tutorial is about building the ActivityBot robot and programming its 8-core Propeller microcontroller brain using the text-based C language. By following these pages step by step, you will learn to:
- Assemble and wire up your robot
- Set up the SimpleIDE programming software
- Find the special C libraries and example code just for your ActivityBot
- Write simple programs in C for the multi-core Propeller microcontroller
- Program your ActivityBot to navigate with encoders
- Build sensor-based navigation systems for your ActivityBot so it can navigate on its own
Hardware needed
One of these ActivityBot Robot Kit options from Parallax Inc:
- ActivityBot 360° Robot Kit (#32600) This is the current version and main subject of this tutorial.
- ActivityBot Robot Kit (original, #32500). This is an older version with external encoders. You will need to look for special instructions as you go if you have the older version.
Before You Start
To work with the ActivityBot, you will need the SimpleIDE programming software set up. Learning a little about the Propeller microcontroller and practicing some programming before diving into robotics is also a good idea. Complete these short tutorials before you start:
- Read Propeller Brains for Your Inventions
- Be software-ready with Propeller C – Set Up SimpleIDE
- Try some programming with Propeller C – Start Simple
- Expand your programming skills with Propeller C – Functions
After You Finish
Once you’ve mastered the basics, you can mod your ’bot with your newfound skills.
If You Need Help
…we will help you! Email support@parallax.com .
Ready to get started? Just follow the links below.
Curriculum
- 1 Section
- 48 Lessons
- Lifetime
- (Legacy Version) Propeller C Programming with the ActivityBot48
- 1.1Mechanical Assembly
- 1.2Check your Hardware
- 1.3Step 1 – Prepare your Encoders
- 1.4Step 2 – Prepare the Tires
- 1.5Step 3 – Prepare the Chassis
- 1.6Step 4 – Prepare the Servos
- 1.7Step 5 – Mount the Right Servo
- 1.8Step 6 – Mount the Left Servo
- 1.9Step 7 – Mount the Right Encoder
- 1.10Step 8 – Mount the Left Encoder
- 1.11Step 9 – Mount the Battery Pack
- 1.12Step 10 – Mount the Tail Wheel
- 1.13Step 11 – Mount the Drive Wheels
- 1.14Step 12 – Mount the Activity Board
- 1.15Electrical Connections
- 1.16Software and Programming
- 1.17Circuit Practice
- 1.18Powering & Connecting Circuits
- 1.19Blinks
- 1.20Beeps
- 1.21Navigation Basics
- 1.22Test Feedback 360° Servos
- 1.23Calibrate Feedback 360° Encoders
- 1.24Test the External Encoders
- 1.25Calibrate External Encoders
- 1.26Go Certain Distances
- 1.27Set Certain Speeds
- 1.28Navigate by Touch
- 1.29Build the Whiskers
- 1.30Test the Whiskers
- 1.31Inside the Whisker Circuit (Optional)
- 1.32Add Whisker Indicator Lights
- 1.33Whisker-Wheel Response
- 1.34Roaming with Whiskers
- 1.35Navigate by Ultrasound
- 1.36Build and Test the Ping))) Sensor Circuit
- 1.37Roaming with Ultrasound
- 1.38Follow Objects with Ultrasound
- 1.39Navigate by Visible Light
- 1.40Build the Light Sensor Circuits
- 1.41Using the Measurements
- 1.42Roaming with Light Sensors
- 1.43Navigate by Infrared Flashlights
- 1.44Build the IR Sensor Circuits
- 1.45Test the IR Sensor Circuits
- 1.46Roaming with Infrared Flashlights
- 1.47Extras
- 1.48Troubleshooting
