Whisker sensors allow your robot to detect obstacles by bumping into them. When the robot's whisker bumps into an object, it makes an electrical connection between the whisker and a circuit on the breadboard. In this lesson, you will program your robot’s Propeller microcontroller to detect those contacts and make the robot avoid obstacles.

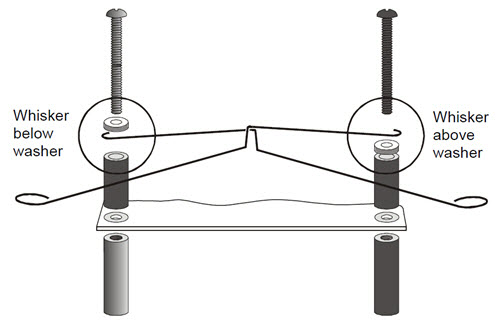
The next picture shows whisker wiring. Along with the whisker circuits, it has the same piezospeaker we've been using.

*P14/P15 resistors are needed only for ActivityBot kits using External Encoders (#32500).
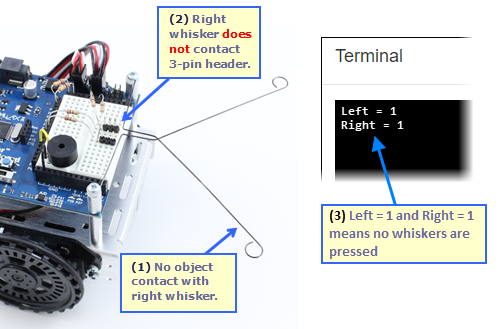
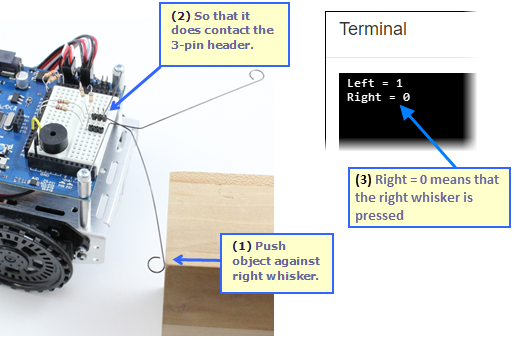
It is essential to test the whisker switches before programming your robot to navigate with them. That way, you can be sure the whiskers are sending the right messages. Otherwise, they might be telling the Propeller that they detect something even though they didn't, or vice-versa.
Without pressing any whiskers, the Terminal should display Left = 1 and Right = 1. If either of the numbers is 0, or if either of them flickers between 1 and 0, there is probably a circuit error.
Next, let's check to make sure the Propeller chip detects when the right whisker is pressed or makes contact with an obstacle.
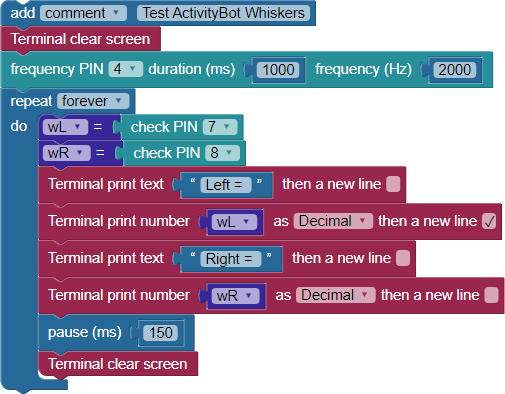
The project starts with a Terminal clear screen block, followed by our "reset indicator" (frequency out) block that beeps the piezospeaker.
After that, the program enters a repeat forever loop. Inside the loop, the first task is to check the state of each I/O pin connected to a whisker circuit - P7 and P8. The value of each state is stored with a Set variable block, wL for the left whisker connected to P7, and wR or the whisker on P8.
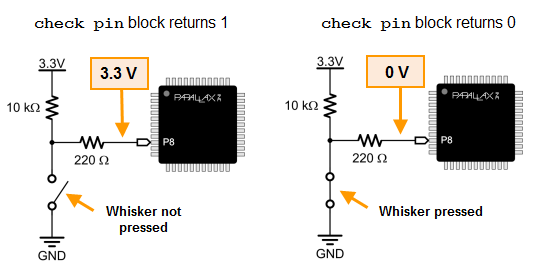
The Propeller I/O pin reads a 1—a "high" signal when the circuit is inactive, that is when the whisker is not being pressed. When the circuit is active as the whisker is being pressed, the Propeller I/O pin reads a 0—a "low" signal.
The next four blocks display the whisker states. A Terminal print text block followed by a Terminal print number block to show each variable and its value. These blocks are followed by a pause (ms) 150, which slows down the loop just enough to let you see the data in the Terminal. A Terminal clear screen block comes last which allows fresh data to be displayed on the next trip through the loop.
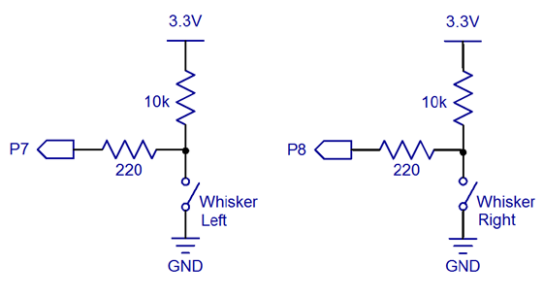
Each robot whisker forms a normally-open switch in an active-low circuit with a 10 kΩ pull-up resistor. In its normal, unpressed, inactive state (left), the whisker switch is open - the whisker wire does not touch the 3-pin header post - keeping GND (0 V) out of the circuit. There is no path from GND to P8. So, all we have is 3.3 V on one end of a pair of resistors, and P8 set to input on the other end, sensing 3.3 V and so reporting a high signal (1).
In its active state (left), the pressed whisker switch closes when the wire touches the 3-pin header post. Now P8, through the 220 Ω resistor, 3-pin header, whisker, mounting post, and the mounting hole in the Activity Board, is connected to GND (0 V). P8 set to input senses 0 V, and so reports a low signal (0).
The 10 kΩ resistor in this circuit is called a pull-up resistor. It pulls the voltage at P8 up to 3.3 V when the whisker is not pressed. A pull-up or pull-down resistor applies a voltage that is opposite of the voltage the I/O pin will detect when the switch/button contact is made. Without it, the I/O pin set to input will be more like an antenna, allowing nearby electric fields to affect whether it detects 1 or 0, possibly supplying false data to your project.
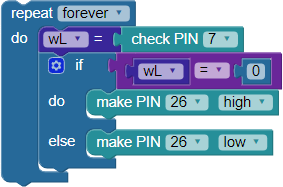
Right now, the Terminal provides visible feedback when each whisker is pressed. That's not very useful for a robot that you want to disconnect from the computer! Let's use the Propeller Activity Board's built-in P26 and P27 LED circuits as whisker indicator lights.
Now let's try a program that makes the robot back up while you push and hold a whisker up against its breadboard post.

The first two blocks may look familiar now and are going to be at the start of all the navigation programs from here on out. First, the frequency out block makes a 3000 Hz, 1-second beep on the piezospeaker connected to P4. Remember, that's the brownout indicator that lets you know if the program restarts due to low batteries. The second is the Robot ActivityBot initialize block, which must be at the top of the program come before any other Robot drive... blocks.
The rest of the code is inside a repeat forever loop. Two variables are declared next, each with a check PIN block attached. The variable left wheel stores the input state of the left whisker circuit connected to P7, and right wheel stores the input state of the right whisker circuit connected to P8. Remember, these whisker circuits provide active low outputs. If a whisker is pressed, the I/O pin connected to that circuit will sense 0 volts so that the check PIN block would provide a 0. If a whisker is NOT pressed, check PIN would provide a 1.
First thing in the loop, an If...do...else block checks to see if either whisker is pressed. The attached if condition blocks could be read as "if left wheel equals zero or right wheel equals zero, do..." The condition is built using a boolean comparison block set to or. Inside that are two compare value blocks, each individually checks whether a variable (left wheel or right wheel) equals zero.
If either whisker is pressed, the if condition is true, and the block enclosed by if...do gets executed. In this case, that's the Robot drive speed, with both wheels turning at -64 ticks per second causing the ActivitBot to back up.
If neither whisker variable stores a 0, the program execution skips the block enclosed by if...do and moves on to the block enclosed by else...if. There, a Robot drive speed left 0 right 0 block makes both wheels stop turning.
Check early, check often! — Notice there is no pause block in the repeat forever loop above which allows the loop to execute very rapidly, monitoring the sensors and therefore updating which drive speed block is in use frequently. This allows the robot to quickly respond to sensor input with the appropriate motion. It's something to keep in mind when navigating with sensors.
...and don't block me! — Any code inside a loop that is blocking - code that does not let any other process proceed until complete - will slow down that loop. Examples of "blocks that block" are pause (ms) and frequency out. But, you can use this to your advantage by placing pause or frequency out right after robot drive speed to control how long the robot performs an evasive maneuver inside of a larger loop.
Here is a modified loop for your main function. It replaces the if...else statements with code that allows you to push one whisker at a time to make it turn away to one side or the other, or both whiskers to make it move straight backward.

Your ActivityBot should turn to the side away from whichever whisker is pressed. If you press both whiskers at once, it should back up.
Right now, if you press both of your robot's whiskers at the same time, it will awkwardly wiggle as it backs up with pivoting turns. Can you fix that?
Now that you've learned how to make the robot react to its whiskers it's time to expand on that. Let's free your ActivityBot to roam around on its own, and navigate away from obstacles using its whiskers.
To roam, the ActivityBot needs to go forward until it bumps into something. When that happens, it needs to back up, turn away from the obstacle, and then go forward again.
While the robot is going forward, it should repeatedly check its whiskers with minimal delays between checks. That way, it can know right away when it has encountered an obstacle.
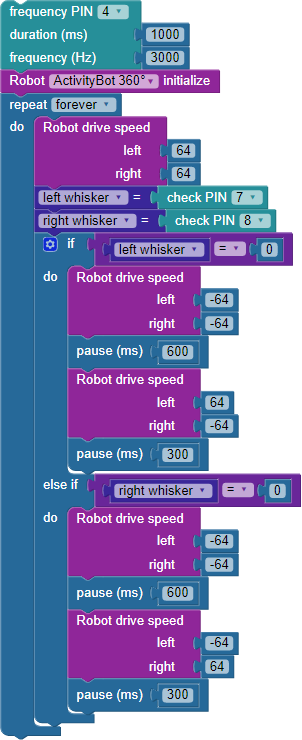
After the frequency out block that serves as a brownout indicator, and the required Robot ActivityBot initialize block, the rest of the code is inside a single repeat forever loop.
First comes a Robot drive speed block that sets left and right wheels to 64 ticks per second, which is approximately 50% of the ActivityBot's top controlled speed. After that, check PIN blocks store the input states of the whisker circuits in the variables left whisker and right whisker. Immediately after that, the if...do...else...if block evaluates those variables to see if there is a detected obstacle. Since there are no pauses between these blocks, the ActivityBot can respond very quickly to sensor input.
The if...do...else...if block first checks to see if the left whisker equals zero, which indicates the left whisker circuit is closed by hitting an obstacle. If this is true, Robot drive speed -64, -64 makes the ActivityBot drive backward while the pause (ms) 600 block executes. Then the next Robot drive speed block uses left 64 and right -64 to turn the wheels in opposite directions at the same speed. This setting makes the ActivityBot rotate right, away from the side which detected the obstacle. The rotation maneuver lasts as long as it takes for pause (ms) 300 to execute.
But, if left whisker = 0 is false, those maneuvers are skipped and the else...if condition checks to see if right whisker = 0 is true. If it is, then an obstacle on the right has been detected, and the code executes the Robot drive speed and pause (ms) blocks right below, this time backing up and using left -64 and right 64 to rotate left, away from the obstacle on the right.
If neither variable is equal to zero, then no evasive actions inside the if...do...else...if loop is executed. The code will return to the top of the repeat forever loop, where Robot drive speed 64, 64 propels the ActivityBot forward a bit more before checking the whisker states all over again.
Iteration — According to Merriam Webster [1], one definition of iteration is "a procedure in which repetition of a sequence of operations yields results successively closer to a desired result." Iterative testing and tuning is an integral part of developing robotics applications.
The example program uses the default Robot drive speed value of 64 (and also -64). That's at 50% of the speed the ActivityBot can go when using encoders. Since there is no Robot set acceleration used, the default value of 600 ticks per second squared is in use. These moderate default values work together well. They are an excellent choice while developing a basic sensor navigation routine, so the ActivityBot doesn't zip away unexpectedly. Now that your whisker system is working let's speed things up a little at a time and tune the maneuvers along the way.
How far does the ActivityBot back up after detecting an object? And then how many degrees does it rotate?
You have probably noticed that as you increased the ActivityBot's speed, its response seems increasingly sluggish. At top speed, the ActivityBot might even hit the wall before it responds to the whisker switches and backs up. It may have also knocked the 3-pin header out of its sockets a bit, preventing further whisker-switch contact. What do you think is causing that?

Links
[1] http://(https://www.merriam-webster.com/dictionary/iteration)