Windows
Windows Installation
- Verify that your computer is running Windows 7, 8, 8.1 or 10.
- Download SimpleIDE for Windows (offsite)
- Run the installer.
- IMPORTANT: For best results with the Propeller C Tutorials, accept all defaults including driver installation.
- Restart your computer once the installation has completed, before connecting your board.
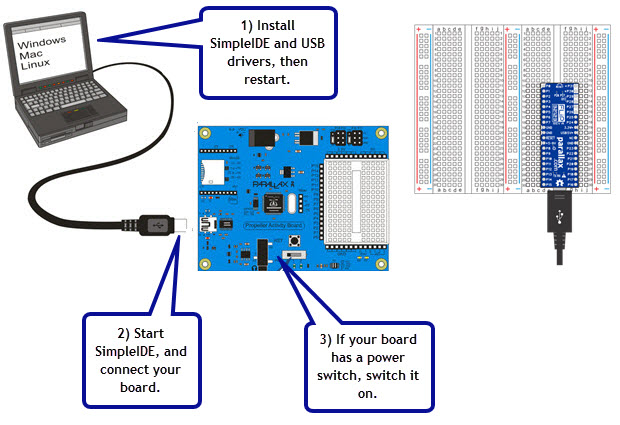
Connect your Board & Run a Test Program
- Run SimpleIDE.
- Allow SimpleIDE to create a workspace (if prompted).
- Connect your Propeller Activity Board or other Propeller board to your computer’s USB port with a USB A to Mini-B cable or USB A to Micro-B cable.
- Wait for your computer to detect and display a COM port for your board (upper right corner of SimpleIDE window).
- If your Propeller board is not USB-powered, connect a power supply now. If your Propeller board has a power switch, turn it on.
3-position Switch
If your board has a 3-position switch, you can set it to 1 or 2. 1 will power the microcontroller and the sockets alongside the white breadboard. 2 will also power the 3-pin headers above the breadboard.
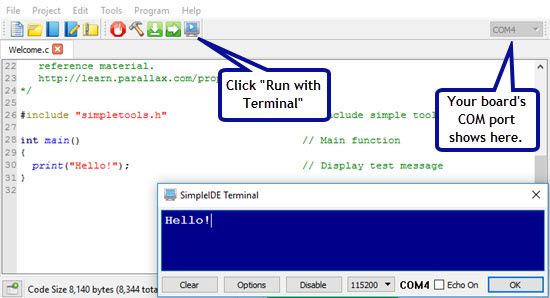
- Click the Run with Terminal button, and verify that the “Hello!” message appears.
- You should update your Learn folder to ensure you’re using the most up-to-date libraries and code. Please go to Update Your Learn Folder for instructions on how to update.
Need help? Email support@parallax.com, visit the Learn Forum.
Found a bug? Please report it to the SimpleIDE Open Source Project site’s Issues page.