The P in PID stands for proportional. This activity introduces closed loop control with just the proportional calculation along with a PBASIC program that performs this calculation. This activity demonstrates how a proportional calculation can be used to have an effect on the system that is "proportional" do the difference between the measured level and the desired level.
The Proportional Control Loop
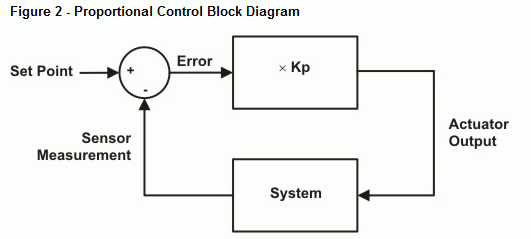
Proportional control is sufficient for some systems, and examples of proportional control can be found in Robotics with the Boe-Bot. As circuit schematics are used to describe circuits, block diagrams are used to describe control systems. A block diagram for proportional control is shown in Figure 2. The circle on the left is called a summing junction, and it shows how the measured sensor value is subtracted from the desired sensor value (the set point) to calculate the error. This is the error that needs to be corrected by the control system. Proportional control attempts to correct this error by multiplying it by some constant value (Kp). The resulting actuator output exerts a correcting influence on the system. By definition, this influence is proportional to the measured error. Since the actuator output has some effect on the system, the sensor value is checked again, and the whole process is repeated, over and over again to maintain the level(s) in the system.
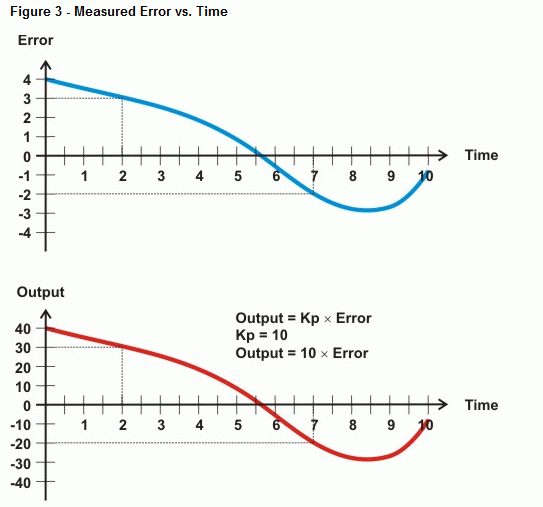
Let's say a robot is trying to maintain a distance between itself and a target, but something keeps moving the target. Proportional control will detect the change in distance and apply drive to the robots wheels to make it back away from or catch up to the target. This drive is proportional to the error in the distance measurement. Keep in mind that "error" doesn't mean the distance measurement is wrong, it just means that the measurement is different from the desired value. Figure 3 shows a graph of the change in some error measurements over time. Notice how the error is 3 in the sample at time = 2. Since Kp is 10, the output is 30. In the second sample at time = 7, the error is -2, so the output is -20.
Example Program - ProportionalAlgorithm.bs2
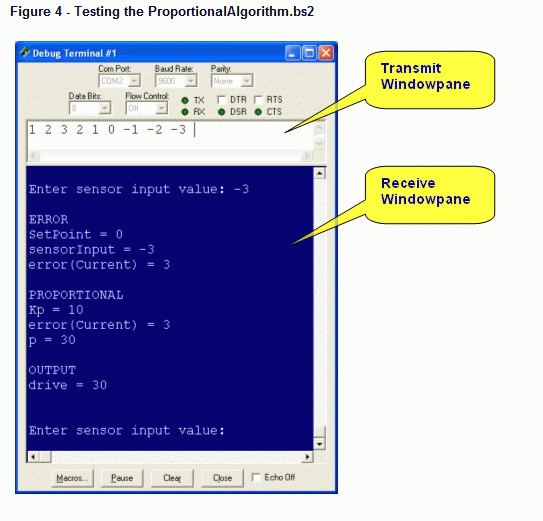
Let's look more closely at how proportional control works with ProportionalAlgorithm.bs2. This program takes a sensor input that you enter into the Debug Terminal's transmit windowpane, performs the error and proportional calculations, and sends the drive value to the Debug Terminal's receive windowpane. (See Figure 4.)
- Enter and run ProportionalAlgorthm.bs2.
- For each number you enter, the output value should be ten times the calculated error.
- Try this sequence of numbers, making sure to press the space bar once between each number to make the DEBUGIN command accept it. 1 2 3 2 1 0 -1 -2 -3.
' ProportionalAlgorithm.bs2
' Demonstrates how proportional control influences error correction
' in a feedback loop.

' {$STAMP BS2}
' {$PBASIC 2.5}

SetPoint       CON     0                     ' Set point
Kp             CON     10                    ' Proportionality constant

Current        CON     0                     ' Current error

sensorInput    VAR     Word                  ' Input
error          VAR     Word(1)               ' One element error array
p              VAR     Word                  ' Proportional term
drive          VAR     Word                  ' Output

DO

  DEBUG "Enter sensor input value: "
  DEBUGIN SDEC sensorInput

  ' Calculate error.
  error(Current) = SetPoint - sensorInput

  ' Calculate proportional term.
  p = Kp * error(current)

  ' Calculate output.
  drive = p

  ' Display values.
  DEBUG CR, CR, "ERROR", CR,
        SDEC ? SetPoint, SDEC ? sensorInput, SDEC ? error(Current), CR,
        "PROPORTIONAL", CR,
        SDEC ? Kp, SDEC ? error(Current), SDEC ? p, CR,
        "OUTPUT", CR,
        SDEC ? drive, CR, CR

LOOP
How ProportionalAlgorithm.bs2 works
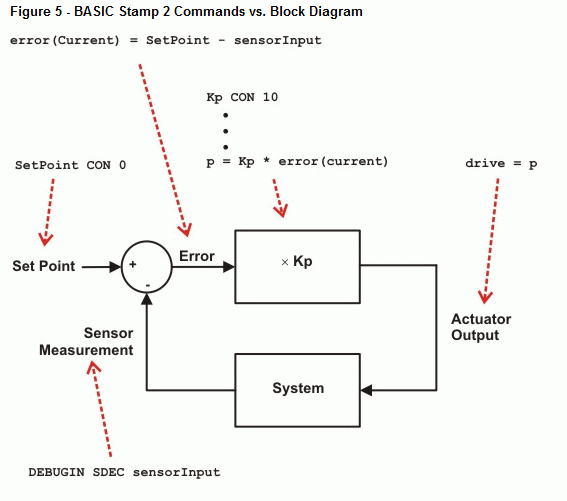
The DO...LOOP repeats the operations in the proportional control block over and over again. Figure 5 shows how each element in the block diagram is performed by a PBASIC statement. You are the System block and the sensor input. The program gets the sensorInput variable from you with the command DEBUGIN SDEC sensorInput. It then performs the error calculation with this statement error(Current) = SetPoint - sensorInput. The proportional block is executed with this statement p = Kp * error(current). The actuator output, which is also an input to the system is determined by this command: drive = p.
Your Turn - Adding Offset to the Actuator Output
Let's say that you expect sensor values from -10 to 10, but you need to use these values to control a servo. Let's also say that the useful signal input range for the servo is from 1.3 ms to 1.7 ms. That translates to PULSOUT Duration arguments that range from 650 to 850 for the BASIC Stamp 2. You will need to add an offset to the output values as shown in Figure 5. Since the input is from -10 to 10, and Kp is 100, it means the result of the proportional block (Kp) will be -100 to 100. So, your offset value will have to be 750 to give you PULSOUT Duration arguments that range from 650 to 850. To make the program accommodate the extra summing junction, you will have to modify this statement:
' Calculate output.
drive = p
One simple way to do it would be like this: drive = p + 750. However, it's a better coding practice to declare a constant at the beginning of the program and then use it in the drive statement, so try this:
- Add this constant declaration to the beginning of the program: Offset CON 750.
- Change the drive calculation to drive = p + Offset.
- Run the modified version of the program and verify that inputs from 10 to -10 result in outputs from 650 to 850.