")
Item code: 900-00008
What It Can Do
- High-torque geared motor interfaces easily to wheels and other mechanics
- Speed control of motor from slow to full, in both directions
- Motorizes most anything, such as a robot or model car
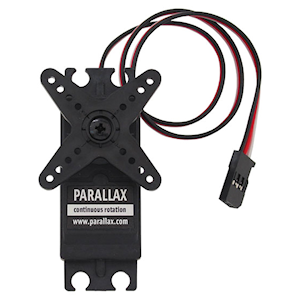
Standard servo motors made for hobby radio-control are designed to spin in a limited circle. The Parallax Continuous Rotation (CR) Servo has the same size and shape as a standard servo, but it’s made to keep turning clockwise or counterclockwise.
The control signal for a servo is a stream of pulses. The exact duration of these pulses, in fractions of a second, is what determines the position of the servo. Each pulse is from 1300 to 1700 microseconds (μs) in duration — one microsecond is one millionth of a second. The pulses repeat about 50 times each second (once every 20 milliseconds).
- 1300 μs: Turn clockwise
- 1500 μs: Stops the motor
- 1700 μs: Turn counterclockwise

The speed of the motor, in either direction, can be controlled by applying pulses of intermediate duration; for example, 1525 μs pulses will cause the motor to turn slowly counterclockwise. At 1575 μs the motor will turn a little faster, and so on.
You can apply timing pulses shorter than 1300 μs and greater than 1700 μs; however, motor speed is not increased beyond these values.
Parts List
- Parallax Continuous Rotation Servo
- BASIC Stamp HomeWork Board, Propeller Board of Education, Propeller QuickStart, or Arduino Uno microcontroller, solderless breadboard as needed
- 22 gauge solid conductor hookup wire
Basic Wiring

- Power requirements: 4 to 6 VDC , 15-200 mA
- Communication: Pulse-width modulation
- Dimensions: 2.2 x 0.8 x 1.6 in (55.8x 19 x 406 mm) excluding servo horn
- Torque: 38 oz-in @ 6 V
Program KickStarts
Each of the example programs turn the servo counter clockwise, then clockwise, and finally stops. This movement is repeated indefinitely.
Important! Servo motors draw only minimal current when they’re not attached to a mechanical load, such as the leg of a robot. The example connection diagrams shown here provide only modest current to the servo, so they are not intended to move heavy loads. They’re useful for demonstration only.
To operate bigger loads the servo motor should be connected to its own 4.8 V to 6 V battery supply. See the links below for information on how to use separate power to operate one or more R/C servo motors.
Due to slight differences in electronic circuitry within the CR Servo, you may need to adjust the servo mechanics so that the motor stops moving when pulses of exactly 1500 μs are supplied.
An externally-accessible trimmer control on the side of the CR Servo allows you to calibrate the stop point. Slowly adjust the control using a small (#0 or #1) Phillips screwdriver while applying a stream of 1500 μs pulses to the servo, 20 ms apart. Calibration programs are provided in this KickStart.

BASIC Stamp 2 HomeWork Board

Calibration Program
Download BASIC Stamp 2 calibration code for the Continuous Rotation Servo
'{$STAMP BS2}
'{$PBASIC 2.5}

DO  ' Repeat forever
 PULSOUT 0, 750 ' Stop
 PAUSE 20
LOOP
Demonstration Program
Download BASIC Stamp 2 demonstration code for the Continuous Rotation Servo
'{$STAMP BS2}
'{$PBASIC 2.5}

counter VAR Word

DO  ' Repeat forever
  FOR counter = 1 TO 100 ' Loop for 2 seconds
    PULSOUT 0, 850 ' Servo counterclockwise
    PAUSE 20
  NEXT

  FOR counter = 1 TO 100 ' Loop for 2 seconds
    PULSOUT 0, 650 ' Servo clockwise
    PAUSE 20
  NEXT

  FOR counter = 1 TO 100 ' Loop for 2 seconds
    PULSOUT 0, 750 ' Servo stop
    PAUSE 20
  NEXT

LOOP
A servo can drain a fresh 9 V battery in less than 20 minutes. For tips on using a separate power supply for a servo on the HomeWork Board, see the Parallax servos product pages (linked below).
Propeller BOE and Propeller QuickStart

Propeller BOE Wiring Diagram

Propeller QuickStart Wiring Diagram
Important!Use a separate AA-size battery pack to power the servo. Connect as shown, being sure not to mix up any of the wires. You can use alkaline or nickel metal hydride (NiMH) cells.
Download Propeller Spin calibration and demo code for the Continuous Rotation Servo
Calibration Program
OBJ
  SERVO : "Servo32v7.spin"

CON
    _clkmode = xtal1 + pll16x
    _xinfreq = 5_000_000

    ServoCh1 = 0

PUB Servo32_DEMO | temp

    SERVO.Start

  repeat
    SERVO.Set(ServoCh1,1500)    ' Stop
    repeat 800000
Demonstration Program
OBJ
  SERVO : "Servo32v7.spin"

CON
    _clkmode = xtal1 + pll16x
    _xinfreq = 5_000_000

    ServoCh1 = 0                ' Servo to pin 0

PUB Servo32_DEMO | temp

    SERVO.Start                 ' Start servo handler

  repeat
    SERVO.Set(ServoCh1,1700)    ' Pin, width -- CCW
    repeat 800000               ' Wait
    SERVO.Set(ServoCh1,1300)    ' CW
    repeat 800000
    SERVO.Set(ServoCh1,1500)    ' Stop
    repeat 800000
To use this program you must include the Servo32v7 object in the same folder as the program file. The Servo32v7 object is included in the download archive file. See using Propeller object libraries for more information on using Propeller object files.
Arduino Uno

Calibration Program
Download Arduino calibration code for the Continuous Rotation Servo
#include <Servo.h>
Servo myServo;

void setup() {
  myServo.attach(9);
  myServo.writeMicroseconds(1500);  // Stop
}

void loop() { }
Demonstration Program
Download Arduino demo code for the Continuous Rotation Servo
#include <Servo.h>
Servo myServo;        // Create Servo object to control the servo

void setup() {
  myServo.attach(9);  // Servo is connected to digital pin 9
}

void loop() {
  myServo.writeMicroseconds(1700);  // Counter clockwise
  delay(2000);                      // Wait 2 seconds
  myServo.writeMicroseconds(1300);  // Clockwise
  delay(2000);
  myServo.writeMicroseconds(1500);  // Stop
  delay(2000);
}
These sketches use the Servo library, which is included with the Arduino IDE software.
For More Information
- See the Parallax Continuous Rotation Servo (#900-00008) store page for full documentation.
- You may substitute the Parallax Standard Servo (#900-00005) if you want a regular R/C servo motor that turns only in a limited arc. Use the following pulse widths to control the motor:
- 1000 μs: Turn clockwise
- 1500 μs: Center
- 2000 μs: Turn counterclockwise
- The product pages for the standard and continuous rotation servos provide downloads for the full product documentation and wiring diagrams for separate power supplies.
- Serveral Parallax development and education boards provide integrated 3-pin headers for easy connecting to servos (either 4 or 6 headers, depending on the board). These products the Parallax Board of Education (BASIC Stamp 2), Board of Education Shield (for Arduiino), Propeller Board of Education, and Propeller Activity Board.