Propeller BlocklyProp Block Reference
-
About Board Types
- About Board Types
- About Naming Things
- About Multicore
- About BlocklyProp Updates
- BlocklyProp Bulk Project Download
- Control
- Operators
- Values
- Arrays
- Variables
- Functions
- Pin states
- Communicate
- Sensor
- Memory
- Analog / Pulses
- Sound Impact Wiring & Example Code
- Audio
- ColorPal Wiring & Code Example
- Servo
- Badge Lock
- Robot
- Badge LEDs
- PIR Wiring & Example Code
- System
- Temp & Humidity
- Temperature & Humidity Sensor Wiring & Example Code
- Badge Buttons
- Memsic 2125 Wiring & Example Code
- GPS
- Fingerprint Scanner Wiring & Example Code
- Graph
- Joystick Wiring & Example Code
- RFID Wiring & Example Code
- PING))) Wiring & Example Code
- 4×4 Keypad Wiring & Example Code
- Air Quality BME680
- Badge Display
- LIS3DH Accelerometer
- 4 x 4 Keypad
- ePaper
- GPS Wiring & Example Code
- IR Remote Wiring & Example Code
- Fingerprint Scanner
- Advanced WX
- Simple WX
- WX WiFi
- RGB LEDs
- LSM9DS1 9-axis IMU
- PWM
- Pulse in / out
- Voltage
- RC time
- ColorPal
- Sound Impact Sensor
- Sony Remote
- RFID
- PIR
- Ping))) Distance
- MMA7455
- Memsic 2-axis
- 2-Axis Joystick
- HMC5883L
- XBee
- Protocols
- Terminal
- OLED
- Serial LCD
-
About Naming Things
- About Board Types
- About Naming Things
- About Multicore
- About BlocklyProp Updates
- BlocklyProp Bulk Project Download
- Control
- Operators
- Values
- Arrays
- Variables
- Functions
- Pin states
- Communicate
- Sensor
- Memory
- Analog / Pulses
- Sound Impact Wiring & Example Code
- Audio
- ColorPal Wiring & Code Example
- Servo
- Badge Lock
- Robot
- Badge LEDs
- PIR Wiring & Example Code
- System
- Temp & Humidity
- Temperature & Humidity Sensor Wiring & Example Code
- Badge Buttons
- Memsic 2125 Wiring & Example Code
- GPS
- Fingerprint Scanner Wiring & Example Code
- Graph
- Joystick Wiring & Example Code
- RFID Wiring & Example Code
- PING))) Wiring & Example Code
- 4×4 Keypad Wiring & Example Code
- Air Quality BME680
- Badge Display
- LIS3DH Accelerometer
- 4 x 4 Keypad
- ePaper
- GPS Wiring & Example Code
- IR Remote Wiring & Example Code
- Fingerprint Scanner
- Advanced WX
- Simple WX
- WX WiFi
- RGB LEDs
- LSM9DS1 9-axis IMU
- PWM
- Pulse in / out
- Voltage
- RC time
- ColorPal
- Sound Impact Sensor
- Sony Remote
- RFID
- PIR
- Ping))) Distance
- MMA7455
- Memsic 2-axis
- 2-Axis Joystick
- HMC5883L
- XBee
- Protocols
- Terminal
- OLED
- Serial LCD
-
About Multicore
- About Board Types
- About Naming Things
- About Multicore
- About BlocklyProp Updates
- BlocklyProp Bulk Project Download
- Control
- Operators
- Values
- Arrays
- Variables
- Functions
- Pin states
- Communicate
- Sensor
- Memory
- Analog / Pulses
- Sound Impact Wiring & Example Code
- Audio
- ColorPal Wiring & Code Example
- Servo
- Badge Lock
- Robot
- Badge LEDs
- PIR Wiring & Example Code
- System
- Temp & Humidity
- Temperature & Humidity Sensor Wiring & Example Code
- Badge Buttons
- Memsic 2125 Wiring & Example Code
- GPS
- Fingerprint Scanner Wiring & Example Code
- Graph
- Joystick Wiring & Example Code
- RFID Wiring & Example Code
- PING))) Wiring & Example Code
- 4×4 Keypad Wiring & Example Code
- Air Quality BME680
- Badge Display
- LIS3DH Accelerometer
- 4 x 4 Keypad
- ePaper
- GPS Wiring & Example Code
- IR Remote Wiring & Example Code
- Fingerprint Scanner
- Advanced WX
- Simple WX
- WX WiFi
- RGB LEDs
- LSM9DS1 9-axis IMU
- PWM
- Pulse in / out
- Voltage
- RC time
- ColorPal
- Sound Impact Sensor
- Sony Remote
- RFID
- PIR
- Ping))) Distance
- MMA7455
- Memsic 2-axis
- 2-Axis Joystick
- HMC5883L
- XBee
- Protocols
- Terminal
- OLED
- Serial LCD
-
About BlocklyProp Updates
- About Board Types
- About Naming Things
- About Multicore
- About BlocklyProp Updates
- BlocklyProp Bulk Project Download
- Control
- Operators
- Values
- Arrays
- Variables
- Functions
- Pin states
- Communicate
- Sensor
- Memory
- Analog / Pulses
- Sound Impact Wiring & Example Code
- Audio
- ColorPal Wiring & Code Example
- Servo
- Badge Lock
- Robot
- Badge LEDs
- PIR Wiring & Example Code
- System
- Temp & Humidity
- Temperature & Humidity Sensor Wiring & Example Code
- Badge Buttons
- Memsic 2125 Wiring & Example Code
- GPS
- Fingerprint Scanner Wiring & Example Code
- Graph
- Joystick Wiring & Example Code
- RFID Wiring & Example Code
- PING))) Wiring & Example Code
- 4×4 Keypad Wiring & Example Code
- Air Quality BME680
- Badge Display
- LIS3DH Accelerometer
- 4 x 4 Keypad
- ePaper
- GPS Wiring & Example Code
- IR Remote Wiring & Example Code
- Fingerprint Scanner
- Advanced WX
- Simple WX
- WX WiFi
- RGB LEDs
- LSM9DS1 9-axis IMU
- PWM
- Pulse in / out
- Voltage
- RC time
- ColorPal
- Sound Impact Sensor
- Sony Remote
- RFID
- PIR
- Ping))) Distance
- MMA7455
- Memsic 2-axis
- 2-Axis Joystick
- HMC5883L
- XBee
- Protocols
- Terminal
- OLED
- Serial LCD
-
BlocklyProp Bulk Project Download
- About Board Types
- About Naming Things
- About Multicore
- About BlocklyProp Updates
- BlocklyProp Bulk Project Download
- Control
- Operators
- Values
- Arrays
- Variables
- Functions
- Pin states
- Communicate
- Sensor
- Memory
- Analog / Pulses
- Sound Impact Wiring & Example Code
- Audio
- ColorPal Wiring & Code Example
- Servo
- Badge Lock
- Robot
- Badge LEDs
- PIR Wiring & Example Code
- System
- Temp & Humidity
- Temperature & Humidity Sensor Wiring & Example Code
- Badge Buttons
- Memsic 2125 Wiring & Example Code
- GPS
- Fingerprint Scanner Wiring & Example Code
- Graph
- Joystick Wiring & Example Code
- RFID Wiring & Example Code
- PING))) Wiring & Example Code
- 4×4 Keypad Wiring & Example Code
- Air Quality BME680
- Badge Display
- LIS3DH Accelerometer
- 4 x 4 Keypad
- ePaper
- GPS Wiring & Example Code
- IR Remote Wiring & Example Code
- Fingerprint Scanner
- Advanced WX
- Simple WX
- WX WiFi
- RGB LEDs
- LSM9DS1 9-axis IMU
- PWM
- Pulse in / out
- Voltage
- RC time
- ColorPal
- Sound Impact Sensor
- Sony Remote
- RFID
- PIR
- Ping))) Distance
- MMA7455
- Memsic 2-axis
- 2-Axis Joystick
- HMC5883L
- XBee
- Protocols
- Terminal
- OLED
- Serial LCD
-
Control
- About Board Types
- About Naming Things
- About Multicore
- About BlocklyProp Updates
- BlocklyProp Bulk Project Download
- Control
- Operators
- Values
- Arrays
- Variables
- Functions
- Pin states
- Communicate
- Sensor
- Memory
- Analog / Pulses
- Sound Impact Wiring & Example Code
- Audio
- ColorPal Wiring & Code Example
- Servo
- Badge Lock
- Robot
- Badge LEDs
- PIR Wiring & Example Code
- System
- Temp & Humidity
- Temperature & Humidity Sensor Wiring & Example Code
- Badge Buttons
- Memsic 2125 Wiring & Example Code
- GPS
- Fingerprint Scanner Wiring & Example Code
- Graph
- Joystick Wiring & Example Code
- RFID Wiring & Example Code
- PING))) Wiring & Example Code
- 4×4 Keypad Wiring & Example Code
- Air Quality BME680
- Badge Display
- LIS3DH Accelerometer
- 4 x 4 Keypad
- ePaper
- GPS Wiring & Example Code
- IR Remote Wiring & Example Code
- Fingerprint Scanner
- Advanced WX
- Simple WX
- WX WiFi
- RGB LEDs
- LSM9DS1 9-axis IMU
- PWM
- Pulse in / out
- Voltage
- RC time
- ColorPal
- Sound Impact Sensor
- Sony Remote
- RFID
- PIR
- Ping))) Distance
- MMA7455
- Memsic 2-axis
- 2-Axis Joystick
- HMC5883L
- XBee
- Protocols
- Terminal
- OLED
- Serial LCD
-
Operators
- About Board Types
- About Naming Things
- About Multicore
- About BlocklyProp Updates
- BlocklyProp Bulk Project Download
- Control
- Operators
- Values
- Arrays
- Variables
- Functions
- Pin states
- Communicate
- Sensor
- Memory
- Analog / Pulses
- Sound Impact Wiring & Example Code
- Audio
- ColorPal Wiring & Code Example
- Servo
- Badge Lock
- Robot
- Badge LEDs
- PIR Wiring & Example Code
- System
- Temp & Humidity
- Temperature & Humidity Sensor Wiring & Example Code
- Badge Buttons
- Memsic 2125 Wiring & Example Code
- GPS
- Fingerprint Scanner Wiring & Example Code
- Graph
- Joystick Wiring & Example Code
- RFID Wiring & Example Code
- PING))) Wiring & Example Code
- 4×4 Keypad Wiring & Example Code
- Air Quality BME680
- Badge Display
- LIS3DH Accelerometer
- 4 x 4 Keypad
- ePaper
- GPS Wiring & Example Code
- IR Remote Wiring & Example Code
- Fingerprint Scanner
- Advanced WX
- Simple WX
- WX WiFi
- RGB LEDs
- LSM9DS1 9-axis IMU
- PWM
- Pulse in / out
- Voltage
- RC time
- ColorPal
- Sound Impact Sensor
- Sony Remote
- RFID
- PIR
- Ping))) Distance
- MMA7455
- Memsic 2-axis
- 2-Axis Joystick
- HMC5883L
- XBee
- Protocols
- Terminal
- OLED
- Serial LCD
-
Values
- About Board Types
- About Naming Things
- About Multicore
- About BlocklyProp Updates
- BlocklyProp Bulk Project Download
- Control
- Operators
- Values
- Arrays
- Variables
- Functions
- Pin states
- Communicate
- Sensor
- Memory
- Analog / Pulses
- Sound Impact Wiring & Example Code
- Audio
- ColorPal Wiring & Code Example
- Servo
- Badge Lock
- Robot
- Badge LEDs
- PIR Wiring & Example Code
- System
- Temp & Humidity
- Temperature & Humidity Sensor Wiring & Example Code
- Badge Buttons
- Memsic 2125 Wiring & Example Code
- GPS
- Fingerprint Scanner Wiring & Example Code
- Graph
- Joystick Wiring & Example Code
- RFID Wiring & Example Code
- PING))) Wiring & Example Code
- 4×4 Keypad Wiring & Example Code
- Air Quality BME680
- Badge Display
- LIS3DH Accelerometer
- 4 x 4 Keypad
- ePaper
- GPS Wiring & Example Code
- IR Remote Wiring & Example Code
- Fingerprint Scanner
- Advanced WX
- Simple WX
- WX WiFi
- RGB LEDs
- LSM9DS1 9-axis IMU
- PWM
- Pulse in / out
- Voltage
- RC time
- ColorPal
- Sound Impact Sensor
- Sony Remote
- RFID
- PIR
- Ping))) Distance
- MMA7455
- Memsic 2-axis
- 2-Axis Joystick
- HMC5883L
- XBee
- Protocols
- Terminal
- OLED
- Serial LCD
-
Arrays
- About Board Types
- About Naming Things
- About Multicore
- About BlocklyProp Updates
- BlocklyProp Bulk Project Download
- Control
- Operators
- Values
- Arrays
- Variables
- Functions
- Pin states
- Communicate
- Sensor
- Memory
- Analog / Pulses
- Sound Impact Wiring & Example Code
- Audio
- ColorPal Wiring & Code Example
- Servo
- Badge Lock
- Robot
- Badge LEDs
- PIR Wiring & Example Code
- System
- Temp & Humidity
- Temperature & Humidity Sensor Wiring & Example Code
- Badge Buttons
- Memsic 2125 Wiring & Example Code
- GPS
- Fingerprint Scanner Wiring & Example Code
- Graph
- Joystick Wiring & Example Code
- RFID Wiring & Example Code
- PING))) Wiring & Example Code
- 4×4 Keypad Wiring & Example Code
- Air Quality BME680
- Badge Display
- LIS3DH Accelerometer
- 4 x 4 Keypad
- ePaper
- GPS Wiring & Example Code
- IR Remote Wiring & Example Code
- Fingerprint Scanner
- Advanced WX
- Simple WX
- WX WiFi
- RGB LEDs
- LSM9DS1 9-axis IMU
- PWM
- Pulse in / out
- Voltage
- RC time
- ColorPal
- Sound Impact Sensor
- Sony Remote
- RFID
- PIR
- Ping))) Distance
- MMA7455
- Memsic 2-axis
- 2-Axis Joystick
- HMC5883L
- XBee
- Protocols
- Terminal
- OLED
- Serial LCD
-
Variables
- About Board Types
- About Naming Things
- About Multicore
- About BlocklyProp Updates
- BlocklyProp Bulk Project Download
- Control
- Operators
- Values
- Arrays
- Variables
- Functions
- Pin states
- Communicate
- Sensor
- Memory
- Analog / Pulses
- Sound Impact Wiring & Example Code
- Audio
- ColorPal Wiring & Code Example
- Servo
- Badge Lock
- Robot
- Badge LEDs
- PIR Wiring & Example Code
- System
- Temp & Humidity
- Temperature & Humidity Sensor Wiring & Example Code
- Badge Buttons
- Memsic 2125 Wiring & Example Code
- GPS
- Fingerprint Scanner Wiring & Example Code
- Graph
- Joystick Wiring & Example Code
- RFID Wiring & Example Code
- PING))) Wiring & Example Code
- 4×4 Keypad Wiring & Example Code
- Air Quality BME680
- Badge Display
- LIS3DH Accelerometer
- 4 x 4 Keypad
- ePaper
- GPS Wiring & Example Code
- IR Remote Wiring & Example Code
- Fingerprint Scanner
- Advanced WX
- Simple WX
- WX WiFi
- RGB LEDs
- LSM9DS1 9-axis IMU
- PWM
- Pulse in / out
- Voltage
- RC time
- ColorPal
- Sound Impact Sensor
- Sony Remote
- RFID
- PIR
- Ping))) Distance
- MMA7455
- Memsic 2-axis
- 2-Axis Joystick
- HMC5883L
- XBee
- Protocols
- Terminal
- OLED
- Serial LCD
-
Functions
- About Board Types
- About Naming Things
- About Multicore
- About BlocklyProp Updates
- BlocklyProp Bulk Project Download
- Control
- Operators
- Values
- Arrays
- Variables
- Functions
- Pin states
- Communicate
- Sensor
- Memory
- Analog / Pulses
- Sound Impact Wiring & Example Code
- Audio
- ColorPal Wiring & Code Example
- Servo
- Badge Lock
- Robot
- Badge LEDs
- PIR Wiring & Example Code
- System
- Temp & Humidity
- Temperature & Humidity Sensor Wiring & Example Code
- Badge Buttons
- Memsic 2125 Wiring & Example Code
- GPS
- Fingerprint Scanner Wiring & Example Code
- Graph
- Joystick Wiring & Example Code
- RFID Wiring & Example Code
- PING))) Wiring & Example Code
- 4×4 Keypad Wiring & Example Code
- Air Quality BME680
- Badge Display
- LIS3DH Accelerometer
- 4 x 4 Keypad
- ePaper
- GPS Wiring & Example Code
- IR Remote Wiring & Example Code
- Fingerprint Scanner
- Advanced WX
- Simple WX
- WX WiFi
- RGB LEDs
- LSM9DS1 9-axis IMU
- PWM
- Pulse in / out
- Voltage
- RC time
- ColorPal
- Sound Impact Sensor
- Sony Remote
- RFID
- PIR
- Ping))) Distance
- MMA7455
- Memsic 2-axis
- 2-Axis Joystick
- HMC5883L
- XBee
- Protocols
- Terminal
- OLED
- Serial LCD
-
Pin states
- About Board Types
- About Naming Things
- About Multicore
- About BlocklyProp Updates
- BlocklyProp Bulk Project Download
- Control
- Operators
- Values
- Arrays
- Variables
- Functions
- Pin states
- Communicate
- Sensor
- Memory
- Analog / Pulses
- Sound Impact Wiring & Example Code
- Audio
- ColorPal Wiring & Code Example
- Servo
- Badge Lock
- Robot
- Badge LEDs
- PIR Wiring & Example Code
- System
- Temp & Humidity
- Temperature & Humidity Sensor Wiring & Example Code
- Badge Buttons
- Memsic 2125 Wiring & Example Code
- GPS
- Fingerprint Scanner Wiring & Example Code
- Graph
- Joystick Wiring & Example Code
- RFID Wiring & Example Code
- PING))) Wiring & Example Code
- 4×4 Keypad Wiring & Example Code
- Air Quality BME680
- Badge Display
- LIS3DH Accelerometer
- 4 x 4 Keypad
- ePaper
- GPS Wiring & Example Code
- IR Remote Wiring & Example Code
- Fingerprint Scanner
- Advanced WX
- Simple WX
- WX WiFi
- RGB LEDs
- LSM9DS1 9-axis IMU
- PWM
- Pulse in / out
- Voltage
- RC time
- ColorPal
- Sound Impact Sensor
- Sony Remote
- RFID
- PIR
- Ping))) Distance
- MMA7455
- Memsic 2-axis
- 2-Axis Joystick
- HMC5883L
- XBee
- Protocols
- Terminal
- OLED
- Serial LCD
-
Communicate
- About Board Types
- About Naming Things
- About Multicore
- About BlocklyProp Updates
- BlocklyProp Bulk Project Download
- Control
- Operators
- Values
- Arrays
- Variables
- Functions
- Pin states
- Communicate
- Sensor
- Memory
- Analog / Pulses
- Sound Impact Wiring & Example Code
- Audio
- ColorPal Wiring & Code Example
- Servo
- Badge Lock
- Robot
- Badge LEDs
- PIR Wiring & Example Code
- System
- Temp & Humidity
- Temperature & Humidity Sensor Wiring & Example Code
- Badge Buttons
- Memsic 2125 Wiring & Example Code
- GPS
- Fingerprint Scanner Wiring & Example Code
- Graph
- Joystick Wiring & Example Code
- RFID Wiring & Example Code
- PING))) Wiring & Example Code
- 4×4 Keypad Wiring & Example Code
- Air Quality BME680
- Badge Display
- LIS3DH Accelerometer
- 4 x 4 Keypad
- ePaper
- GPS Wiring & Example Code
- IR Remote Wiring & Example Code
- Fingerprint Scanner
- Advanced WX
- Simple WX
- WX WiFi
- RGB LEDs
- LSM9DS1 9-axis IMU
- PWM
- Pulse in / out
- Voltage
- RC time
- ColorPal
- Sound Impact Sensor
- Sony Remote
- RFID
- PIR
- Ping))) Distance
- MMA7455
- Memsic 2-axis
- 2-Axis Joystick
- HMC5883L
- XBee
- Protocols
- Terminal
- OLED
- Serial LCD
-
Sensor
- About Board Types
- About Naming Things
- About Multicore
- About BlocklyProp Updates
- BlocklyProp Bulk Project Download
- Control
- Operators
- Values
- Arrays
- Variables
- Functions
- Pin states
- Communicate
- Sensor
- Memory
- Analog / Pulses
- Sound Impact Wiring & Example Code
- Audio
- ColorPal Wiring & Code Example
- Servo
- Badge Lock
- Robot
- Badge LEDs
- PIR Wiring & Example Code
- System
- Temp & Humidity
- Temperature & Humidity Sensor Wiring & Example Code
- Badge Buttons
- Memsic 2125 Wiring & Example Code
- GPS
- Fingerprint Scanner Wiring & Example Code
- Graph
- Joystick Wiring & Example Code
- RFID Wiring & Example Code
- PING))) Wiring & Example Code
- 4×4 Keypad Wiring & Example Code
- Air Quality BME680
- Badge Display
- LIS3DH Accelerometer
- 4 x 4 Keypad
- ePaper
- GPS Wiring & Example Code
- IR Remote Wiring & Example Code
- Fingerprint Scanner
- Advanced WX
- Simple WX
- WX WiFi
- RGB LEDs
- LSM9DS1 9-axis IMU
- PWM
- Pulse in / out
- Voltage
- RC time
- ColorPal
- Sound Impact Sensor
- Sony Remote
- RFID
- PIR
- Ping))) Distance
- MMA7455
- Memsic 2-axis
- 2-Axis Joystick
- HMC5883L
- XBee
- Protocols
- Terminal
- OLED
- Serial LCD
-
Memory
- About Board Types
- About Naming Things
- About Multicore
- About BlocklyProp Updates
- BlocklyProp Bulk Project Download
- Control
- Operators
- Values
- Arrays
- Variables
- Functions
- Pin states
- Communicate
- Sensor
- Memory
- Analog / Pulses
- Sound Impact Wiring & Example Code
- Audio
- ColorPal Wiring & Code Example
- Servo
- Badge Lock
- Robot
- Badge LEDs
- PIR Wiring & Example Code
- System
- Temp & Humidity
- Temperature & Humidity Sensor Wiring & Example Code
- Badge Buttons
- Memsic 2125 Wiring & Example Code
- GPS
- Fingerprint Scanner Wiring & Example Code
- Graph
- Joystick Wiring & Example Code
- RFID Wiring & Example Code
- PING))) Wiring & Example Code
- 4×4 Keypad Wiring & Example Code
- Air Quality BME680
- Badge Display
- LIS3DH Accelerometer
- 4 x 4 Keypad
- ePaper
- GPS Wiring & Example Code
- IR Remote Wiring & Example Code
- Fingerprint Scanner
- Advanced WX
- Simple WX
- WX WiFi
- RGB LEDs
- LSM9DS1 9-axis IMU
- PWM
- Pulse in / out
- Voltage
- RC time
- ColorPal
- Sound Impact Sensor
- Sony Remote
- RFID
- PIR
- Ping))) Distance
- MMA7455
- Memsic 2-axis
- 2-Axis Joystick
- HMC5883L
- XBee
- Protocols
- Terminal
- OLED
- Serial LCD
-
Analog / Pulses
- About Board Types
- About Naming Things
- About Multicore
- About BlocklyProp Updates
- BlocklyProp Bulk Project Download
- Control
- Operators
- Values
- Arrays
- Variables
- Functions
- Pin states
- Communicate
- Sensor
- Memory
- Analog / Pulses
- Sound Impact Wiring & Example Code
- Audio
- ColorPal Wiring & Code Example
- Servo
- Badge Lock
- Robot
- Badge LEDs
- PIR Wiring & Example Code
- System
- Temp & Humidity
- Temperature & Humidity Sensor Wiring & Example Code
- Badge Buttons
- Memsic 2125 Wiring & Example Code
- GPS
- Fingerprint Scanner Wiring & Example Code
- Graph
- Joystick Wiring & Example Code
- RFID Wiring & Example Code
- PING))) Wiring & Example Code
- 4×4 Keypad Wiring & Example Code
- Air Quality BME680
- Badge Display
- LIS3DH Accelerometer
- 4 x 4 Keypad
- ePaper
- GPS Wiring & Example Code
- IR Remote Wiring & Example Code
- Fingerprint Scanner
- Advanced WX
- Simple WX
- WX WiFi
- RGB LEDs
- LSM9DS1 9-axis IMU
- PWM
- Pulse in / out
- Voltage
- RC time
- ColorPal
- Sound Impact Sensor
- Sony Remote
- RFID
- PIR
- Ping))) Distance
- MMA7455
- Memsic 2-axis
- 2-Axis Joystick
- HMC5883L
- XBee
- Protocols
- Terminal
- OLED
- Serial LCD
-
Sound Impact Wiring & Example Code
- About Board Types
- About Naming Things
- About Multicore
- About BlocklyProp Updates
- BlocklyProp Bulk Project Download
- Control
- Operators
- Values
- Arrays
- Variables
- Functions
- Pin states
- Communicate
- Sensor
- Memory
- Analog / Pulses
- Sound Impact Wiring & Example Code
- Audio
- ColorPal Wiring & Code Example
- Servo
- Badge Lock
- Robot
- Badge LEDs
- PIR Wiring & Example Code
- System
- Temp & Humidity
- Temperature & Humidity Sensor Wiring & Example Code
- Badge Buttons
- Memsic 2125 Wiring & Example Code
- GPS
- Fingerprint Scanner Wiring & Example Code
- Graph
- Joystick Wiring & Example Code
- RFID Wiring & Example Code
- PING))) Wiring & Example Code
- 4×4 Keypad Wiring & Example Code
- Air Quality BME680
- Badge Display
- LIS3DH Accelerometer
- 4 x 4 Keypad
- ePaper
- GPS Wiring & Example Code
- IR Remote Wiring & Example Code
- Fingerprint Scanner
- Advanced WX
- Simple WX
- WX WiFi
- RGB LEDs
- LSM9DS1 9-axis IMU
- PWM
- Pulse in / out
- Voltage
- RC time
- ColorPal
- Sound Impact Sensor
- Sony Remote
- RFID
- PIR
- Ping))) Distance
- MMA7455
- Memsic 2-axis
- 2-Axis Joystick
- HMC5883L
- XBee
- Protocols
- Terminal
- OLED
- Serial LCD
-
Audio
- About Board Types
- About Naming Things
- About Multicore
- About BlocklyProp Updates
- BlocklyProp Bulk Project Download
- Control
- Operators
- Values
- Arrays
- Variables
- Functions
- Pin states
- Communicate
- Sensor
- Memory
- Analog / Pulses
- Sound Impact Wiring & Example Code
- Audio
- ColorPal Wiring & Code Example
- Servo
- Badge Lock
- Robot
- Badge LEDs
- PIR Wiring & Example Code
- System
- Temp & Humidity
- Temperature & Humidity Sensor Wiring & Example Code
- Badge Buttons
- Memsic 2125 Wiring & Example Code
- GPS
- Fingerprint Scanner Wiring & Example Code
- Graph
- Joystick Wiring & Example Code
- RFID Wiring & Example Code
- PING))) Wiring & Example Code
- 4×4 Keypad Wiring & Example Code
- Air Quality BME680
- Badge Display
- LIS3DH Accelerometer
- 4 x 4 Keypad
- ePaper
- GPS Wiring & Example Code
- IR Remote Wiring & Example Code
- Fingerprint Scanner
- Advanced WX
- Simple WX
- WX WiFi
- RGB LEDs
- LSM9DS1 9-axis IMU
- PWM
- Pulse in / out
- Voltage
- RC time
- ColorPal
- Sound Impact Sensor
- Sony Remote
- RFID
- PIR
- Ping))) Distance
- MMA7455
- Memsic 2-axis
- 2-Axis Joystick
- HMC5883L
- XBee
- Protocols
- Terminal
- OLED
- Serial LCD
-
ColorPal Wiring & Code Example
- About Board Types
- About Naming Things
- About Multicore
- About BlocklyProp Updates
- BlocklyProp Bulk Project Download
- Control
- Operators
- Values
- Arrays
- Variables
- Functions
- Pin states
- Communicate
- Sensor
- Memory
- Analog / Pulses
- Sound Impact Wiring & Example Code
- Audio
- ColorPal Wiring & Code Example
- Servo
- Badge Lock
- Robot
- Badge LEDs
- PIR Wiring & Example Code
- System
- Temp & Humidity
- Temperature & Humidity Sensor Wiring & Example Code
- Badge Buttons
- Memsic 2125 Wiring & Example Code
- GPS
- Fingerprint Scanner Wiring & Example Code
- Graph
- Joystick Wiring & Example Code
- RFID Wiring & Example Code
- PING))) Wiring & Example Code
- 4×4 Keypad Wiring & Example Code
- Air Quality BME680
- Badge Display
- LIS3DH Accelerometer
- 4 x 4 Keypad
- ePaper
- GPS Wiring & Example Code
- IR Remote Wiring & Example Code
- Fingerprint Scanner
- Advanced WX
- Simple WX
- WX WiFi
- RGB LEDs
- LSM9DS1 9-axis IMU
- PWM
- Pulse in / out
- Voltage
- RC time
- ColorPal
- Sound Impact Sensor
- Sony Remote
- RFID
- PIR
- Ping))) Distance
- MMA7455
- Memsic 2-axis
- 2-Axis Joystick
- HMC5883L
- XBee
- Protocols
- Terminal
- OLED
- Serial LCD
-
Servo
- About Board Types
- About Naming Things
- About Multicore
- About BlocklyProp Updates
- BlocklyProp Bulk Project Download
- Control
- Operators
- Values
- Arrays
- Variables
- Functions
- Pin states
- Communicate
- Sensor
- Memory
- Analog / Pulses
- Sound Impact Wiring & Example Code
- Audio
- ColorPal Wiring & Code Example
- Servo
- Badge Lock
- Robot
- Badge LEDs
- PIR Wiring & Example Code
- System
- Temp & Humidity
- Temperature & Humidity Sensor Wiring & Example Code
- Badge Buttons
- Memsic 2125 Wiring & Example Code
- GPS
- Fingerprint Scanner Wiring & Example Code
- Graph
- Joystick Wiring & Example Code
- RFID Wiring & Example Code
- PING))) Wiring & Example Code
- 4×4 Keypad Wiring & Example Code
- Air Quality BME680
- Badge Display
- LIS3DH Accelerometer
- 4 x 4 Keypad
- ePaper
- GPS Wiring & Example Code
- IR Remote Wiring & Example Code
- Fingerprint Scanner
- Advanced WX
- Simple WX
- WX WiFi
- RGB LEDs
- LSM9DS1 9-axis IMU
- PWM
- Pulse in / out
- Voltage
- RC time
- ColorPal
- Sound Impact Sensor
- Sony Remote
- RFID
- PIR
- Ping))) Distance
- MMA7455
- Memsic 2-axis
- 2-Axis Joystick
- HMC5883L
- XBee
- Protocols
- Terminal
- OLED
- Serial LCD
-
Badge Lock
- About Board Types
- About Naming Things
- About Multicore
- About BlocklyProp Updates
- BlocklyProp Bulk Project Download
- Control
- Operators
- Values
- Arrays
- Variables
- Functions
- Pin states
- Communicate
- Sensor
- Memory
- Analog / Pulses
- Sound Impact Wiring & Example Code
- Audio
- ColorPal Wiring & Code Example
- Servo
- Badge Lock
- Robot
- Badge LEDs
- PIR Wiring & Example Code
- System
- Temp & Humidity
- Temperature & Humidity Sensor Wiring & Example Code
- Badge Buttons
- Memsic 2125 Wiring & Example Code
- GPS
- Fingerprint Scanner Wiring & Example Code
- Graph
- Joystick Wiring & Example Code
- RFID Wiring & Example Code
- PING))) Wiring & Example Code
- 4×4 Keypad Wiring & Example Code
- Air Quality BME680
- Badge Display
- LIS3DH Accelerometer
- 4 x 4 Keypad
- ePaper
- GPS Wiring & Example Code
- IR Remote Wiring & Example Code
- Fingerprint Scanner
- Advanced WX
- Simple WX
- WX WiFi
- RGB LEDs
- LSM9DS1 9-axis IMU
- PWM
- Pulse in / out
- Voltage
- RC time
- ColorPal
- Sound Impact Sensor
- Sony Remote
- RFID
- PIR
- Ping))) Distance
- MMA7455
- Memsic 2-axis
- 2-Axis Joystick
- HMC5883L
- XBee
- Protocols
- Terminal
- OLED
- Serial LCD
-
Robot
- About Board Types
- About Naming Things
- About Multicore
- About BlocklyProp Updates
- BlocklyProp Bulk Project Download
- Control
- Operators
- Values
- Arrays
- Variables
- Functions
- Pin states
- Communicate
- Sensor
- Memory
- Analog / Pulses
- Sound Impact Wiring & Example Code
- Audio
- ColorPal Wiring & Code Example
- Servo
- Badge Lock
- Robot
- Badge LEDs
- PIR Wiring & Example Code
- System
- Temp & Humidity
- Temperature & Humidity Sensor Wiring & Example Code
- Badge Buttons
- Memsic 2125 Wiring & Example Code
- GPS
- Fingerprint Scanner Wiring & Example Code
- Graph
- Joystick Wiring & Example Code
- RFID Wiring & Example Code
- PING))) Wiring & Example Code
- 4×4 Keypad Wiring & Example Code
- Air Quality BME680
- Badge Display
- LIS3DH Accelerometer
- 4 x 4 Keypad
- ePaper
- GPS Wiring & Example Code
- IR Remote Wiring & Example Code
- Fingerprint Scanner
- Advanced WX
- Simple WX
- WX WiFi
- RGB LEDs
- LSM9DS1 9-axis IMU
- PWM
- Pulse in / out
- Voltage
- RC time
- ColorPal
- Sound Impact Sensor
- Sony Remote
- RFID
- PIR
- Ping))) Distance
- MMA7455
- Memsic 2-axis
- 2-Axis Joystick
- HMC5883L
- XBee
- Protocols
- Terminal
- OLED
- Serial LCD
-
Badge LEDs
- About Board Types
- About Naming Things
- About Multicore
- About BlocklyProp Updates
- BlocklyProp Bulk Project Download
- Control
- Operators
- Values
- Arrays
- Variables
- Functions
- Pin states
- Communicate
- Sensor
- Memory
- Analog / Pulses
- Sound Impact Wiring & Example Code
- Audio
- ColorPal Wiring & Code Example
- Servo
- Badge Lock
- Robot
- Badge LEDs
- PIR Wiring & Example Code
- System
- Temp & Humidity
- Temperature & Humidity Sensor Wiring & Example Code
- Badge Buttons
- Memsic 2125 Wiring & Example Code
- GPS
- Fingerprint Scanner Wiring & Example Code
- Graph
- Joystick Wiring & Example Code
- RFID Wiring & Example Code
- PING))) Wiring & Example Code
- 4×4 Keypad Wiring & Example Code
- Air Quality BME680
- Badge Display
- LIS3DH Accelerometer
- 4 x 4 Keypad
- ePaper
- GPS Wiring & Example Code
- IR Remote Wiring & Example Code
- Fingerprint Scanner
- Advanced WX
- Simple WX
- WX WiFi
- RGB LEDs
- LSM9DS1 9-axis IMU
- PWM
- Pulse in / out
- Voltage
- RC time
- ColorPal
- Sound Impact Sensor
- Sony Remote
- RFID
- PIR
- Ping))) Distance
- MMA7455
- Memsic 2-axis
- 2-Axis Joystick
- HMC5883L
- XBee
- Protocols
- Terminal
- OLED
- Serial LCD
-
PIR Wiring & Example Code
- About Board Types
- About Naming Things
- About Multicore
- About BlocklyProp Updates
- BlocklyProp Bulk Project Download
- Control
- Operators
- Values
- Arrays
- Variables
- Functions
- Pin states
- Communicate
- Sensor
- Memory
- Analog / Pulses
- Sound Impact Wiring & Example Code
- Audio
- ColorPal Wiring & Code Example
- Servo
- Badge Lock
- Robot
- Badge LEDs
- PIR Wiring & Example Code
- System
- Temp & Humidity
- Temperature & Humidity Sensor Wiring & Example Code
- Badge Buttons
- Memsic 2125 Wiring & Example Code
- GPS
- Fingerprint Scanner Wiring & Example Code
- Graph
- Joystick Wiring & Example Code
- RFID Wiring & Example Code
- PING))) Wiring & Example Code
- 4×4 Keypad Wiring & Example Code
- Air Quality BME680
- Badge Display
- LIS3DH Accelerometer
- 4 x 4 Keypad
- ePaper
- GPS Wiring & Example Code
- IR Remote Wiring & Example Code
- Fingerprint Scanner
- Advanced WX
- Simple WX
- WX WiFi
- RGB LEDs
- LSM9DS1 9-axis IMU
- PWM
- Pulse in / out
- Voltage
- RC time
- ColorPal
- Sound Impact Sensor
- Sony Remote
- RFID
- PIR
- Ping))) Distance
- MMA7455
- Memsic 2-axis
- 2-Axis Joystick
- HMC5883L
- XBee
- Protocols
- Terminal
- OLED
- Serial LCD
-
System
- About Board Types
- About Naming Things
- About Multicore
- About BlocklyProp Updates
- BlocklyProp Bulk Project Download
- Control
- Operators
- Values
- Arrays
- Variables
- Functions
- Pin states
- Communicate
- Sensor
- Memory
- Analog / Pulses
- Sound Impact Wiring & Example Code
- Audio
- ColorPal Wiring & Code Example
- Servo
- Badge Lock
- Robot
- Badge LEDs
- PIR Wiring & Example Code
- System
- Temp & Humidity
- Temperature & Humidity Sensor Wiring & Example Code
- Badge Buttons
- Memsic 2125 Wiring & Example Code
- GPS
- Fingerprint Scanner Wiring & Example Code
- Graph
- Joystick Wiring & Example Code
- RFID Wiring & Example Code
- PING))) Wiring & Example Code
- 4×4 Keypad Wiring & Example Code
- Air Quality BME680
- Badge Display
- LIS3DH Accelerometer
- 4 x 4 Keypad
- ePaper
- GPS Wiring & Example Code
- IR Remote Wiring & Example Code
- Fingerprint Scanner
- Advanced WX
- Simple WX
- WX WiFi
- RGB LEDs
- LSM9DS1 9-axis IMU
- PWM
- Pulse in / out
- Voltage
- RC time
- ColorPal
- Sound Impact Sensor
- Sony Remote
- RFID
- PIR
- Ping))) Distance
- MMA7455
- Memsic 2-axis
- 2-Axis Joystick
- HMC5883L
- XBee
- Protocols
- Terminal
- OLED
- Serial LCD
-
Temp & Humidity
- About Board Types
- About Naming Things
- About Multicore
- About BlocklyProp Updates
- BlocklyProp Bulk Project Download
- Control
- Operators
- Values
- Arrays
- Variables
- Functions
- Pin states
- Communicate
- Sensor
- Memory
- Analog / Pulses
- Sound Impact Wiring & Example Code
- Audio
- ColorPal Wiring & Code Example
- Servo
- Badge Lock
- Robot
- Badge LEDs
- PIR Wiring & Example Code
- System
- Temp & Humidity
- Temperature & Humidity Sensor Wiring & Example Code
- Badge Buttons
- Memsic 2125 Wiring & Example Code
- GPS
- Fingerprint Scanner Wiring & Example Code
- Graph
- Joystick Wiring & Example Code
- RFID Wiring & Example Code
- PING))) Wiring & Example Code
- 4×4 Keypad Wiring & Example Code
- Air Quality BME680
- Badge Display
- LIS3DH Accelerometer
- 4 x 4 Keypad
- ePaper
- GPS Wiring & Example Code
- IR Remote Wiring & Example Code
- Fingerprint Scanner
- Advanced WX
- Simple WX
- WX WiFi
- RGB LEDs
- LSM9DS1 9-axis IMU
- PWM
- Pulse in / out
- Voltage
- RC time
- ColorPal
- Sound Impact Sensor
- Sony Remote
- RFID
- PIR
- Ping))) Distance
- MMA7455
- Memsic 2-axis
- 2-Axis Joystick
- HMC5883L
- XBee
- Protocols
- Terminal
- OLED
- Serial LCD
-
Temperature & Humidity Sensor Wiring & Example Code
- About Board Types
- About Naming Things
- About Multicore
- About BlocklyProp Updates
- BlocklyProp Bulk Project Download
- Control
- Operators
- Values
- Arrays
- Variables
- Functions
- Pin states
- Communicate
- Sensor
- Memory
- Analog / Pulses
- Sound Impact Wiring & Example Code
- Audio
- ColorPal Wiring & Code Example
- Servo
- Badge Lock
- Robot
- Badge LEDs
- PIR Wiring & Example Code
- System
- Temp & Humidity
- Temperature & Humidity Sensor Wiring & Example Code
- Badge Buttons
- Memsic 2125 Wiring & Example Code
- GPS
- Fingerprint Scanner Wiring & Example Code
- Graph
- Joystick Wiring & Example Code
- RFID Wiring & Example Code
- PING))) Wiring & Example Code
- 4×4 Keypad Wiring & Example Code
- Air Quality BME680
- Badge Display
- LIS3DH Accelerometer
- 4 x 4 Keypad
- ePaper
- GPS Wiring & Example Code
- IR Remote Wiring & Example Code
- Fingerprint Scanner
- Advanced WX
- Simple WX
- WX WiFi
- RGB LEDs
- LSM9DS1 9-axis IMU
- PWM
- Pulse in / out
- Voltage
- RC time
- ColorPal
- Sound Impact Sensor
- Sony Remote
- RFID
- PIR
- Ping))) Distance
- MMA7455
- Memsic 2-axis
- 2-Axis Joystick
- HMC5883L
- XBee
- Protocols
- Terminal
- OLED
- Serial LCD
-
Badge Buttons
- About Board Types
- About Naming Things
- About Multicore
- About BlocklyProp Updates
- BlocklyProp Bulk Project Download
- Control
- Operators
- Values
- Arrays
- Variables
- Functions
- Pin states
- Communicate
- Sensor
- Memory
- Analog / Pulses
- Sound Impact Wiring & Example Code
- Audio
- ColorPal Wiring & Code Example
- Servo
- Badge Lock
- Robot
- Badge LEDs
- PIR Wiring & Example Code
- System
- Temp & Humidity
- Temperature & Humidity Sensor Wiring & Example Code
- Badge Buttons
- Memsic 2125 Wiring & Example Code
- GPS
- Fingerprint Scanner Wiring & Example Code
- Graph
- Joystick Wiring & Example Code
- RFID Wiring & Example Code
- PING))) Wiring & Example Code
- 4×4 Keypad Wiring & Example Code
- Air Quality BME680
- Badge Display
- LIS3DH Accelerometer
- 4 x 4 Keypad
- ePaper
- GPS Wiring & Example Code
- IR Remote Wiring & Example Code
- Fingerprint Scanner
- Advanced WX
- Simple WX
- WX WiFi
- RGB LEDs
- LSM9DS1 9-axis IMU
- PWM
- Pulse in / out
- Voltage
- RC time
- ColorPal
- Sound Impact Sensor
- Sony Remote
- RFID
- PIR
- Ping))) Distance
- MMA7455
- Memsic 2-axis
- 2-Axis Joystick
- HMC5883L
- XBee
- Protocols
- Terminal
- OLED
- Serial LCD
-
Memsic 2125 Wiring & Example Code
- About Board Types
- About Naming Things
- About Multicore
- About BlocklyProp Updates
- BlocklyProp Bulk Project Download
- Control
- Operators
- Values
- Arrays
- Variables
- Functions
- Pin states
- Communicate
- Sensor
- Memory
- Analog / Pulses
- Sound Impact Wiring & Example Code
- Audio
- ColorPal Wiring & Code Example
- Servo
- Badge Lock
- Robot
- Badge LEDs
- PIR Wiring & Example Code
- System
- Temp & Humidity
- Temperature & Humidity Sensor Wiring & Example Code
- Badge Buttons
- Memsic 2125 Wiring & Example Code
- GPS
- Fingerprint Scanner Wiring & Example Code
- Graph
- Joystick Wiring & Example Code
- RFID Wiring & Example Code
- PING))) Wiring & Example Code
- 4×4 Keypad Wiring & Example Code
- Air Quality BME680
- Badge Display
- LIS3DH Accelerometer
- 4 x 4 Keypad
- ePaper
- GPS Wiring & Example Code
- IR Remote Wiring & Example Code
- Fingerprint Scanner
- Advanced WX
- Simple WX
- WX WiFi
- RGB LEDs
- LSM9DS1 9-axis IMU
- PWM
- Pulse in / out
- Voltage
- RC time
- ColorPal
- Sound Impact Sensor
- Sony Remote
- RFID
- PIR
- Ping))) Distance
- MMA7455
- Memsic 2-axis
- 2-Axis Joystick
- HMC5883L
- XBee
- Protocols
- Terminal
- OLED
- Serial LCD
-
GPS
- About Board Types
- About Naming Things
- About Multicore
- About BlocklyProp Updates
- BlocklyProp Bulk Project Download
- Control
- Operators
- Values
- Arrays
- Variables
- Functions
- Pin states
- Communicate
- Sensor
- Memory
- Analog / Pulses
- Sound Impact Wiring & Example Code
- Audio
- ColorPal Wiring & Code Example
- Servo
- Badge Lock
- Robot
- Badge LEDs
- PIR Wiring & Example Code
- System
- Temp & Humidity
- Temperature & Humidity Sensor Wiring & Example Code
- Badge Buttons
- Memsic 2125 Wiring & Example Code
- GPS
- Fingerprint Scanner Wiring & Example Code
- Graph
- Joystick Wiring & Example Code
- RFID Wiring & Example Code
- PING))) Wiring & Example Code
- 4×4 Keypad Wiring & Example Code
- Air Quality BME680
- Badge Display
- LIS3DH Accelerometer
- 4 x 4 Keypad
- ePaper
- GPS Wiring & Example Code
- IR Remote Wiring & Example Code
- Fingerprint Scanner
- Advanced WX
- Simple WX
- WX WiFi
- RGB LEDs
- LSM9DS1 9-axis IMU
- PWM
- Pulse in / out
- Voltage
- RC time
- ColorPal
- Sound Impact Sensor
- Sony Remote
- RFID
- PIR
- Ping))) Distance
- MMA7455
- Memsic 2-axis
- 2-Axis Joystick
- HMC5883L
- XBee
- Protocols
- Terminal
- OLED
- Serial LCD
-
Fingerprint Scanner Wiring & Example Code
- About Board Types
- About Naming Things
- About Multicore
- About BlocklyProp Updates
- BlocklyProp Bulk Project Download
- Control
- Operators
- Values
- Arrays
- Variables
- Functions
- Pin states
- Communicate
- Sensor
- Memory
- Analog / Pulses
- Sound Impact Wiring & Example Code
- Audio
- ColorPal Wiring & Code Example
- Servo
- Badge Lock
- Robot
- Badge LEDs
- PIR Wiring & Example Code
- System
- Temp & Humidity
- Temperature & Humidity Sensor Wiring & Example Code
- Badge Buttons
- Memsic 2125 Wiring & Example Code
- GPS
- Fingerprint Scanner Wiring & Example Code
- Graph
- Joystick Wiring & Example Code
- RFID Wiring & Example Code
- PING))) Wiring & Example Code
- 4×4 Keypad Wiring & Example Code
- Air Quality BME680
- Badge Display
- LIS3DH Accelerometer
- 4 x 4 Keypad
- ePaper
- GPS Wiring & Example Code
- IR Remote Wiring & Example Code
- Fingerprint Scanner
- Advanced WX
- Simple WX
- WX WiFi
- RGB LEDs
- LSM9DS1 9-axis IMU
- PWM
- Pulse in / out
- Voltage
- RC time
- ColorPal
- Sound Impact Sensor
- Sony Remote
- RFID
- PIR
- Ping))) Distance
- MMA7455
- Memsic 2-axis
- 2-Axis Joystick
- HMC5883L
- XBee
- Protocols
- Terminal
- OLED
- Serial LCD
-
Graph
- About Board Types
- About Naming Things
- About Multicore
- About BlocklyProp Updates
- BlocklyProp Bulk Project Download
- Control
- Operators
- Values
- Arrays
- Variables
- Functions
- Pin states
- Communicate
- Sensor
- Memory
- Analog / Pulses
- Sound Impact Wiring & Example Code
- Audio
- ColorPal Wiring & Code Example
- Servo
- Badge Lock
- Robot
- Badge LEDs
- PIR Wiring & Example Code
- System
- Temp & Humidity
- Temperature & Humidity Sensor Wiring & Example Code
- Badge Buttons
- Memsic 2125 Wiring & Example Code
- GPS
- Fingerprint Scanner Wiring & Example Code
- Graph
- Joystick Wiring & Example Code
- RFID Wiring & Example Code
- PING))) Wiring & Example Code
- 4×4 Keypad Wiring & Example Code
- Air Quality BME680
- Badge Display
- LIS3DH Accelerometer
- 4 x 4 Keypad
- ePaper
- GPS Wiring & Example Code
- IR Remote Wiring & Example Code
- Fingerprint Scanner
- Advanced WX
- Simple WX
- WX WiFi
- RGB LEDs
- LSM9DS1 9-axis IMU
- PWM
- Pulse in / out
- Voltage
- RC time
- ColorPal
- Sound Impact Sensor
- Sony Remote
- RFID
- PIR
- Ping))) Distance
- MMA7455
- Memsic 2-axis
- 2-Axis Joystick
- HMC5883L
- XBee
- Protocols
- Terminal
- OLED
- Serial LCD
-
Joystick Wiring & Example Code
- About Board Types
- About Naming Things
- About Multicore
- About BlocklyProp Updates
- BlocklyProp Bulk Project Download
- Control
- Operators
- Values
- Arrays
- Variables
- Functions
- Pin states
- Communicate
- Sensor
- Memory
- Analog / Pulses
- Sound Impact Wiring & Example Code
- Audio
- ColorPal Wiring & Code Example
- Servo
- Badge Lock
- Robot
- Badge LEDs
- PIR Wiring & Example Code
- System
- Temp & Humidity
- Temperature & Humidity Sensor Wiring & Example Code
- Badge Buttons
- Memsic 2125 Wiring & Example Code
- GPS
- Fingerprint Scanner Wiring & Example Code
- Graph
- Joystick Wiring & Example Code
- RFID Wiring & Example Code
- PING))) Wiring & Example Code
- 4×4 Keypad Wiring & Example Code
- Air Quality BME680
- Badge Display
- LIS3DH Accelerometer
- 4 x 4 Keypad
- ePaper
- GPS Wiring & Example Code
- IR Remote Wiring & Example Code
- Fingerprint Scanner
- Advanced WX
- Simple WX
- WX WiFi
- RGB LEDs
- LSM9DS1 9-axis IMU
- PWM
- Pulse in / out
- Voltage
- RC time
- ColorPal
- Sound Impact Sensor
- Sony Remote
- RFID
- PIR
- Ping))) Distance
- MMA7455
- Memsic 2-axis
- 2-Axis Joystick
- HMC5883L
- XBee
- Protocols
- Terminal
- OLED
- Serial LCD
-
RFID Wiring & Example Code
- About Board Types
- About Naming Things
- About Multicore
- About BlocklyProp Updates
- BlocklyProp Bulk Project Download
- Control
- Operators
- Values
- Arrays
- Variables
- Functions
- Pin states
- Communicate
- Sensor
- Memory
- Analog / Pulses
- Sound Impact Wiring & Example Code
- Audio
- ColorPal Wiring & Code Example
- Servo
- Badge Lock
- Robot
- Badge LEDs
- PIR Wiring & Example Code
- System
- Temp & Humidity
- Temperature & Humidity Sensor Wiring & Example Code
- Badge Buttons
- Memsic 2125 Wiring & Example Code
- GPS
- Fingerprint Scanner Wiring & Example Code
- Graph
- Joystick Wiring & Example Code
- RFID Wiring & Example Code
- PING))) Wiring & Example Code
- 4×4 Keypad Wiring & Example Code
- Air Quality BME680
- Badge Display
- LIS3DH Accelerometer
- 4 x 4 Keypad
- ePaper
- GPS Wiring & Example Code
- IR Remote Wiring & Example Code
- Fingerprint Scanner
- Advanced WX
- Simple WX
- WX WiFi
- RGB LEDs
- LSM9DS1 9-axis IMU
- PWM
- Pulse in / out
- Voltage
- RC time
- ColorPal
- Sound Impact Sensor
- Sony Remote
- RFID
- PIR
- Ping))) Distance
- MMA7455
- Memsic 2-axis
- 2-Axis Joystick
- HMC5883L
- XBee
- Protocols
- Terminal
- OLED
- Serial LCD
-
PING))) Wiring & Example Code
- About Board Types
- About Naming Things
- About Multicore
- About BlocklyProp Updates
- BlocklyProp Bulk Project Download
- Control
- Operators
- Values
- Arrays
- Variables
- Functions
- Pin states
- Communicate
- Sensor
- Memory
- Analog / Pulses
- Sound Impact Wiring & Example Code
- Audio
- ColorPal Wiring & Code Example
- Servo
- Badge Lock
- Robot
- Badge LEDs
- PIR Wiring & Example Code
- System
- Temp & Humidity
- Temperature & Humidity Sensor Wiring & Example Code
- Badge Buttons
- Memsic 2125 Wiring & Example Code
- GPS
- Fingerprint Scanner Wiring & Example Code
- Graph
- Joystick Wiring & Example Code
- RFID Wiring & Example Code
- PING))) Wiring & Example Code
- 4×4 Keypad Wiring & Example Code
- Air Quality BME680
- Badge Display
- LIS3DH Accelerometer
- 4 x 4 Keypad
- ePaper
- GPS Wiring & Example Code
- IR Remote Wiring & Example Code
- Fingerprint Scanner
- Advanced WX
- Simple WX
- WX WiFi
- RGB LEDs
- LSM9DS1 9-axis IMU
- PWM
- Pulse in / out
- Voltage
- RC time
- ColorPal
- Sound Impact Sensor
- Sony Remote
- RFID
- PIR
- Ping))) Distance
- MMA7455
- Memsic 2-axis
- 2-Axis Joystick
- HMC5883L
- XBee
- Protocols
- Terminal
- OLED
- Serial LCD
-
4×4 Keypad Wiring & Example Code
- About Board Types
- About Naming Things
- About Multicore
- About BlocklyProp Updates
- BlocklyProp Bulk Project Download
- Control
- Operators
- Values
- Arrays
- Variables
- Functions
- Pin states
- Communicate
- Sensor
- Memory
- Analog / Pulses
- Sound Impact Wiring & Example Code
- Audio
- ColorPal Wiring & Code Example
- Servo
- Badge Lock
- Robot
- Badge LEDs
- PIR Wiring & Example Code
- System
- Temp & Humidity
- Temperature & Humidity Sensor Wiring & Example Code
- Badge Buttons
- Memsic 2125 Wiring & Example Code
- GPS
- Fingerprint Scanner Wiring & Example Code
- Graph
- Joystick Wiring & Example Code
- RFID Wiring & Example Code
- PING))) Wiring & Example Code
- 4×4 Keypad Wiring & Example Code
- Air Quality BME680
- Badge Display
- LIS3DH Accelerometer
- 4 x 4 Keypad
- ePaper
- GPS Wiring & Example Code
- IR Remote Wiring & Example Code
- Fingerprint Scanner
- Advanced WX
- Simple WX
- WX WiFi
- RGB LEDs
- LSM9DS1 9-axis IMU
- PWM
- Pulse in / out
- Voltage
- RC time
- ColorPal
- Sound Impact Sensor
- Sony Remote
- RFID
- PIR
- Ping))) Distance
- MMA7455
- Memsic 2-axis
- 2-Axis Joystick
- HMC5883L
- XBee
- Protocols
- Terminal
- OLED
- Serial LCD
-
Air Quality BME680
- About Board Types
- About Naming Things
- About Multicore
- About BlocklyProp Updates
- BlocklyProp Bulk Project Download
- Control
- Operators
- Values
- Arrays
- Variables
- Functions
- Pin states
- Communicate
- Sensor
- Memory
- Analog / Pulses
- Sound Impact Wiring & Example Code
- Audio
- ColorPal Wiring & Code Example
- Servo
- Badge Lock
- Robot
- Badge LEDs
- PIR Wiring & Example Code
- System
- Temp & Humidity
- Temperature & Humidity Sensor Wiring & Example Code
- Badge Buttons
- Memsic 2125 Wiring & Example Code
- GPS
- Fingerprint Scanner Wiring & Example Code
- Graph
- Joystick Wiring & Example Code
- RFID Wiring & Example Code
- PING))) Wiring & Example Code
- 4×4 Keypad Wiring & Example Code
- Air Quality BME680
- Badge Display
- LIS3DH Accelerometer
- 4 x 4 Keypad
- ePaper
- GPS Wiring & Example Code
- IR Remote Wiring & Example Code
- Fingerprint Scanner
- Advanced WX
- Simple WX
- WX WiFi
- RGB LEDs
- LSM9DS1 9-axis IMU
- PWM
- Pulse in / out
- Voltage
- RC time
- ColorPal
- Sound Impact Sensor
- Sony Remote
- RFID
- PIR
- Ping))) Distance
- MMA7455
- Memsic 2-axis
- 2-Axis Joystick
- HMC5883L
- XBee
- Protocols
- Terminal
- OLED
- Serial LCD
-
Badge Display
- About Board Types
- About Naming Things
- About Multicore
- About BlocklyProp Updates
- BlocklyProp Bulk Project Download
- Control
- Operators
- Values
- Arrays
- Variables
- Functions
- Pin states
- Communicate
- Sensor
- Memory
- Analog / Pulses
- Sound Impact Wiring & Example Code
- Audio
- ColorPal Wiring & Code Example
- Servo
- Badge Lock
- Robot
- Badge LEDs
- PIR Wiring & Example Code
- System
- Temp & Humidity
- Temperature & Humidity Sensor Wiring & Example Code
- Badge Buttons
- Memsic 2125 Wiring & Example Code
- GPS
- Fingerprint Scanner Wiring & Example Code
- Graph
- Joystick Wiring & Example Code
- RFID Wiring & Example Code
- PING))) Wiring & Example Code
- 4×4 Keypad Wiring & Example Code
- Air Quality BME680
- Badge Display
- LIS3DH Accelerometer
- 4 x 4 Keypad
- ePaper
- GPS Wiring & Example Code
- IR Remote Wiring & Example Code
- Fingerprint Scanner
- Advanced WX
- Simple WX
- WX WiFi
- RGB LEDs
- LSM9DS1 9-axis IMU
- PWM
- Pulse in / out
- Voltage
- RC time
- ColorPal
- Sound Impact Sensor
- Sony Remote
- RFID
- PIR
- Ping))) Distance
- MMA7455
- Memsic 2-axis
- 2-Axis Joystick
- HMC5883L
- XBee
- Protocols
- Terminal
- OLED
- Serial LCD
-
LIS3DH Accelerometer
- About Board Types
- About Naming Things
- About Multicore
- About BlocklyProp Updates
- BlocklyProp Bulk Project Download
- Control
- Operators
- Values
- Arrays
- Variables
- Functions
- Pin states
- Communicate
- Sensor
- Memory
- Analog / Pulses
- Sound Impact Wiring & Example Code
- Audio
- ColorPal Wiring & Code Example
- Servo
- Badge Lock
- Robot
- Badge LEDs
- PIR Wiring & Example Code
- System
- Temp & Humidity
- Temperature & Humidity Sensor Wiring & Example Code
- Badge Buttons
- Memsic 2125 Wiring & Example Code
- GPS
- Fingerprint Scanner Wiring & Example Code
- Graph
- Joystick Wiring & Example Code
- RFID Wiring & Example Code
- PING))) Wiring & Example Code
- 4×4 Keypad Wiring & Example Code
- Air Quality BME680
- Badge Display
- LIS3DH Accelerometer
- 4 x 4 Keypad
- ePaper
- GPS Wiring & Example Code
- IR Remote Wiring & Example Code
- Fingerprint Scanner
- Advanced WX
- Simple WX
- WX WiFi
- RGB LEDs
- LSM9DS1 9-axis IMU
- PWM
- Pulse in / out
- Voltage
- RC time
- ColorPal
- Sound Impact Sensor
- Sony Remote
- RFID
- PIR
- Ping))) Distance
- MMA7455
- Memsic 2-axis
- 2-Axis Joystick
- HMC5883L
- XBee
- Protocols
- Terminal
- OLED
- Serial LCD
-
4 x 4 Keypad
- About Board Types
- About Naming Things
- About Multicore
- About BlocklyProp Updates
- BlocklyProp Bulk Project Download
- Control
- Operators
- Values
- Arrays
- Variables
- Functions
- Pin states
- Communicate
- Sensor
- Memory
- Analog / Pulses
- Sound Impact Wiring & Example Code
- Audio
- ColorPal Wiring & Code Example
- Servo
- Badge Lock
- Robot
- Badge LEDs
- PIR Wiring & Example Code
- System
- Temp & Humidity
- Temperature & Humidity Sensor Wiring & Example Code
- Badge Buttons
- Memsic 2125 Wiring & Example Code
- GPS
- Fingerprint Scanner Wiring & Example Code
- Graph
- Joystick Wiring & Example Code
- RFID Wiring & Example Code
- PING))) Wiring & Example Code
- 4×4 Keypad Wiring & Example Code
- Air Quality BME680
- Badge Display
- LIS3DH Accelerometer
- 4 x 4 Keypad
- ePaper
- GPS Wiring & Example Code
- IR Remote Wiring & Example Code
- Fingerprint Scanner
- Advanced WX
- Simple WX
- WX WiFi
- RGB LEDs
- LSM9DS1 9-axis IMU
- PWM
- Pulse in / out
- Voltage
- RC time
- ColorPal
- Sound Impact Sensor
- Sony Remote
- RFID
- PIR
- Ping))) Distance
- MMA7455
- Memsic 2-axis
- 2-Axis Joystick
- HMC5883L
- XBee
- Protocols
- Terminal
- OLED
- Serial LCD
-
ePaper
- About Board Types
- About Naming Things
- About Multicore
- About BlocklyProp Updates
- BlocklyProp Bulk Project Download
- Control
- Operators
- Values
- Arrays
- Variables
- Functions
- Pin states
- Communicate
- Sensor
- Memory
- Analog / Pulses
- Sound Impact Wiring & Example Code
- Audio
- ColorPal Wiring & Code Example
- Servo
- Badge Lock
- Robot
- Badge LEDs
- PIR Wiring & Example Code
- System
- Temp & Humidity
- Temperature & Humidity Sensor Wiring & Example Code
- Badge Buttons
- Memsic 2125 Wiring & Example Code
- GPS
- Fingerprint Scanner Wiring & Example Code
- Graph
- Joystick Wiring & Example Code
- RFID Wiring & Example Code
- PING))) Wiring & Example Code
- 4×4 Keypad Wiring & Example Code
- Air Quality BME680
- Badge Display
- LIS3DH Accelerometer
- 4 x 4 Keypad
- ePaper
- GPS Wiring & Example Code
- IR Remote Wiring & Example Code
- Fingerprint Scanner
- Advanced WX
- Simple WX
- WX WiFi
- RGB LEDs
- LSM9DS1 9-axis IMU
- PWM
- Pulse in / out
- Voltage
- RC time
- ColorPal
- Sound Impact Sensor
- Sony Remote
- RFID
- PIR
- Ping))) Distance
- MMA7455
- Memsic 2-axis
- 2-Axis Joystick
- HMC5883L
- XBee
- Protocols
- Terminal
- OLED
- Serial LCD
-
GPS Wiring & Example Code
- About Board Types
- About Naming Things
- About Multicore
- About BlocklyProp Updates
- BlocklyProp Bulk Project Download
- Control
- Operators
- Values
- Arrays
- Variables
- Functions
- Pin states
- Communicate
- Sensor
- Memory
- Analog / Pulses
- Sound Impact Wiring & Example Code
- Audio
- ColorPal Wiring & Code Example
- Servo
- Badge Lock
- Robot
- Badge LEDs
- PIR Wiring & Example Code
- System
- Temp & Humidity
- Temperature & Humidity Sensor Wiring & Example Code
- Badge Buttons
- Memsic 2125 Wiring & Example Code
- GPS
- Fingerprint Scanner Wiring & Example Code
- Graph
- Joystick Wiring & Example Code
- RFID Wiring & Example Code
- PING))) Wiring & Example Code
- 4×4 Keypad Wiring & Example Code
- Air Quality BME680
- Badge Display
- LIS3DH Accelerometer
- 4 x 4 Keypad
- ePaper
- GPS Wiring & Example Code
- IR Remote Wiring & Example Code
- Fingerprint Scanner
- Advanced WX
- Simple WX
- WX WiFi
- RGB LEDs
- LSM9DS1 9-axis IMU
- PWM
- Pulse in / out
- Voltage
- RC time
- ColorPal
- Sound Impact Sensor
- Sony Remote
- RFID
- PIR
- Ping))) Distance
- MMA7455
- Memsic 2-axis
- 2-Axis Joystick
- HMC5883L
- XBee
- Protocols
- Terminal
- OLED
- Serial LCD
-
IR Remote Wiring & Example Code
- About Board Types
- About Naming Things
- About Multicore
- About BlocklyProp Updates
- BlocklyProp Bulk Project Download
- Control
- Operators
- Values
- Arrays
- Variables
- Functions
- Pin states
- Communicate
- Sensor
- Memory
- Analog / Pulses
- Sound Impact Wiring & Example Code
- Audio
- ColorPal Wiring & Code Example
- Servo
- Badge Lock
- Robot
- Badge LEDs
- PIR Wiring & Example Code
- System
- Temp & Humidity
- Temperature & Humidity Sensor Wiring & Example Code
- Badge Buttons
- Memsic 2125 Wiring & Example Code
- GPS
- Fingerprint Scanner Wiring & Example Code
- Graph
- Joystick Wiring & Example Code
- RFID Wiring & Example Code
- PING))) Wiring & Example Code
- 4×4 Keypad Wiring & Example Code
- Air Quality BME680
- Badge Display
- LIS3DH Accelerometer
- 4 x 4 Keypad
- ePaper
- GPS Wiring & Example Code
- IR Remote Wiring & Example Code
- Fingerprint Scanner
- Advanced WX
- Simple WX
- WX WiFi
- RGB LEDs
- LSM9DS1 9-axis IMU
- PWM
- Pulse in / out
- Voltage
- RC time
- ColorPal
- Sound Impact Sensor
- Sony Remote
- RFID
- PIR
- Ping))) Distance
- MMA7455
- Memsic 2-axis
- 2-Axis Joystick
- HMC5883L
- XBee
- Protocols
- Terminal
- OLED
- Serial LCD
-
Fingerprint Scanner
- About Board Types
- About Naming Things
- About Multicore
- About BlocklyProp Updates
- BlocklyProp Bulk Project Download
- Control
- Operators
- Values
- Arrays
- Variables
- Functions
- Pin states
- Communicate
- Sensor
- Memory
- Analog / Pulses
- Sound Impact Wiring & Example Code
- Audio
- ColorPal Wiring & Code Example
- Servo
- Badge Lock
- Robot
- Badge LEDs
- PIR Wiring & Example Code
- System
- Temp & Humidity
- Temperature & Humidity Sensor Wiring & Example Code
- Badge Buttons
- Memsic 2125 Wiring & Example Code
- GPS
- Fingerprint Scanner Wiring & Example Code
- Graph
- Joystick Wiring & Example Code
- RFID Wiring & Example Code
- PING))) Wiring & Example Code
- 4×4 Keypad Wiring & Example Code
- Air Quality BME680
- Badge Display
- LIS3DH Accelerometer
- 4 x 4 Keypad
- ePaper
- GPS Wiring & Example Code
- IR Remote Wiring & Example Code
- Fingerprint Scanner
- Advanced WX
- Simple WX
- WX WiFi
- RGB LEDs
- LSM9DS1 9-axis IMU
- PWM
- Pulse in / out
- Voltage
- RC time
- ColorPal
- Sound Impact Sensor
- Sony Remote
- RFID
- PIR
- Ping))) Distance
- MMA7455
- Memsic 2-axis
- 2-Axis Joystick
- HMC5883L
- XBee
- Protocols
- Terminal
- OLED
- Serial LCD
-
Advanced WX
- About Board Types
- About Naming Things
- About Multicore
- About BlocklyProp Updates
- BlocklyProp Bulk Project Download
- Control
- Operators
- Values
- Arrays
- Variables
- Functions
- Pin states
- Communicate
- Sensor
- Memory
- Analog / Pulses
- Sound Impact Wiring & Example Code
- Audio
- ColorPal Wiring & Code Example
- Servo
- Badge Lock
- Robot
- Badge LEDs
- PIR Wiring & Example Code
- System
- Temp & Humidity
- Temperature & Humidity Sensor Wiring & Example Code
- Badge Buttons
- Memsic 2125 Wiring & Example Code
- GPS
- Fingerprint Scanner Wiring & Example Code
- Graph
- Joystick Wiring & Example Code
- RFID Wiring & Example Code
- PING))) Wiring & Example Code
- 4×4 Keypad Wiring & Example Code
- Air Quality BME680
- Badge Display
- LIS3DH Accelerometer
- 4 x 4 Keypad
- ePaper
- GPS Wiring & Example Code
- IR Remote Wiring & Example Code
- Fingerprint Scanner
- Advanced WX
- Simple WX
- WX WiFi
- RGB LEDs
- LSM9DS1 9-axis IMU
- PWM
- Pulse in / out
- Voltage
- RC time
- ColorPal
- Sound Impact Sensor
- Sony Remote
- RFID
- PIR
- Ping))) Distance
- MMA7455
- Memsic 2-axis
- 2-Axis Joystick
- HMC5883L
- XBee
- Protocols
- Terminal
- OLED
- Serial LCD
-
Simple WX
- About Board Types
- About Naming Things
- About Multicore
- About BlocklyProp Updates
- BlocklyProp Bulk Project Download
- Control
- Operators
- Values
- Arrays
- Variables
- Functions
- Pin states
- Communicate
- Sensor
- Memory
- Analog / Pulses
- Sound Impact Wiring & Example Code
- Audio
- ColorPal Wiring & Code Example
- Servo
- Badge Lock
- Robot
- Badge LEDs
- PIR Wiring & Example Code
- System
- Temp & Humidity
- Temperature & Humidity Sensor Wiring & Example Code
- Badge Buttons
- Memsic 2125 Wiring & Example Code
- GPS
- Fingerprint Scanner Wiring & Example Code
- Graph
- Joystick Wiring & Example Code
- RFID Wiring & Example Code
- PING))) Wiring & Example Code
- 4×4 Keypad Wiring & Example Code
- Air Quality BME680
- Badge Display
- LIS3DH Accelerometer
- 4 x 4 Keypad
- ePaper
- GPS Wiring & Example Code
- IR Remote Wiring & Example Code
- Fingerprint Scanner
- Advanced WX
- Simple WX
- WX WiFi
- RGB LEDs
- LSM9DS1 9-axis IMU
- PWM
- Pulse in / out
- Voltage
- RC time
- ColorPal
- Sound Impact Sensor
- Sony Remote
- RFID
- PIR
- Ping))) Distance
- MMA7455
- Memsic 2-axis
- 2-Axis Joystick
- HMC5883L
- XBee
- Protocols
- Terminal
- OLED
- Serial LCD
-
WX WiFi
- About Board Types
- About Naming Things
- About Multicore
- About BlocklyProp Updates
- BlocklyProp Bulk Project Download
- Control
- Operators
- Values
- Arrays
- Variables
- Functions
- Pin states
- Communicate
- Sensor
- Memory
- Analog / Pulses
- Sound Impact Wiring & Example Code
- Audio
- ColorPal Wiring & Code Example
- Servo
- Badge Lock
- Robot
- Badge LEDs
- PIR Wiring & Example Code
- System
- Temp & Humidity
- Temperature & Humidity Sensor Wiring & Example Code
- Badge Buttons
- Memsic 2125 Wiring & Example Code
- GPS
- Fingerprint Scanner Wiring & Example Code
- Graph
- Joystick Wiring & Example Code
- RFID Wiring & Example Code
- PING))) Wiring & Example Code
- 4×4 Keypad Wiring & Example Code
- Air Quality BME680
- Badge Display
- LIS3DH Accelerometer
- 4 x 4 Keypad
- ePaper
- GPS Wiring & Example Code
- IR Remote Wiring & Example Code
- Fingerprint Scanner
- Advanced WX
- Simple WX
- WX WiFi
- RGB LEDs
- LSM9DS1 9-axis IMU
- PWM
- Pulse in / out
- Voltage
- RC time
- ColorPal
- Sound Impact Sensor
- Sony Remote
- RFID
- PIR
- Ping))) Distance
- MMA7455
- Memsic 2-axis
- 2-Axis Joystick
- HMC5883L
- XBee
- Protocols
- Terminal
- OLED
- Serial LCD
-
RGB LEDs
- About Board Types
- About Naming Things
- About Multicore
- About BlocklyProp Updates
- BlocklyProp Bulk Project Download
- Control
- Operators
- Values
- Arrays
- Variables
- Functions
- Pin states
- Communicate
- Sensor
- Memory
- Analog / Pulses
- Sound Impact Wiring & Example Code
- Audio
- ColorPal Wiring & Code Example
- Servo
- Badge Lock
- Robot
- Badge LEDs
- PIR Wiring & Example Code
- System
- Temp & Humidity
- Temperature & Humidity Sensor Wiring & Example Code
- Badge Buttons
- Memsic 2125 Wiring & Example Code
- GPS
- Fingerprint Scanner Wiring & Example Code
- Graph
- Joystick Wiring & Example Code
- RFID Wiring & Example Code
- PING))) Wiring & Example Code
- 4×4 Keypad Wiring & Example Code
- Air Quality BME680
- Badge Display
- LIS3DH Accelerometer
- 4 x 4 Keypad
- ePaper
- GPS Wiring & Example Code
- IR Remote Wiring & Example Code
- Fingerprint Scanner
- Advanced WX
- Simple WX
- WX WiFi
- RGB LEDs
- LSM9DS1 9-axis IMU
- PWM
- Pulse in / out
- Voltage
- RC time
- ColorPal
- Sound Impact Sensor
- Sony Remote
- RFID
- PIR
- Ping))) Distance
- MMA7455
- Memsic 2-axis
- 2-Axis Joystick
- HMC5883L
- XBee
- Protocols
- Terminal
- OLED
- Serial LCD
-
LSM9DS1 9-axis IMU
- About Board Types
- About Naming Things
- About Multicore
- About BlocklyProp Updates
- BlocklyProp Bulk Project Download
- Control
- Operators
- Values
- Arrays
- Variables
- Functions
- Pin states
- Communicate
- Sensor
- Memory
- Analog / Pulses
- Sound Impact Wiring & Example Code
- Audio
- ColorPal Wiring & Code Example
- Servo
- Badge Lock
- Robot
- Badge LEDs
- PIR Wiring & Example Code
- System
- Temp & Humidity
- Temperature & Humidity Sensor Wiring & Example Code
- Badge Buttons
- Memsic 2125 Wiring & Example Code
- GPS
- Fingerprint Scanner Wiring & Example Code
- Graph
- Joystick Wiring & Example Code
- RFID Wiring & Example Code
- PING))) Wiring & Example Code
- 4×4 Keypad Wiring & Example Code
- Air Quality BME680
- Badge Display
- LIS3DH Accelerometer
- 4 x 4 Keypad
- ePaper
- GPS Wiring & Example Code
- IR Remote Wiring & Example Code
- Fingerprint Scanner
- Advanced WX
- Simple WX
- WX WiFi
- RGB LEDs
- LSM9DS1 9-axis IMU
- PWM
- Pulse in / out
- Voltage
- RC time
- ColorPal
- Sound Impact Sensor
- Sony Remote
- RFID
- PIR
- Ping))) Distance
- MMA7455
- Memsic 2-axis
- 2-Axis Joystick
- HMC5883L
- XBee
- Protocols
- Terminal
- OLED
- Serial LCD
-
PWM
- About Board Types
- About Naming Things
- About Multicore
- About BlocklyProp Updates
- BlocklyProp Bulk Project Download
- Control
- Operators
- Values
- Arrays
- Variables
- Functions
- Pin states
- Communicate
- Sensor
- Memory
- Analog / Pulses
- Sound Impact Wiring & Example Code
- Audio
- ColorPal Wiring & Code Example
- Servo
- Badge Lock
- Robot
- Badge LEDs
- PIR Wiring & Example Code
- System
- Temp & Humidity
- Temperature & Humidity Sensor Wiring & Example Code
- Badge Buttons
- Memsic 2125 Wiring & Example Code
- GPS
- Fingerprint Scanner Wiring & Example Code
- Graph
- Joystick Wiring & Example Code
- RFID Wiring & Example Code
- PING))) Wiring & Example Code
- 4×4 Keypad Wiring & Example Code
- Air Quality BME680
- Badge Display
- LIS3DH Accelerometer
- 4 x 4 Keypad
- ePaper
- GPS Wiring & Example Code
- IR Remote Wiring & Example Code
- Fingerprint Scanner
- Advanced WX
- Simple WX
- WX WiFi
- RGB LEDs
- LSM9DS1 9-axis IMU
- PWM
- Pulse in / out
- Voltage
- RC time
- ColorPal
- Sound Impact Sensor
- Sony Remote
- RFID
- PIR
- Ping))) Distance
- MMA7455
- Memsic 2-axis
- 2-Axis Joystick
- HMC5883L
- XBee
- Protocols
- Terminal
- OLED
- Serial LCD
-
Pulse in / out
- About Board Types
- About Naming Things
- About Multicore
- About BlocklyProp Updates
- BlocklyProp Bulk Project Download
- Control
- Operators
- Values
- Arrays
- Variables
- Functions
- Pin states
- Communicate
- Sensor
- Memory
- Analog / Pulses
- Sound Impact Wiring & Example Code
- Audio
- ColorPal Wiring & Code Example
- Servo
- Badge Lock
- Robot
- Badge LEDs
- PIR Wiring & Example Code
- System
- Temp & Humidity
- Temperature & Humidity Sensor Wiring & Example Code
- Badge Buttons
- Memsic 2125 Wiring & Example Code
- GPS
- Fingerprint Scanner Wiring & Example Code
- Graph
- Joystick Wiring & Example Code
- RFID Wiring & Example Code
- PING))) Wiring & Example Code
- 4×4 Keypad Wiring & Example Code
- Air Quality BME680
- Badge Display
- LIS3DH Accelerometer
- 4 x 4 Keypad
- ePaper
- GPS Wiring & Example Code
- IR Remote Wiring & Example Code
- Fingerprint Scanner
- Advanced WX
- Simple WX
- WX WiFi
- RGB LEDs
- LSM9DS1 9-axis IMU
- PWM
- Pulse in / out
- Voltage
- RC time
- ColorPal
- Sound Impact Sensor
- Sony Remote
- RFID
- PIR
- Ping))) Distance
- MMA7455
- Memsic 2-axis
- 2-Axis Joystick
- HMC5883L
- XBee
- Protocols
- Terminal
- OLED
- Serial LCD
-
Voltage
- About Board Types
- About Naming Things
- About Multicore
- About BlocklyProp Updates
- BlocklyProp Bulk Project Download
- Control
- Operators
- Values
- Arrays
- Variables
- Functions
- Pin states
- Communicate
- Sensor
- Memory
- Analog / Pulses
- Sound Impact Wiring & Example Code
- Audio
- ColorPal Wiring & Code Example
- Servo
- Badge Lock
- Robot
- Badge LEDs
- PIR Wiring & Example Code
- System
- Temp & Humidity
- Temperature & Humidity Sensor Wiring & Example Code
- Badge Buttons
- Memsic 2125 Wiring & Example Code
- GPS
- Fingerprint Scanner Wiring & Example Code
- Graph
- Joystick Wiring & Example Code
- RFID Wiring & Example Code
- PING))) Wiring & Example Code
- 4×4 Keypad Wiring & Example Code
- Air Quality BME680
- Badge Display
- LIS3DH Accelerometer
- 4 x 4 Keypad
- ePaper
- GPS Wiring & Example Code
- IR Remote Wiring & Example Code
- Fingerprint Scanner
- Advanced WX
- Simple WX
- WX WiFi
- RGB LEDs
- LSM9DS1 9-axis IMU
- PWM
- Pulse in / out
- Voltage
- RC time
- ColorPal
- Sound Impact Sensor
- Sony Remote
- RFID
- PIR
- Ping))) Distance
- MMA7455
- Memsic 2-axis
- 2-Axis Joystick
- HMC5883L
- XBee
- Protocols
- Terminal
- OLED
- Serial LCD
-
RC time
- About Board Types
- About Naming Things
- About Multicore
- About BlocklyProp Updates
- BlocklyProp Bulk Project Download
- Control
- Operators
- Values
- Arrays
- Variables
- Functions
- Pin states
- Communicate
- Sensor
- Memory
- Analog / Pulses
- Sound Impact Wiring & Example Code
- Audio
- ColorPal Wiring & Code Example
- Servo
- Badge Lock
- Robot
- Badge LEDs
- PIR Wiring & Example Code
- System
- Temp & Humidity
- Temperature & Humidity Sensor Wiring & Example Code
- Badge Buttons
- Memsic 2125 Wiring & Example Code
- GPS
- Fingerprint Scanner Wiring & Example Code
- Graph
- Joystick Wiring & Example Code
- RFID Wiring & Example Code
- PING))) Wiring & Example Code
- 4×4 Keypad Wiring & Example Code
- Air Quality BME680
- Badge Display
- LIS3DH Accelerometer
- 4 x 4 Keypad
- ePaper
- GPS Wiring & Example Code
- IR Remote Wiring & Example Code
- Fingerprint Scanner
- Advanced WX
- Simple WX
- WX WiFi
- RGB LEDs
- LSM9DS1 9-axis IMU
- PWM
- Pulse in / out
- Voltage
- RC time
- ColorPal
- Sound Impact Sensor
- Sony Remote
- RFID
- PIR
- Ping))) Distance
- MMA7455
- Memsic 2-axis
- 2-Axis Joystick
- HMC5883L
- XBee
- Protocols
- Terminal
- OLED
- Serial LCD
-
ColorPal
- About Board Types
- About Naming Things
- About Multicore
- About BlocklyProp Updates
- BlocklyProp Bulk Project Download
- Control
- Operators
- Values
- Arrays
- Variables
- Functions
- Pin states
- Communicate
- Sensor
- Memory
- Analog / Pulses
- Sound Impact Wiring & Example Code
- Audio
- ColorPal Wiring & Code Example
- Servo
- Badge Lock
- Robot
- Badge LEDs
- PIR Wiring & Example Code
- System
- Temp & Humidity
- Temperature & Humidity Sensor Wiring & Example Code
- Badge Buttons
- Memsic 2125 Wiring & Example Code
- GPS
- Fingerprint Scanner Wiring & Example Code
- Graph
- Joystick Wiring & Example Code
- RFID Wiring & Example Code
- PING))) Wiring & Example Code
- 4×4 Keypad Wiring & Example Code
- Air Quality BME680
- Badge Display
- LIS3DH Accelerometer
- 4 x 4 Keypad
- ePaper
- GPS Wiring & Example Code
- IR Remote Wiring & Example Code
- Fingerprint Scanner
- Advanced WX
- Simple WX
- WX WiFi
- RGB LEDs
- LSM9DS1 9-axis IMU
- PWM
- Pulse in / out
- Voltage
- RC time
- ColorPal
- Sound Impact Sensor
- Sony Remote
- RFID
- PIR
- Ping))) Distance
- MMA7455
- Memsic 2-axis
- 2-Axis Joystick
- HMC5883L
- XBee
- Protocols
- Terminal
- OLED
- Serial LCD
-
Sound Impact Sensor
- About Board Types
- About Naming Things
- About Multicore
- About BlocklyProp Updates
- BlocklyProp Bulk Project Download
- Control
- Operators
- Values
- Arrays
- Variables
- Functions
- Pin states
- Communicate
- Sensor
- Memory
- Analog / Pulses
- Sound Impact Wiring & Example Code
- Audio
- ColorPal Wiring & Code Example
- Servo
- Badge Lock
- Robot
- Badge LEDs
- PIR Wiring & Example Code
- System
- Temp & Humidity
- Temperature & Humidity Sensor Wiring & Example Code
- Badge Buttons
- Memsic 2125 Wiring & Example Code
- GPS
- Fingerprint Scanner Wiring & Example Code
- Graph
- Joystick Wiring & Example Code
- RFID Wiring & Example Code
- PING))) Wiring & Example Code
- 4×4 Keypad Wiring & Example Code
- Air Quality BME680
- Badge Display
- LIS3DH Accelerometer
- 4 x 4 Keypad
- ePaper
- GPS Wiring & Example Code
- IR Remote Wiring & Example Code
- Fingerprint Scanner
- Advanced WX
- Simple WX
- WX WiFi
- RGB LEDs
- LSM9DS1 9-axis IMU
- PWM
- Pulse in / out
- Voltage
- RC time
- ColorPal
- Sound Impact Sensor
- Sony Remote
- RFID
- PIR
- Ping))) Distance
- MMA7455
- Memsic 2-axis
- 2-Axis Joystick
- HMC5883L
- XBee
- Protocols
- Terminal
- OLED
- Serial LCD
-
Sony Remote
- About Board Types
- About Naming Things
- About Multicore
- About BlocklyProp Updates
- BlocklyProp Bulk Project Download
- Control
- Operators
- Values
- Arrays
- Variables
- Functions
- Pin states
- Communicate
- Sensor
- Memory
- Analog / Pulses
- Sound Impact Wiring & Example Code
- Audio
- ColorPal Wiring & Code Example
- Servo
- Badge Lock
- Robot
- Badge LEDs
- PIR Wiring & Example Code
- System
- Temp & Humidity
- Temperature & Humidity Sensor Wiring & Example Code
- Badge Buttons
- Memsic 2125 Wiring & Example Code
- GPS
- Fingerprint Scanner Wiring & Example Code
- Graph
- Joystick Wiring & Example Code
- RFID Wiring & Example Code
- PING))) Wiring & Example Code
- 4×4 Keypad Wiring & Example Code
- Air Quality BME680
- Badge Display
- LIS3DH Accelerometer
- 4 x 4 Keypad
- ePaper
- GPS Wiring & Example Code
- IR Remote Wiring & Example Code
- Fingerprint Scanner
- Advanced WX
- Simple WX
- WX WiFi
- RGB LEDs
- LSM9DS1 9-axis IMU
- PWM
- Pulse in / out
- Voltage
- RC time
- ColorPal
- Sound Impact Sensor
- Sony Remote
- RFID
- PIR
- Ping))) Distance
- MMA7455
- Memsic 2-axis
- 2-Axis Joystick
- HMC5883L
- XBee
- Protocols
- Terminal
- OLED
- Serial LCD
-
RFID
- About Board Types
- About Naming Things
- About Multicore
- About BlocklyProp Updates
- BlocklyProp Bulk Project Download
- Control
- Operators
- Values
- Arrays
- Variables
- Functions
- Pin states
- Communicate
- Sensor
- Memory
- Analog / Pulses
- Sound Impact Wiring & Example Code
- Audio
- ColorPal Wiring & Code Example
- Servo
- Badge Lock
- Robot
- Badge LEDs
- PIR Wiring & Example Code
- System
- Temp & Humidity
- Temperature & Humidity Sensor Wiring & Example Code
- Badge Buttons
- Memsic 2125 Wiring & Example Code
- GPS
- Fingerprint Scanner Wiring & Example Code
- Graph
- Joystick Wiring & Example Code
- RFID Wiring & Example Code
- PING))) Wiring & Example Code
- 4×4 Keypad Wiring & Example Code
- Air Quality BME680
- Badge Display
- LIS3DH Accelerometer
- 4 x 4 Keypad
- ePaper
- GPS Wiring & Example Code
- IR Remote Wiring & Example Code
- Fingerprint Scanner
- Advanced WX
- Simple WX
- WX WiFi
- RGB LEDs
- LSM9DS1 9-axis IMU
- PWM
- Pulse in / out
- Voltage
- RC time
- ColorPal
- Sound Impact Sensor
- Sony Remote
- RFID
- PIR
- Ping))) Distance
- MMA7455
- Memsic 2-axis
- 2-Axis Joystick
- HMC5883L
- XBee
- Protocols
- Terminal
- OLED
- Serial LCD
-
PIR
- About Board Types
- About Naming Things
- About Multicore
- About BlocklyProp Updates
- BlocklyProp Bulk Project Download
- Control
- Operators
- Values
- Arrays
- Variables
- Functions
- Pin states
- Communicate
- Sensor
- Memory
- Analog / Pulses
- Sound Impact Wiring & Example Code
- Audio
- ColorPal Wiring & Code Example
- Servo
- Badge Lock
- Robot
- Badge LEDs
- PIR Wiring & Example Code
- System
- Temp & Humidity
- Temperature & Humidity Sensor Wiring & Example Code
- Badge Buttons
- Memsic 2125 Wiring & Example Code
- GPS
- Fingerprint Scanner Wiring & Example Code
- Graph
- Joystick Wiring & Example Code
- RFID Wiring & Example Code
- PING))) Wiring & Example Code
- 4×4 Keypad Wiring & Example Code
- Air Quality BME680
- Badge Display
- LIS3DH Accelerometer
- 4 x 4 Keypad
- ePaper
- GPS Wiring & Example Code
- IR Remote Wiring & Example Code
- Fingerprint Scanner
- Advanced WX
- Simple WX
- WX WiFi
- RGB LEDs
- LSM9DS1 9-axis IMU
- PWM
- Pulse in / out
- Voltage
- RC time
- ColorPal
- Sound Impact Sensor
- Sony Remote
- RFID
- PIR
- Ping))) Distance
- MMA7455
- Memsic 2-axis
- 2-Axis Joystick
- HMC5883L
- XBee
- Protocols
- Terminal
- OLED
- Serial LCD
-
Ping))) Distance
- About Board Types
- About Naming Things
- About Multicore
- About BlocklyProp Updates
- BlocklyProp Bulk Project Download
- Control
- Operators
- Values
- Arrays
- Variables
- Functions
- Pin states
- Communicate
- Sensor
- Memory
- Analog / Pulses
- Sound Impact Wiring & Example Code
- Audio
- ColorPal Wiring & Code Example
- Servo
- Badge Lock
- Robot
- Badge LEDs
- PIR Wiring & Example Code
- System
- Temp & Humidity
- Temperature & Humidity Sensor Wiring & Example Code
- Badge Buttons
- Memsic 2125 Wiring & Example Code
- GPS
- Fingerprint Scanner Wiring & Example Code
- Graph
- Joystick Wiring & Example Code
- RFID Wiring & Example Code
- PING))) Wiring & Example Code
- 4×4 Keypad Wiring & Example Code
- Air Quality BME680
- Badge Display
- LIS3DH Accelerometer
- 4 x 4 Keypad
- ePaper
- GPS Wiring & Example Code
- IR Remote Wiring & Example Code
- Fingerprint Scanner
- Advanced WX
- Simple WX
- WX WiFi
- RGB LEDs
- LSM9DS1 9-axis IMU
- PWM
- Pulse in / out
- Voltage
- RC time
- ColorPal
- Sound Impact Sensor
- Sony Remote
- RFID
- PIR
- Ping))) Distance
- MMA7455
- Memsic 2-axis
- 2-Axis Joystick
- HMC5883L
- XBee
- Protocols
- Terminal
- OLED
- Serial LCD
-
MMA7455
- About Board Types
- About Naming Things
- About Multicore
- About BlocklyProp Updates
- BlocklyProp Bulk Project Download
- Control
- Operators
- Values
- Arrays
- Variables
- Functions
- Pin states
- Communicate
- Sensor
- Memory
- Analog / Pulses
- Sound Impact Wiring & Example Code
- Audio
- ColorPal Wiring & Code Example
- Servo
- Badge Lock
- Robot
- Badge LEDs
- PIR Wiring & Example Code
- System
- Temp & Humidity
- Temperature & Humidity Sensor Wiring & Example Code
- Badge Buttons
- Memsic 2125 Wiring & Example Code
- GPS
- Fingerprint Scanner Wiring & Example Code
- Graph
- Joystick Wiring & Example Code
- RFID Wiring & Example Code
- PING))) Wiring & Example Code
- 4×4 Keypad Wiring & Example Code
- Air Quality BME680
- Badge Display
- LIS3DH Accelerometer
- 4 x 4 Keypad
- ePaper
- GPS Wiring & Example Code
- IR Remote Wiring & Example Code
- Fingerprint Scanner
- Advanced WX
- Simple WX
- WX WiFi
- RGB LEDs
- LSM9DS1 9-axis IMU
- PWM
- Pulse in / out
- Voltage
- RC time
- ColorPal
- Sound Impact Sensor
- Sony Remote
- RFID
- PIR
- Ping))) Distance
- MMA7455
- Memsic 2-axis
- 2-Axis Joystick
- HMC5883L
- XBee
- Protocols
- Terminal
- OLED
- Serial LCD
-
Memsic 2-axis
- About Board Types
- About Naming Things
- About Multicore
- About BlocklyProp Updates
- BlocklyProp Bulk Project Download
- Control
- Operators
- Values
- Arrays
- Variables
- Functions
- Pin states
- Communicate
- Sensor
- Memory
- Analog / Pulses
- Sound Impact Wiring & Example Code
- Audio
- ColorPal Wiring & Code Example
- Servo
- Badge Lock
- Robot
- Badge LEDs
- PIR Wiring & Example Code
- System
- Temp & Humidity
- Temperature & Humidity Sensor Wiring & Example Code
- Badge Buttons
- Memsic 2125 Wiring & Example Code
- GPS
- Fingerprint Scanner Wiring & Example Code
- Graph
- Joystick Wiring & Example Code
- RFID Wiring & Example Code
- PING))) Wiring & Example Code
- 4×4 Keypad Wiring & Example Code
- Air Quality BME680
- Badge Display
- LIS3DH Accelerometer
- 4 x 4 Keypad
- ePaper
- GPS Wiring & Example Code
- IR Remote Wiring & Example Code
- Fingerprint Scanner
- Advanced WX
- Simple WX
- WX WiFi
- RGB LEDs
- LSM9DS1 9-axis IMU
- PWM
- Pulse in / out
- Voltage
- RC time
- ColorPal
- Sound Impact Sensor
- Sony Remote
- RFID
- PIR
- Ping))) Distance
- MMA7455
- Memsic 2-axis
- 2-Axis Joystick
- HMC5883L
- XBee
- Protocols
- Terminal
- OLED
- Serial LCD
-
2-Axis Joystick
- About Board Types
- About Naming Things
- About Multicore
- About BlocklyProp Updates
- BlocklyProp Bulk Project Download
- Control
- Operators
- Values
- Arrays
- Variables
- Functions
- Pin states
- Communicate
- Sensor
- Memory
- Analog / Pulses
- Sound Impact Wiring & Example Code
- Audio
- ColorPal Wiring & Code Example
- Servo
- Badge Lock
- Robot
- Badge LEDs
- PIR Wiring & Example Code
- System
- Temp & Humidity
- Temperature & Humidity Sensor Wiring & Example Code
- Badge Buttons
- Memsic 2125 Wiring & Example Code
- GPS
- Fingerprint Scanner Wiring & Example Code
- Graph
- Joystick Wiring & Example Code
- RFID Wiring & Example Code
- PING))) Wiring & Example Code
- 4×4 Keypad Wiring & Example Code
- Air Quality BME680
- Badge Display
- LIS3DH Accelerometer
- 4 x 4 Keypad
- ePaper
- GPS Wiring & Example Code
- IR Remote Wiring & Example Code
- Fingerprint Scanner
- Advanced WX
- Simple WX
- WX WiFi
- RGB LEDs
- LSM9DS1 9-axis IMU
- PWM
- Pulse in / out
- Voltage
- RC time
- ColorPal
- Sound Impact Sensor
- Sony Remote
- RFID
- PIR
- Ping))) Distance
- MMA7455
- Memsic 2-axis
- 2-Axis Joystick
- HMC5883L
- XBee
- Protocols
- Terminal
- OLED
- Serial LCD
-
HMC5883L
- About Board Types
- About Naming Things
- About Multicore
- About BlocklyProp Updates
- BlocklyProp Bulk Project Download
- Control
- Operators
- Values
- Arrays
- Variables
- Functions
- Pin states
- Communicate
- Sensor
- Memory
- Analog / Pulses
- Sound Impact Wiring & Example Code
- Audio
- ColorPal Wiring & Code Example
- Servo
- Badge Lock
- Robot
- Badge LEDs
- PIR Wiring & Example Code
- System
- Temp & Humidity
- Temperature & Humidity Sensor Wiring & Example Code
- Badge Buttons
- Memsic 2125 Wiring & Example Code
- GPS
- Fingerprint Scanner Wiring & Example Code
- Graph
- Joystick Wiring & Example Code
- RFID Wiring & Example Code
- PING))) Wiring & Example Code
- 4×4 Keypad Wiring & Example Code
- Air Quality BME680
- Badge Display
- LIS3DH Accelerometer
- 4 x 4 Keypad
- ePaper
- GPS Wiring & Example Code
- IR Remote Wiring & Example Code
- Fingerprint Scanner
- Advanced WX
- Simple WX
- WX WiFi
- RGB LEDs
- LSM9DS1 9-axis IMU
- PWM
- Pulse in / out
- Voltage
- RC time
- ColorPal
- Sound Impact Sensor
- Sony Remote
- RFID
- PIR
- Ping))) Distance
- MMA7455
- Memsic 2-axis
- 2-Axis Joystick
- HMC5883L
- XBee
- Protocols
- Terminal
- OLED
- Serial LCD
-
XBee
- About Board Types
- About Naming Things
- About Multicore
- About BlocklyProp Updates
- BlocklyProp Bulk Project Download
- Control
- Operators
- Values
- Arrays
- Variables
- Functions
- Pin states
- Communicate
- Sensor
- Memory
- Analog / Pulses
- Sound Impact Wiring & Example Code
- Audio
- ColorPal Wiring & Code Example
- Servo
- Badge Lock
- Robot
- Badge LEDs
- PIR Wiring & Example Code
- System
- Temp & Humidity
- Temperature & Humidity Sensor Wiring & Example Code
- Badge Buttons
- Memsic 2125 Wiring & Example Code
- GPS
- Fingerprint Scanner Wiring & Example Code
- Graph
- Joystick Wiring & Example Code
- RFID Wiring & Example Code
- PING))) Wiring & Example Code
- 4×4 Keypad Wiring & Example Code
- Air Quality BME680
- Badge Display
- LIS3DH Accelerometer
- 4 x 4 Keypad
- ePaper
- GPS Wiring & Example Code
- IR Remote Wiring & Example Code
- Fingerprint Scanner
- Advanced WX
- Simple WX
- WX WiFi
- RGB LEDs
- LSM9DS1 9-axis IMU
- PWM
- Pulse in / out
- Voltage
- RC time
- ColorPal
- Sound Impact Sensor
- Sony Remote
- RFID
- PIR
- Ping))) Distance
- MMA7455
- Memsic 2-axis
- 2-Axis Joystick
- HMC5883L
- XBee
- Protocols
- Terminal
- OLED
- Serial LCD
-
Protocols
- About Board Types
- About Naming Things
- About Multicore
- About BlocklyProp Updates
- BlocklyProp Bulk Project Download
- Control
- Operators
- Values
- Arrays
- Variables
- Functions
- Pin states
- Communicate
- Sensor
- Memory
- Analog / Pulses
- Sound Impact Wiring & Example Code
- Audio
- ColorPal Wiring & Code Example
- Servo
- Badge Lock
- Robot
- Badge LEDs
- PIR Wiring & Example Code
- System
- Temp & Humidity
- Temperature & Humidity Sensor Wiring & Example Code
- Badge Buttons
- Memsic 2125 Wiring & Example Code
- GPS
- Fingerprint Scanner Wiring & Example Code
- Graph
- Joystick Wiring & Example Code
- RFID Wiring & Example Code
- PING))) Wiring & Example Code
- 4×4 Keypad Wiring & Example Code
- Air Quality BME680
- Badge Display
- LIS3DH Accelerometer
- 4 x 4 Keypad
- ePaper
- GPS Wiring & Example Code
- IR Remote Wiring & Example Code
- Fingerprint Scanner
- Advanced WX
- Simple WX
- WX WiFi
- RGB LEDs
- LSM9DS1 9-axis IMU
- PWM
- Pulse in / out
- Voltage
- RC time
- ColorPal
- Sound Impact Sensor
- Sony Remote
- RFID
- PIR
- Ping))) Distance
- MMA7455
- Memsic 2-axis
- 2-Axis Joystick
- HMC5883L
- XBee
- Protocols
- Terminal
- OLED
- Serial LCD
-
Terminal
- About Board Types
- About Naming Things
- About Multicore
- About BlocklyProp Updates
- BlocklyProp Bulk Project Download
- Control
- Operators
- Values
- Arrays
- Variables
- Functions
- Pin states
- Communicate
- Sensor
- Memory
- Analog / Pulses
- Sound Impact Wiring & Example Code
- Audio
- ColorPal Wiring & Code Example
- Servo
- Badge Lock
- Robot
- Badge LEDs
- PIR Wiring & Example Code
- System
- Temp & Humidity
- Temperature & Humidity Sensor Wiring & Example Code
- Badge Buttons
- Memsic 2125 Wiring & Example Code
- GPS
- Fingerprint Scanner Wiring & Example Code
- Graph
- Joystick Wiring & Example Code
- RFID Wiring & Example Code
- PING))) Wiring & Example Code
- 4×4 Keypad Wiring & Example Code
- Air Quality BME680
- Badge Display
- LIS3DH Accelerometer
- 4 x 4 Keypad
- ePaper
- GPS Wiring & Example Code
- IR Remote Wiring & Example Code
- Fingerprint Scanner
- Advanced WX
- Simple WX
- WX WiFi
- RGB LEDs
- LSM9DS1 9-axis IMU
- PWM
- Pulse in / out
- Voltage
- RC time
- ColorPal
- Sound Impact Sensor
- Sony Remote
- RFID
- PIR
- Ping))) Distance
- MMA7455
- Memsic 2-axis
- 2-Axis Joystick
- HMC5883L
- XBee
- Protocols
- Terminal
- OLED
- Serial LCD
-
OLED
- About Board Types
- About Naming Things
- About Multicore
- About BlocklyProp Updates
- BlocklyProp Bulk Project Download
- Control
- Operators
- Values
- Arrays
- Variables
- Functions
- Pin states
- Communicate
- Sensor
- Memory
- Analog / Pulses
- Sound Impact Wiring & Example Code
- Audio
- ColorPal Wiring & Code Example
- Servo
- Badge Lock
- Robot
- Badge LEDs
- PIR Wiring & Example Code
- System
- Temp & Humidity
- Temperature & Humidity Sensor Wiring & Example Code
- Badge Buttons
- Memsic 2125 Wiring & Example Code
- GPS
- Fingerprint Scanner Wiring & Example Code
- Graph
- Joystick Wiring & Example Code
- RFID Wiring & Example Code
- PING))) Wiring & Example Code
- 4×4 Keypad Wiring & Example Code
- Air Quality BME680
- Badge Display
- LIS3DH Accelerometer
- 4 x 4 Keypad
- ePaper
- GPS Wiring & Example Code
- IR Remote Wiring & Example Code
- Fingerprint Scanner
- Advanced WX
- Simple WX
- WX WiFi
- RGB LEDs
- LSM9DS1 9-axis IMU
- PWM
- Pulse in / out
- Voltage
- RC time
- ColorPal
- Sound Impact Sensor
- Sony Remote
- RFID
- PIR
- Ping))) Distance
- MMA7455
- Memsic 2-axis
- 2-Axis Joystick
- HMC5883L
- XBee
- Protocols
- Terminal
- OLED
- Serial LCD
-
Serial LCD
- About Board Types
- About Naming Things
- About Multicore
- About BlocklyProp Updates
- BlocklyProp Bulk Project Download
- Control
- Operators
- Values
- Arrays
- Variables
- Functions
- Pin states
- Communicate
- Sensor
- Memory
- Analog / Pulses
- Sound Impact Wiring & Example Code
- Audio
- ColorPal Wiring & Code Example
- Servo
- Badge Lock
- Robot
- Badge LEDs
- PIR Wiring & Example Code
- System
- Temp & Humidity
- Temperature & Humidity Sensor Wiring & Example Code
- Badge Buttons
- Memsic 2125 Wiring & Example Code
- GPS
- Fingerprint Scanner Wiring & Example Code
- Graph
- Joystick Wiring & Example Code
- RFID Wiring & Example Code
- PING))) Wiring & Example Code
- 4×4 Keypad Wiring & Example Code
- Air Quality BME680
- Badge Display
- LIS3DH Accelerometer
- 4 x 4 Keypad
- ePaper
- GPS Wiring & Example Code
- IR Remote Wiring & Example Code
- Fingerprint Scanner
- Advanced WX
- Simple WX
- WX WiFi
- RGB LEDs
- LSM9DS1 9-axis IMU
- PWM
- Pulse in / out
- Voltage
- RC time
- ColorPal
- Sound Impact Sensor
- Sony Remote
- RFID
- PIR
- Ping))) Distance
- MMA7455
- Memsic 2-axis
- 2-Axis Joystick
- HMC5883L
- XBee
- Protocols
- Terminal
- OLED
- Serial LCD
LIS3DH Accelerometer
BlocklyProp reference for LIS3DH Accelerometer blocks


 Compatible with the Propeller Activity Board WX, Propeller FLiP, or Other board types. Not available for Badge or Scribbler Robot board types.
SOLO ONLY! These blocks are only supported by BLOCKLYPROP SOLO. No login required, save your files on your computer!
These blocks are for using the LIS3DH 3-Axis Accelerometer with ADC (#29020). The blocks support a 3-wire SPI interface as shown. You may also use the device’s analog to digital converter to monitor the voltage on a circuit connected its AD1 pin or its AD2 or AD3 pads. Connect AD1 to reference voltages for calibration, explained in the blocks below.
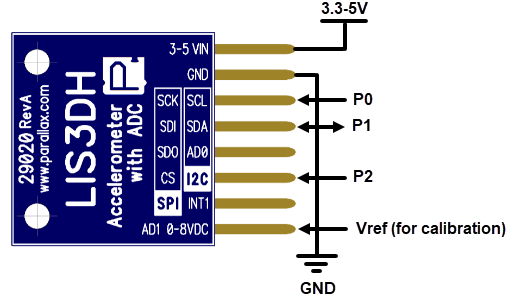
An acceleration meter (accelerometer) senses the forces that acceleration and gravity exert on a small mass inside the sensor. Think about that feeling of being pressed into your seat back as your car speeds up rapidly. Now think about the feeling of how gravity pulls you to the ground. Those are examples of the forces that an accelerometer senses and reports. The LIS3DH is a 3-axis accelerometer module that can measure up to +/- 16g of acceleration in 3 axes up to 50 times per second.
LIS3DH initialize

The LIS3DH initialize block is required to set up the sensor connections. If you forget to use this block, you will see a triangle warning symbol on other LISD3DH blocks as a reminder.
- Match the SCK (serial clock) dropdown to the connected Propeller I/O pin.
- Match the SDI (data input/output) dropdown to the connected Propeller I/O pin.
- Match the CS (chip select) dropdown to the connected Propeller I/O pin.
The LIS3DH initialize block will show additional fields if you choose tilt or voltage options on on LIS3DH read blocks, and if you include the LIS3DH temperature block in your project.
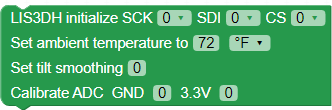
- If you include an LIS3DH temperature block:
- Enter a value for the Set ambient temperature field, from a different thermometer. Default is 72 °F
- Select the temperature units you are using from the dropdown (°F or °C).
- If you include an LIS3DH read [tilt (degrees] block:
- Enter a Set tilt smoothing value, from 0 to 100. This sets the percentage of new data added to a running average. 100% disables smoothing.
- If you include an LIS3DH read [voltage mV] block:
- You will have the option to provide AD1 sensor readings at 0V and 3.3V, and then enter the measured values into the Calibrate ADC GND and 3.3V fields. See the LIS3DH read block, below.
LIS3DH read
The LIS3DH read block stores the sensor’s measurements in variables you have created ahead of time. Choose a type of value to measure and store from the top dropdown menu:
- acceleration (1000ths of g’s)
- voltage (mV)
- tilt (degrees)
Read about each option below.

- acceleration (1000ths of g’s) — this option will store the current g-force measurement in the range of -2g to +2g for each axis in the variables you select for X, Y and Z. Pro Tip: If all 3 axes are returning -192, there is likely a wiring error.

- voltage (mV) — this option will store the current voltage measurement for analog to digital channels in the variables you select for AD1, AD2, and AD3.
- AD1: for input voltages in the 0–7800 mV range, +/- 200 mV DC
- AD2 & AD3: for tiny input voltages in the 900-1600 mV range, +/- 100 mV DC
- To calibrate the ADC for more accuracy:
- Connect the AD1 pin to 0V and run the program below. Write down the GND value from the terminal.
- Connect the AD1 pin to 3.3V, and re-run the program. Write down the 3.3V value from the terminal
- In future programs, Enter these values in LISD3DH initialize block’s Calibrate ADC GND & 3.3V fields in future programs.
- Repeat for each new LIS3DH module; the values will be specific to each device.
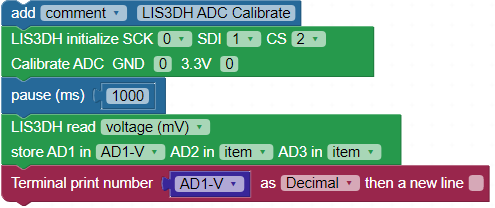
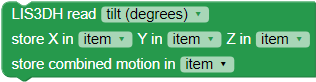
- tilt (degrees) — this option will store a tilt measurement for each axis in the variables you select for X, Y, and Z, along with a combined total motion.
- X is in degrees relative to the ground plane (perpendicular to the gravity axis)
- Y is in degrees relative to the ground plane (perpendicular to the gravity axis)
- Z is in degrees relative to the gravity axis (perpendicular to the ground plane)
- Combined total motion indicates how much the sensor was moving when the tilt reading was taken. If the value is 0, the sensor was sitting still. Useful if you need to know the orientation of an object only after it stops moving.
LIS3DH temperature

The LIS3DH temperature block provides the temperature in the units you choose from the dropdown. When you place this block in the canvas, Set ambient temperature fields appear in the LIS3DH Initialization block. Enter the ambient temperature as taken with a separate thermometer. The operating temperature range is:
- °F: -40 to + 185 °F (Fahrenheit)
- °C: -4- to +85 °C (Celsius)
The value this block returns is not the absolute temperature. It returns the change in temperature during program run time, added to the Set ambient temperature value you entered in the LIS3DH Initialization block. So, if the temperature does not change during program run time, this block will return whatever Set ambient temperature value you gave it, even if it is inaccurate.