Skip to content
Parallax Learn

Parallax Learn

  • Welcome
  • Tutorials
        • Tutorial Series head tag

          Tutorial Series
        • Tutorial Series

          The special, classroom-ready series pages are organized collections of tutorials for our most popular hardware and/or languages. The tutorials for each topic are conveniently accessible from a single page, shown in the order it is recommended that they be completed.
        • Robotics Series Head tag

          Robotics Series
        • Robotics Series

          • Artificial Intelligence
          • Cybersecurity: Radio Data tutorialCybersecurity
          • cyber:bot + Python
          • cyber:bot + MakeCode
          • Boe-Bot Tutorial SeriesBoe-Bot
          • Arduino Shield-Bot
          • ActivityBot with C TutorialsActivityBot + C
          • ActivityBot with BlocklyProp Tutorial SeriesActivityBot + BlocklyProp
          • Scribbler 3 Tutorial SeriesScribbler 3
        • Electronics & Programming Series Head tag

          Electronics & Programming Series
          • BS2 Board of Education Tutorial SeriesBS2 Board of Education
          • Propeller C-Language BasicsPropeller C Basics
          • FLiP Try-It Kit C Tutorial SeriesFLiP Try-It Kit + C
          • FLiP Try-It Kit BlocklyProp TutorialsFLiP Try-It Kit + BlocklyProp
          • Badge WX Tutorial SeriesBadge WX
          • Propeller BlocklyProp Basics and ProjectsPropeller BlocklyProp Basics
          • View All Tutorial Series »
        • Browse Tutorials
        • Browse Tutorials

          Individual tutorials sorted by robot or kit, and language.
        • By Robot or Kit
          • ActivityBot
          • SumoBot WX
          • Boe-Bot
          • Shield-Bot
          • cyber:bot
          • Badge WX
          • ELEV-8
          • ARLO
        • By Language
        • By Language

          • Propeller C
          • Arduino
          • BlocklyProp
          • PBASIC
          • Python
          • MakeCode
          • View All Tutorials »
  • Educators
  • Reference
  • Downloads
  • Home
  • All Courses

Arlo Robot Assembly Guide

Curriculum

  • 1 Section
  • 47 Lessons
  • Lifetime
Expand all sectionsCollapse all sections
  • Arlo Robot Assembly Guide
    47
    • 1.1
      Section 0 – Getting Ready to Build Arlo
    • 1.2
      Section 1 – Motor Mount and Wheel Kit Assembly
    • 1.3
      Step 1 – Axle Assemblies
    • 1.4
      Step 2 – Motor to Bearing Block Assembly
    • 1.5
      Step 3 – Drive Axle Pin
    • 1.6
      Step 4 – Bearing Block and Axle
    • 1.7
      Step 5 – Soldering the Encoder Connectors
    • 1.8
      Step 6 – Encoder Cables
    • 1.9
      Step 7 – Encoder Assemblies
    • 1.10
      Step 8 – Drive Wheels
    • 1.11
      Step 9 – Wheel Assemblies to Drive Shaft
    • 1.12
      Section 2 – Caster Wheel Kits
    • 1.13
      Step 10 – Swivel Rod and Mounting Plate
    • 1.14
      Step 11 – Swivel Block
    • 1.15
      Step 12 – Flange Bearings
    • 1.16
      Step 13 – Shaft Collar and Swivel Post
    • 1.17
      Section 3 – Mounting Wheel Assemblies
    • 1.18
      Step 14 – Lay Out the Parts
    • 1.19
      Step 15 – Motor Mounts to Arlo Base
    • 1.20
      Step 16 – Casters to Arlo Base
    • 1.21
      Step 17 – Screws and Standoffs
    • 1.22
      Section 4 – Arlo Power Distribution Board
    • 1.23
      Step 18 – Low-Profile Components
    • 1.24
      Step 19 – Diodes
    • 1.25
      Step 20 – Fuse Holders
    • 1.26
      Step 21 – Terminal Blocks
    • 1.27
      Step 22 – Switch Terminals
    • 1.28
      Step 23 – Charging Power Jack
    • 1.29
      Step 24 – Voltage Regulators and Heat Sinks
    • 1.30
      Step 25 – Polarized Capacitors
    • 1.31
      Step 26 – Switch Plate
    • 1.32
      Step 27 – Switch Plate Assembly to PDB
    • 1.33
      Section 5 – Batteries and Battery Tray
    • 1.34
      Step 28 – Prepare Battery and Tray
    • 1.35
      Step 29 – Batteries and Tray
    • 1.36
      Section 6 – Assembling and Mounting the Ping))) Sensors
    • 1.37
      Step 30 – Light Pipe and Protector Stands
    • 1.38
      Step 31 – Attach Ping)))s to Stands
    • 1.39
      Section 7 – Control Components and DHB-10 Connections
    • 1.40
      Step 32 – Arlo Power Distribution Board
    • 1.41
      Step 33 – DHB-10 and Control Board
    • 1.42
      Section 8 – Arlo Top Deck
    • 1.43
      Step 34 – Wiring the DHB-10 Power Connections
    • 1.44
      Step 35 – Wire PDB to Battery
    • 1.45
      Step 36 – Prep the Barrel Jack Connection
    • 1.46
      Step 37 – Connecting Power & Encoders
    • 1.47
      Step 38 – Mount Top Deck

Section 1 – Motor Mount and Wheel Kit Assembly

Tools you will need in this section:

  • Hex Key: 5 mm (included in this kit)
  • Hex Key: 5/32” (included in this kit)
  • #1 Phillips/flathead screwdriver combo (included in Caster Wheel Kit)
  • Small regular hammer (not included)
  • Wood block (not included)
  • Bicycle tire pump (not included)

Bill of Materials for the Motor Mount and Wheel Kit (Parallax #28962)

Make sure that you have all of the following components for the Motor Mount and Wheel Kit.  If not, please contact Parallax sales for replacement parts.

  • (1) – Motor, 12 VDC (left) (#750-90005)      
  • (1) – Motor, 12 VDC (right) (#750-90006)  
  • (1) – 36-position Quadrature Encoder Set (#29321)
  • (2) – Motor Bearing Block 2 Aluminum (#34030)
  • (2) – Wheel, Main Rim – 6061 Aluminum (#34015)
  • (2) – Wheel, Rim Ring – 6061 Aluminum (#34016)
  • (2) – Robot Drive Axle 2 (#34031)
  • (2) – 1/8 x 1” Roll Pin (#700-00100)
  • (12) – Screw, #4-40×1/2”, FH, SS (#710-00015)
  • (6) – Screw, M6, 1 mm x 50 mm SH (#710-00031)
  • (2) – ¼” x 20 x 5/8” BH, SS (#710-00105)
  • (6) – Spacer 0.50” x 1”, RND, AL (#713-00030)
  • (2) – Knobby Tire, 6” x 1-1/4” Rubber w/tube (#721-00006)
  • (2) – 0.5” ID x 1.125” OD Ball Bearing (#724-00001)
  • (1) – Hex Key, 5 mm (#725-00023)
  • (1) – Hex Key, 5/32” (#725-00024)

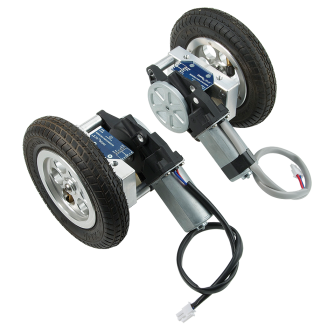
There are two motor assembly sets included in your kit.  These assembly details generally depict only one of the motor assemblies.  You will need to assemble both sets – one becomes a “mirror image” of the other.


Printer-friendly version
Section 0 – Getting Ready to Build Arlo
Prev
Step 1 – Axle Assemblies
Next

DISCUSSION FORUMS | PARALLAX INC. STORE

About | Terms of Use | Feedback: learn@parallax.com | Copyright©Parallax Inc. 2024

© 2026 Parallax Learn • Built with GeneratePress