Skip to content
Parallax Learn

Parallax Learn

  • Welcome
  • Tutorials
        • Tutorial Series head tag

          Tutorial Series
        • Tutorial Series

          The special, classroom-ready series pages are organized collections of tutorials for our most popular hardware and/or languages. The tutorials for each topic are conveniently accessible from a single page, shown in the order it is recommended that they be completed.
        • Robotics Series Head tag

          Robotics Series
        • Robotics Series

          • Artificial Intelligence
          • Cybersecurity: Radio Data tutorialCybersecurity
          • cyber:bot + Python
          • cyber:bot + MakeCode
          • Boe-Bot Tutorial SeriesBoe-Bot
          • Arduino Shield-Bot
          • ActivityBot with C TutorialsActivityBot + C
          • ActivityBot with BlocklyProp Tutorial SeriesActivityBot + BlocklyProp
          • Scribbler 3 Tutorial SeriesScribbler 3
        • Electronics & Programming Series Head tag

          Electronics & Programming Series
          • BS2 Board of Education Tutorial SeriesBS2 Board of Education
          • Propeller C-Language BasicsPropeller C Basics
          • FLiP Try-It Kit C Tutorial SeriesFLiP Try-It Kit + C
          • FLiP Try-It Kit BlocklyProp TutorialsFLiP Try-It Kit + BlocklyProp
          • Badge WX Tutorial SeriesBadge WX
          • Propeller BlocklyProp Basics and ProjectsPropeller BlocklyProp Basics
          • View All Tutorial Series »
        • Browse Tutorials
        • Browse Tutorials

          Individual tutorials sorted by robot or kit, and language.
        • By Robot or Kit
          • ActivityBot
          • SumoBot WX
          • Boe-Bot
          • Shield-Bot
          • cyber:bot
          • Badge WX
          • ELEV-8
          • ARLO
        • By Language
        • By Language

          • Propeller C
          • Arduino
          • BlocklyProp
          • PBASIC
          • Python
          • MakeCode
          • View All Tutorials »
  • Educators
  • Reference
  • Downloads
  • Home
  • All Courses
  • Arlo Robot Assembly Guide

Arlo Robot Assembly Guide

Step 25 – Polarized Capacitors

WARNING: These components MUST be installed in the correct orientation – not only for proper operation, but for safety as well. Check correct polarity before soldering.

Examine the board locations for C1, C2, C3, and C4, and note the markings indicating the correct polarity. You should see a plus-sign or a minus-sign on each of the capacitors themselves.  The hole for each capacitor’s positive terminal is marked with a (+) on the board (below, right).

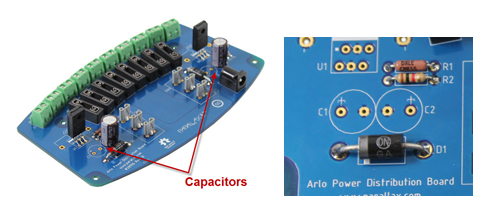
The capacitor’s negative terminal will show a (-) sign on the side of its case. Match the polarity markings on the capacitors to the markings on the PC board. Negative on the capacitor goes to negative on the printed circuit board. Note that when each set of capacitors (C1 & C2, and C3 & C4) is properly installed, they have their negative pins adjacent to each other.

Important! Do not install the capacitors backwards – if you do, they may explode when power is applied.

  • Insert each capacitor, double-check the polarity, flare their leads slightly to help them stay in place, and flip the circuit board over and solder into place.

Properly installed, the capacitors should look like this:


Printer-friendly version
Step 24 – Voltage Regulators and Heat Sinks
Prev
Step 26 – Switch Plate
Next

DISCUSSION FORUMS | PARALLAX INC. STORE

About | Terms of Use | Feedback: learn@parallax.com | Copyright©Parallax Inc. 2024

© 2025 Parallax Learn • Built with GeneratePress