Skip to content
Parallax Learn

Parallax Learn

  • Welcome
  • Tutorials
        • Tutorial Series head tag

          Tutorial Series
        • Tutorial Series

          The special, classroom-ready series pages are organized collections of tutorials for our most popular hardware and/or languages. The tutorials for each topic are conveniently accessible from a single page, shown in the order it is recommended that they be completed.
        • Robotics Series Head tag

          Robotics Series
        • Robotics Series

          • Artificial Intelligence
          • Cybersecurity: Radio Data tutorialCybersecurity
          • cyber:bot + Python
          • cyber:bot + MakeCode
          • Boe-Bot Tutorial SeriesBoe-Bot
          • Arduino Shield-Bot
          • ActivityBot with C TutorialsActivityBot + C
          • ActivityBot with BlocklyProp Tutorial SeriesActivityBot + BlocklyProp
          • Scribbler 3 Tutorial SeriesScribbler 3
        • Electronics & Programming Series Head tag

          Electronics & Programming Series
          • BS2 Board of Education Tutorial SeriesBS2 Board of Education
          • Propeller C-Language BasicsPropeller C Basics
          • FLiP Try-It Kit C Tutorial SeriesFLiP Try-It Kit + C
          • FLiP Try-It Kit BlocklyProp TutorialsFLiP Try-It Kit + BlocklyProp
          • Badge WX Tutorial SeriesBadge WX
          • Propeller BlocklyProp Basics and ProjectsPropeller BlocklyProp Basics
          • View All Tutorial Series »
        • Browse Tutorials
        • Browse Tutorials

          Individual tutorials sorted by robot or kit, and language.
        • By Robot or Kit
          • ActivityBot
          • SumoBot WX
          • Boe-Bot
          • Shield-Bot
          • cyber:bot
          • Badge WX
          • ELEV-8
          • ARLO
        • By Language
        • By Language

          • Propeller C
          • Arduino
          • BlocklyProp
          • PBASIC
          • Python
          • MakeCode
          • View All Tutorials »
  • Educators
  • Reference
  • Downloads
  • Home
  • All Courses

Arlo with an Arduino Uno & BOE Shield Brain

Curriculum

  • 1 Section
  • 14 Lessons
  • Lifetime
Expand all sectionsCollapse all sections
  • Arlo with an Arduino Uno & BOE Shield Brain
    14
    • 1.1
      ArloRobot Arduino Library
    • 1.2
      Connect BOE Shield to DHB-10
    • 1.3
      Test Shield Electrical Connections
    • 1.4
      Clear the Arduino Sketch
    • 1.5
      Test Arduino to DHB-10 Communication
    • 1.6
      Test BOE Shield Arlo Motor Connections
    • 1.7
      Test BOE Shield Arlo Encoder Connections
    • 1.8
      Try & Tune Some BOE Shield-Bot Code
    • 1.9
      Increase BOE Shield Arlo’s Top Speed
    • 1.10
      Control BOE Shield Arlo with the Terminal
    • 1.11
      More Precise BOE Shield Maneuvers with Encoders
    • 1.12
      Connect & Test BOE Shield + Arlo Ping))) Sensors
    • 1.13
      BOE Shield + Arlo Control System Adjustments
    • 1.14
      Troubleshooting Your Arlo + BOE Shield

Control BOE Shield Arlo with the Terminal

Control BOE Shield Arlo with the Terminal

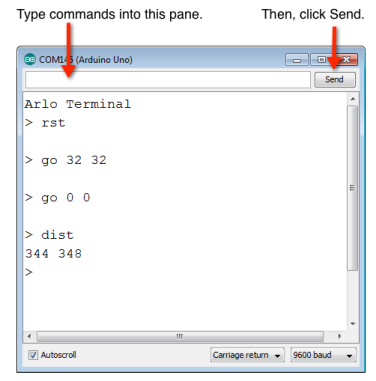
You can also communicate with the Arlo through the Terminal.  The example shown here uses rst to reset the Arlo’s encoder counts to 0.  It’s the equivalent of Arlo.clearCounts().  Next, go 32 32 sets the motor power of both motors to 32/127.  It’s the equivalent of Arlo.writeMotorPower(32, 32).  After some time went by, go 0 0 was typed in to stop the wheels, then dist, which got a reply of 344, 348.  Those are encoder measurements of the number of 144ths of a revolution each wheel turned.  These values can also be obtained in a sketch with longVariable = Arlo.readCountsLeft() and longVariable = Arlo.readCountsRight(). 

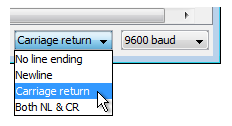
  • Make sure your Terminal’s is set to send carriage return values (when you press the Enter Key) and is communicating at the standard 9600 baud rate.

  • Put the Arlo up on blocks so that its wheels can spin freely without touching your work surface.
  • Set Main, Motors, and BOE Shield power to on.
  • Upload Arlo-Terminal-Communication.ino.
  • Click the text input pane in your Terminal.  It’s just above the pane that displays messages from the Arduino.
  • Type rst, and then click Send.
  • Type go 32 32, and then click Send.
  • Let a few seconds pass.
  • Type go 0 0, and then click Send.
  • Type Dist, and click Send.

NOTE: The reply values to your DIST command will depend on how long you let the wheels run.

/*
  Arlo-Terminal-Communication
 
  IMPORTANT: Set Line Ending to Carriage return in the terminal.
*/

#include <ArloRobot.h>                        // Include Arlo library
#include <SoftwareSerial.h>                   // Include SoftwareSerial library

// Arlo and serial objects required
ArloRobot Arlo;                               // Arlo object
SoftwareSerial ArloSerial(12, 13);            // Serial in I/O 12, out I/O 13

char str[64];

void setup()                                  // Setup function
{
  tone(4, 3000, 2000);                        // Piezospeaker beep
  Serial.begin(9600);                         // Start terminal serial port
 
  ArloSerial.begin(19200);                    // Start DHB-10 serial com
  Arlo.begin(ArloSerial);                     // Pass to Arlo object
 
  Serial.println("Arlo Terminal");            // Display heading
}

void loop()                                   // Main loop
{
  memset(str, 0, 64);                         // Clear the buffer
  Serial.print("> ");                         // Display prompt
  while(Serial.available() == 0);             // Wait for terminal input
  Serial.readBytesUntil('\r', str, 64);       // Read until carriage return
  Serial.println(str);                        // Display what was typed
  ArloSerial.print(str);                      // Send to Arlo's DHB-10
  ArloSerial.write('\r');                     // Append with a carriage return
  memset(str, 0, 64);                         // Clear the buffer again
  ArloSerial.readBytesUntil('\r', str, 64);   // Get Arlo's reply
  Serial.println(str);                        // Display Arlo's reply
}

Printer-friendly version
Increase BOE Shield Arlo’s Top Speed
Prev
More Precise BOE Shield Maneuvers with Encoders
Next

DISCUSSION FORUMS | PARALLAX INC. STORE

About | Terms of Use | Feedback: learn@parallax.com | Copyright©Parallax Inc. 2024

© 2026 Parallax Learn • Built with GeneratePress