Skip to content
Parallax Learn

Parallax Learn

  • Welcome
  • Tutorials
        • Tutorial Series head tag

          Tutorial Series
        • Tutorial Series

          The special, classroom-ready series pages are organized collections of tutorials for our most popular hardware and/or languages. The tutorials for each topic are conveniently accessible from a single page, shown in the order it is recommended that they be completed.
        • Robotics Series Head tag

          Robotics Series
        • Robotics Series

          • Artificial Intelligence
          • Cybersecurity: Radio Data tutorialCybersecurity
          • cyber:bot + Python
          • cyber:bot + MakeCode
          • Boe-Bot Tutorial SeriesBoe-Bot
          • Arduino Shield-Bot
          • ActivityBot with C TutorialsActivityBot + C
          • ActivityBot with BlocklyProp Tutorial SeriesActivityBot + BlocklyProp
          • Scribbler 3 Tutorial SeriesScribbler 3
        • Electronics & Programming Series Head tag

          Electronics & Programming Series
          • BS2 Board of Education Tutorial SeriesBS2 Board of Education
          • Propeller C-Language BasicsPropeller C Basics
          • FLiP Try-It Kit C Tutorial SeriesFLiP Try-It Kit + C
          • FLiP Try-It Kit BlocklyProp TutorialsFLiP Try-It Kit + BlocklyProp
          • Badge WX Tutorial SeriesBadge WX
          • Propeller BlocklyProp Basics and ProjectsPropeller BlocklyProp Basics
          • View All Tutorial Series »
        • Browse Tutorials
        • Browse Tutorials

          Individual tutorials sorted by robot or kit, and language.
        • By Robot or Kit
          • ActivityBot
          • SumoBot WX
          • Boe-Bot
          • Shield-Bot
          • cyber:bot
          • Badge WX
          • ELEV-8
          • ARLO
        • By Language
        • By Language

          • Propeller C
          • Arduino
          • BlocklyProp
          • PBASIC
          • Python
          • MakeCode
          • View All Tutorials »
  • Educators
  • Reference
  • Downloads
  • Home
  • All Courses
  • Avoid Ring’s Edge with QTI Sensors

Avoid Ring’s Edge with QTI Sensors

Install the QTI Line Sensors
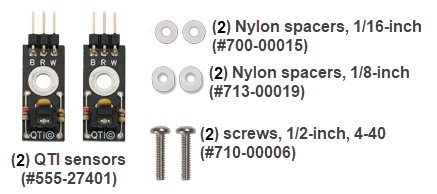
Parts:

  • (1) SumoBot, built up at least through the end of the Add Cables for Front QTI Sensors page
  • (2) QTI line sensors
  • (2) #4-40 1/2″ long pan-head machine screws
  • (2) 1/8″ Nylon spacer
  • (2) 1/16″ Nylon spacer

Procedure

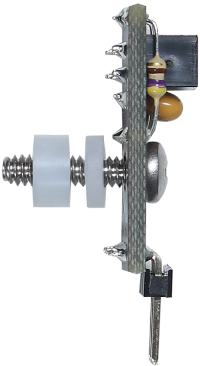
  • Position the parts on each screw in this order:
  • QTI with parts facing the same direction as the screw’s head
  • 1/16” nylon washer
  • 1/8″ nylon washer.


  • Connect each screw (with its QTI and washers) to a front standoff (by the plow).
  • Make sure the pins of each QTI point inward -toward the slot where you just inserted the cables.


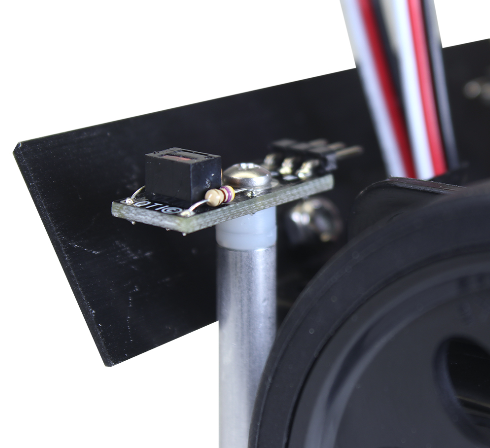
  • Connect the cables you fed through the chassis to each QTI.
  • Make sure that each cable’s:
    • White wire is connected to the QTI’s W pin
    • Red wire is connected to the QTI’s R pin
    • Black wire is connected to the QTI’s B pin
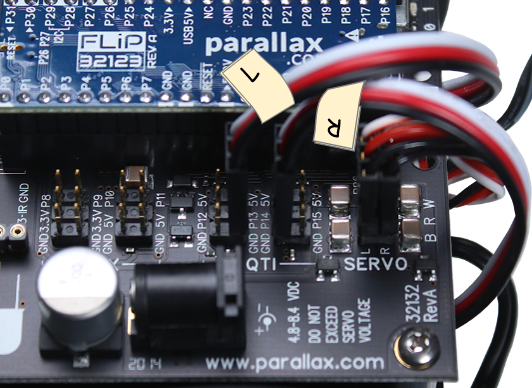
  • Set the SumoBot face down on the table with its underside facing toward you, and identify the left and right QTIs.  
  • Follow the cable from the left QTI to its other end, and mark it L with masking tape.
  • Repeat for the right cable.


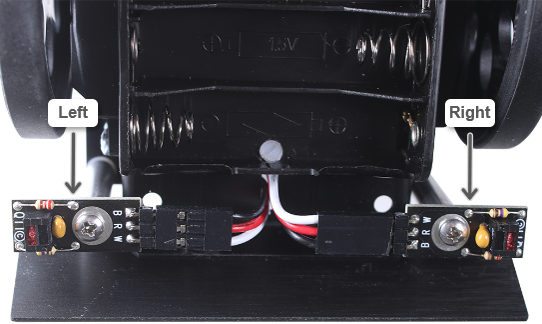
  • Connect the QTI marked L to the P13 header and the QTI marked R to the P14 header.  
  • Make sure each cable’s:
    • Black wire is connect to the pin labeled GND
    • Red wire is connected to the pin with a label that begins with P (like P13 and P14).
    • White wire is connected to the pin labeled 5V.


  • Remove the L and R labels from the QTI cables.
  • Put the batteries back into the battery holder.
  • Connect the battery power plug to the barrel jack.


Printer-friendly version
Add Cables for Front QTI Sensors
Prev
Test QTI Measurement Values with Terminal
Next

DISCUSSION FORUMS | PARALLAX INC. STORE

About | Terms of Use | Feedback: learn@parallax.com | Copyright©Parallax Inc. 2024

© 2025 Parallax Learn • Built with GeneratePress