Skip to content
Parallax Learn

Parallax Learn

  • Welcome
  • Tutorials
        • Tutorial Series head tag

          Tutorial Series
        • Tutorial Series

          The special, classroom-ready series pages are organized collections of tutorials for our most popular hardware and/or languages. The tutorials for each topic are conveniently accessible from a single page, shown in the order it is recommended that they be completed.
        • Robotics Series Head tag

          Robotics Series
        • Robotics Series

          • Artificial Intelligence
          • Cybersecurity: Radio Data tutorialCybersecurity
          • cyber:bot + Python
          • cyber:bot + MakeCode
          • Boe-Bot Tutorial SeriesBoe-Bot
          • Arduino Shield-Bot
          • ActivityBot with C TutorialsActivityBot + C
          • ActivityBot with BlocklyProp Tutorial SeriesActivityBot + BlocklyProp
          • Scribbler 3 Tutorial SeriesScribbler 3
        • Electronics & Programming Series Head tag

          Electronics & Programming Series
          • BS2 Board of Education Tutorial SeriesBS2 Board of Education
          • Propeller C-Language BasicsPropeller C Basics
          • FLiP Try-It Kit C Tutorial SeriesFLiP Try-It Kit + C
          • FLiP Try-It Kit BlocklyProp TutorialsFLiP Try-It Kit + BlocklyProp
          • Badge WX Tutorial SeriesBadge WX
          • Propeller BlocklyProp Basics and ProjectsPropeller BlocklyProp Basics
          • View All Tutorial Series »
        • Browse Tutorials
        • Browse Tutorials

          Individual tutorials sorted by robot or kit, and language.
        • By Robot or Kit
          • ActivityBot
          • SumoBot WX
          • Boe-Bot
          • Shield-Bot
          • cyber:bot
          • Badge WX
          • ELEV-8
          • ARLO
        • By Language
        • By Language

          • Propeller C
          • Arduino
          • BlocklyProp
          • PBASIC
          • Python
          • MakeCode
          • View All Tutorials »
  • Educators
  • Reference
  • Downloads
  • Home
  • All Courses

BlocklyProp Robotics with the ActivityBot 360°

Curriculum

  • 1 Section
  • 41 Lessons
  • Lifetime
Expand all sectionsCollapse all sections
  • BlocklyProp Robotics with the ActivityBot 360°
    41
    • 1.1
      Build the ActivityBot 360°
    • 1.2
      Hardware Check
    • 1.3
      Step 1 – Prepare Wheels
    • 1.4
      Step 2 – Prepare Chassis
    • 1.5
      Step 3 – Prepare Servos
    • 1.6
      Step 4 – Mount Right Servo
    • 1.7
      Step 5 – Mount Left Servo
    • 1.8
      Step 6 – Mount Battery Pack
    • 1.9
      Step 7 – Mount Tail Wheel
    • 1.10
      Step 8 – Mount Drive Wheels
    • 1.11
      Step 9 – Mount the Activity Board WX
    • 1.12
      Electrical Connections
    • 1.13
      Software and Coding Check
    • 1.14
      ActivityBot 360° Circuits
    • 1.15
      Power & Connect Circuits
    • 1.16
      Blink Lights
    • 1.17
      Make a Beep
    • 1.18
      Navigation Basics
    • 1.19
      Feedback 360° Servo Test
    • 1.20
      Feedback 360° Encoder Calibration
    • 1.21
      Driving Distances
    • 1.22
      Driving Speeds
    • 1.23
      Taking Turns
    • 1.24
      Acceleration & Speed Limits
    • 1.25
      Navigate by Touch
    • 1.26
      Build the Whisker Switches
    • 1.27
      Test the Whisker Switches
    • 1.28
      Whisker-Wheel Response
    • 1.29
      Roaming with Whiskers
    • 1.30
      Navigate by Ultrasound
    • 1.31
      Build & Test the Ping))) Sensor Circuit
    • 1.32
      Roaming with Ultrasound
    • 1.33
      Maintain Distance with Ultrasound
    • 1.34
      Navigate by Visible Light
    • 1.35
      Build the Light Sensor Circuits
    • 1.36
      Make the Light Measurements Useful
    • 1.37
      Roaming with Light Sensors
    • 1.38
      Navigate by Infrared Flashlights
    • 1.39
      Build the IR Sensor Circuits
    • 1.40
      Test the IR Sensor Circuits
    • 1.41
      Roaming with Infrared Flashlights

Step 3 – Prepare Servos

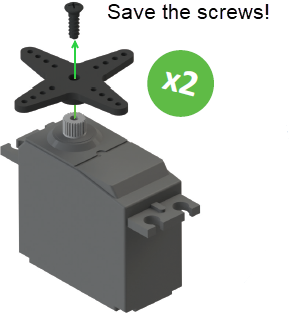
Prepare the Servos for Mounting

  • Using the screwdriver that came with the kit, carefully remove the black screw from the center of each servo horn.
  • SAVE THE SCREWS! You will need them again later.
  • Pull each servo horn straight up and off of its servo spline, and set the horns aside.


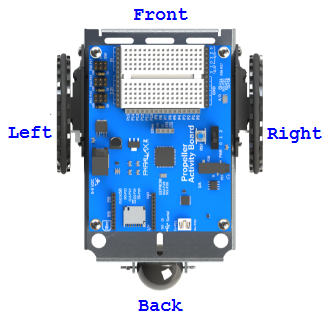
Note Right and Left Servo Positions

In the next few steps you will mount the right and left servos on the chassis. But which side is right and which side is left?

  • Note that the front of the robot chassis has three slots on top.
  • Note that the back of the chassis has an arch for the tail wheel ball.


Printer-friendly version
Step 2 – Prepare Chassis
Prev
Step 4 – Mount Right Servo
Next

DISCUSSION FORUMS | PARALLAX INC. STORE

About | Terms of Use | Feedback: learn@parallax.com | Copyright©Parallax Inc. 2024

© 2026 Parallax Learn • Built with GeneratePress